Mercado Dashboard
Mercado Dashboard, form this mountain you can keep an eye to your store from back end to front end, some major items which are most important to display, highlighted here.
-
- Navigate to Mercado Dashboard, by WP Admin Dashboard -> Mercado -> Dashboard
-
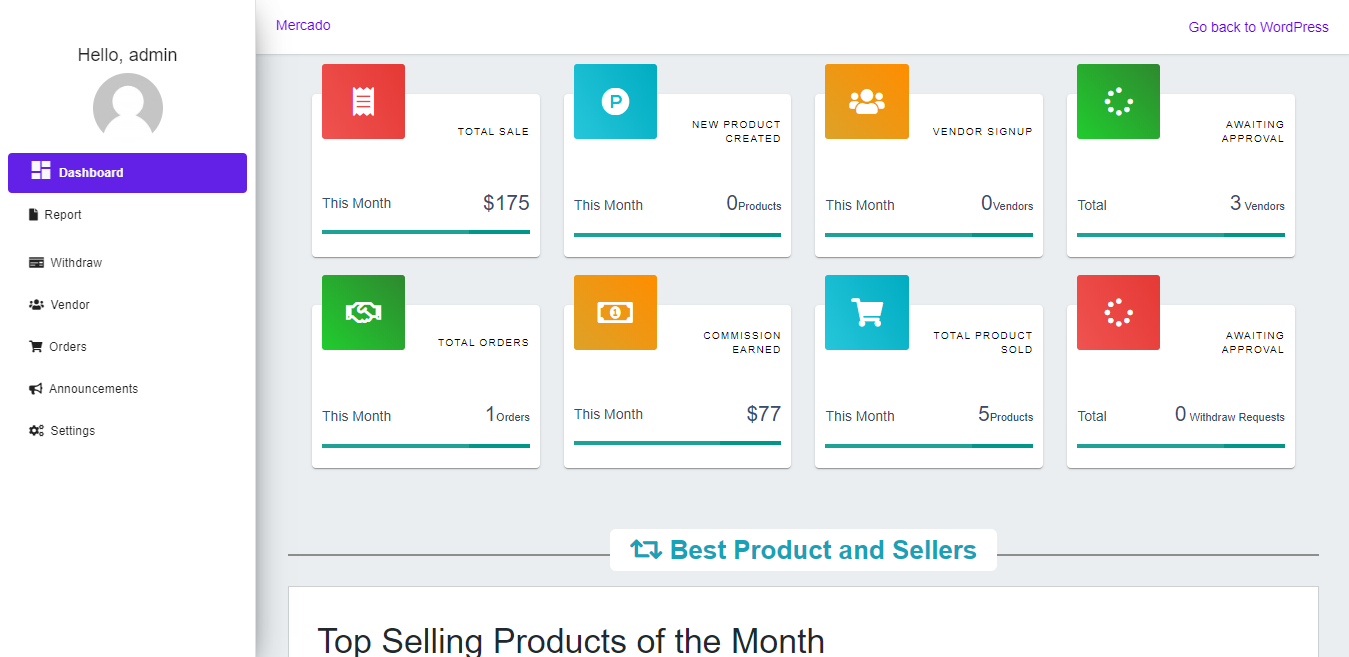
- In this section of Dashboard “Total Sales of the month”, “New product created in this month”, “Vendor signed up within this month”, Awaiting approvals of “Vendors & Withdrawal requests”, “Commission earned of this month”, “Total product sold within this month” & “Total orders of the month”.
-
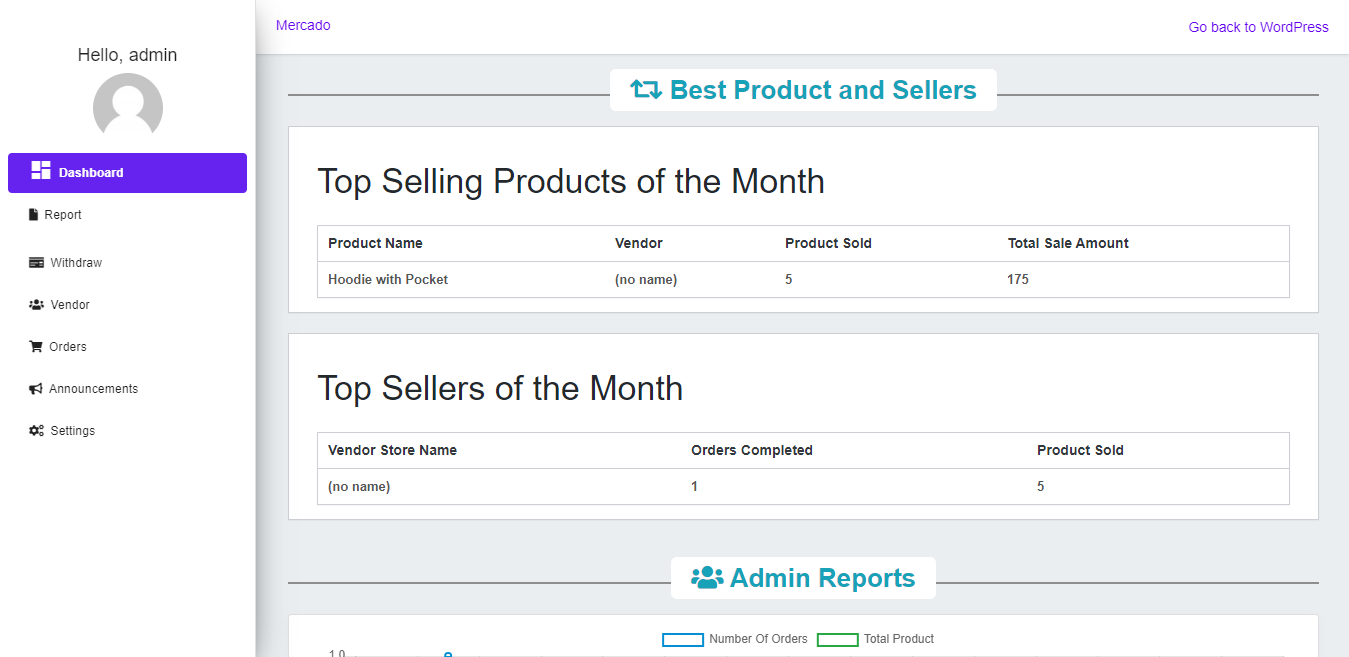
- This section of the dashboard contains Top selling products of this month with their details, vendor name, no. of product sold and total sales amount of the products & Top sellers of the months with orders completed and product sold by the vendor within this month.
-
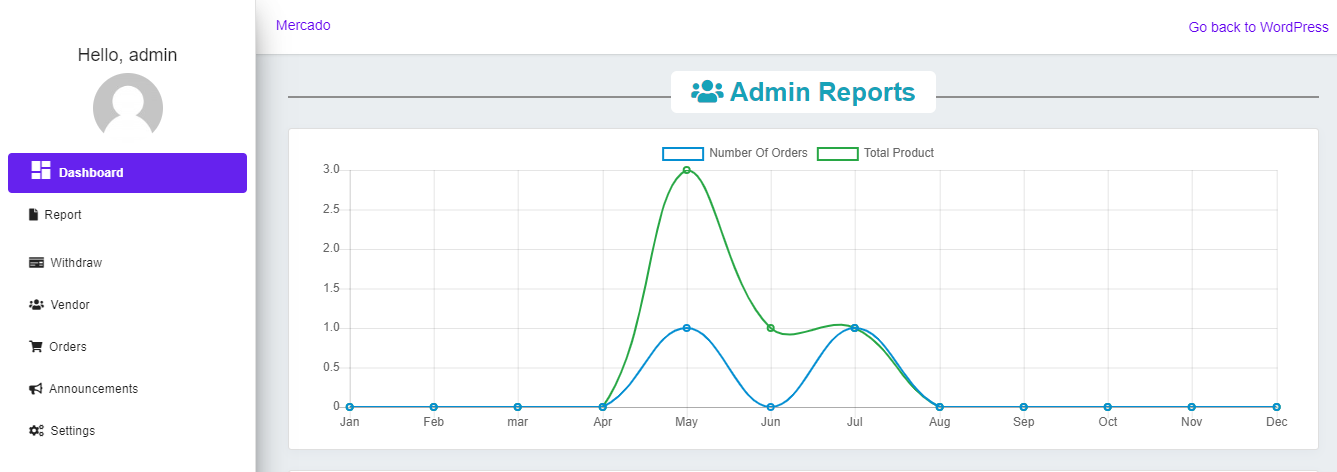
- Here you can view your monthly reports with No. of orders & Total product. which stayed up to date.

- Here you can view your monthly reports with Total Sale & Commission which also stayed up to date.
Manage Withdraw Requests
Payment withdrawal option and minimum withdrawal limit, you can select a payment option in between(Payal & Bank transfer) & also can be selected the minimum withdrawal limit for vendors.
-
- Navigate to Mercado Dashboard, by WP Admin Dashboard -> Mercado -> Dashboard
-
- On the other hand, you can manage all withdrawal requests made by vendors.
- Navigate to Mercado Withdraw section, by WP Admin Dashboard -> Mercado -> Withdraw
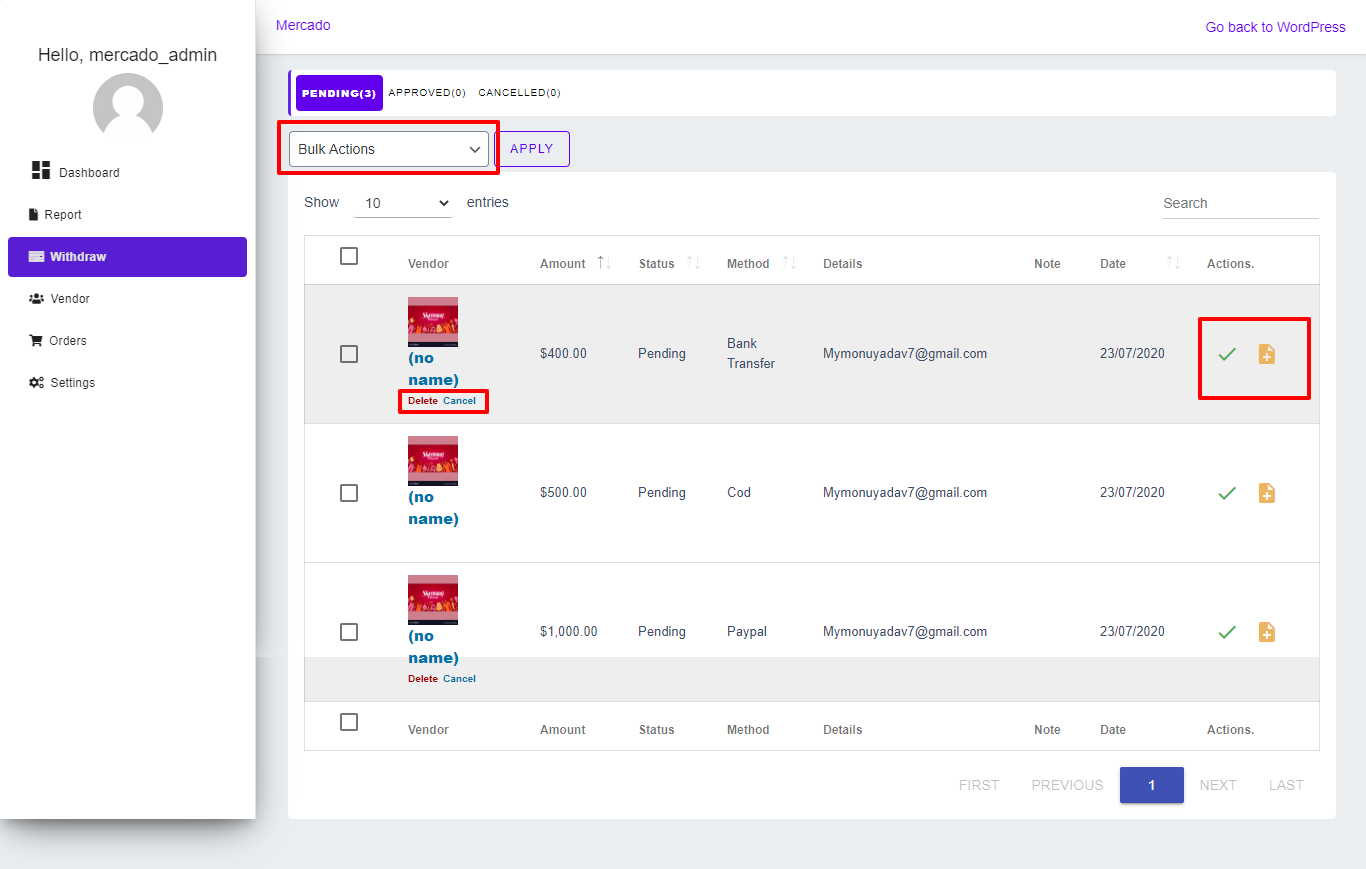
- In this section “Bulk Action” allows you to Approve, cancel & delete multiple requests together, and “delete” button let you allow delete the request by which request deleted permanently, whereas “cancel” button do the cancel request and sent this request to canceled request of admin and vendor section & on clicking “Yes icon”, the request will get approve and amount credit to vendor’s account balance after deducting your(admin) balance.
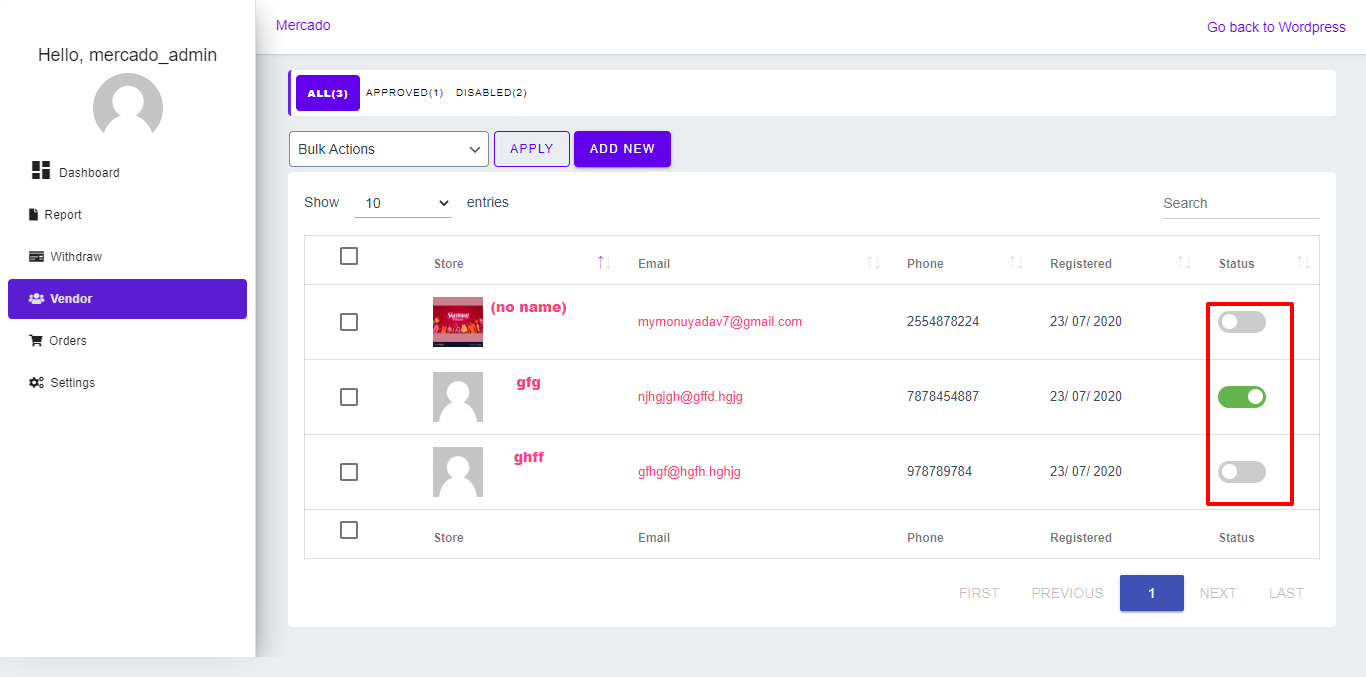
Manage Vendors Capabilities
Here, you can manage vendor’s selling capabilities from enabling/disable to vendors, Edit vendors, view products, view orders of the vendors to add new vendors from this panel.
-
- Navigate to Mercado Vendor, by WP Admin Dashboard -> Mercado -> Vendors
-
- This vendor section allows you to enable/disable the selling of vendors by which vendors can enable their sellings or not.
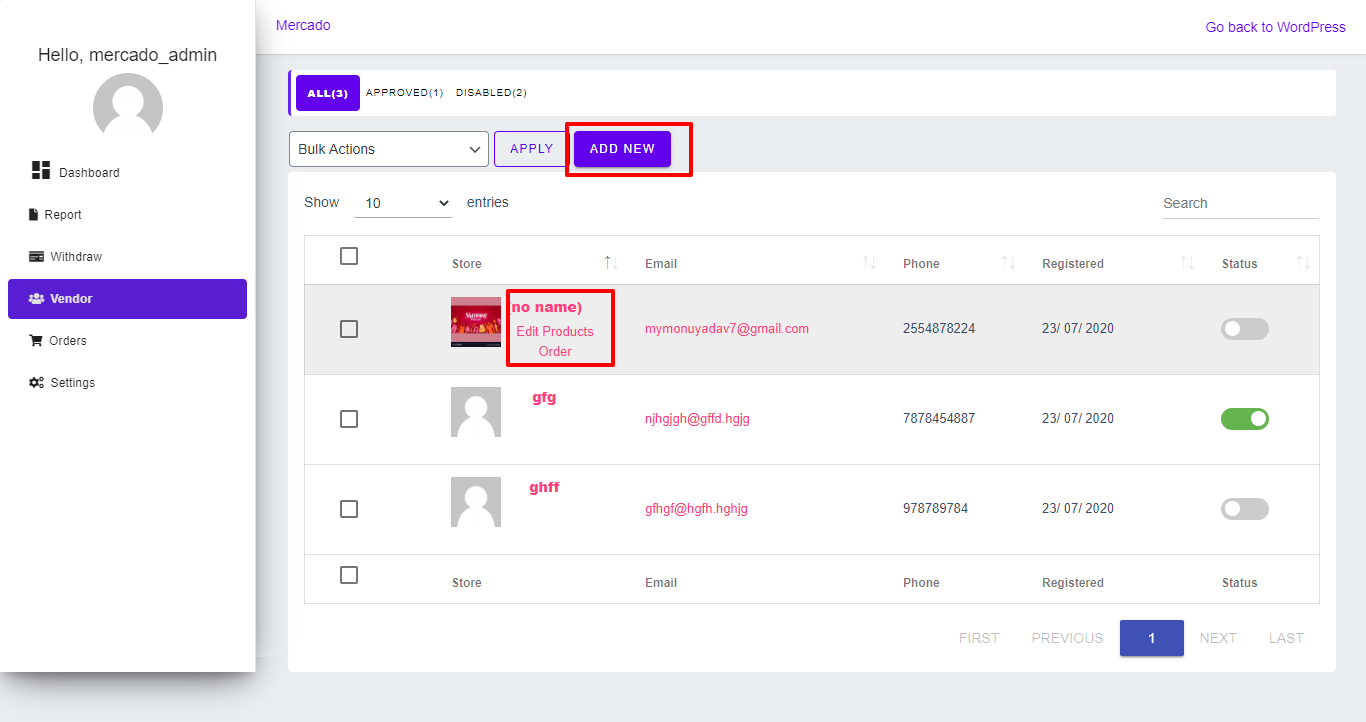
- This clicking allows to their name perspective, whereas edit button access you to edit vendor details, “product” button allows you to view a product, on click of “order” button order viewed of related vendors & “Add new” button allows you to add a new vendor to your marketplace.
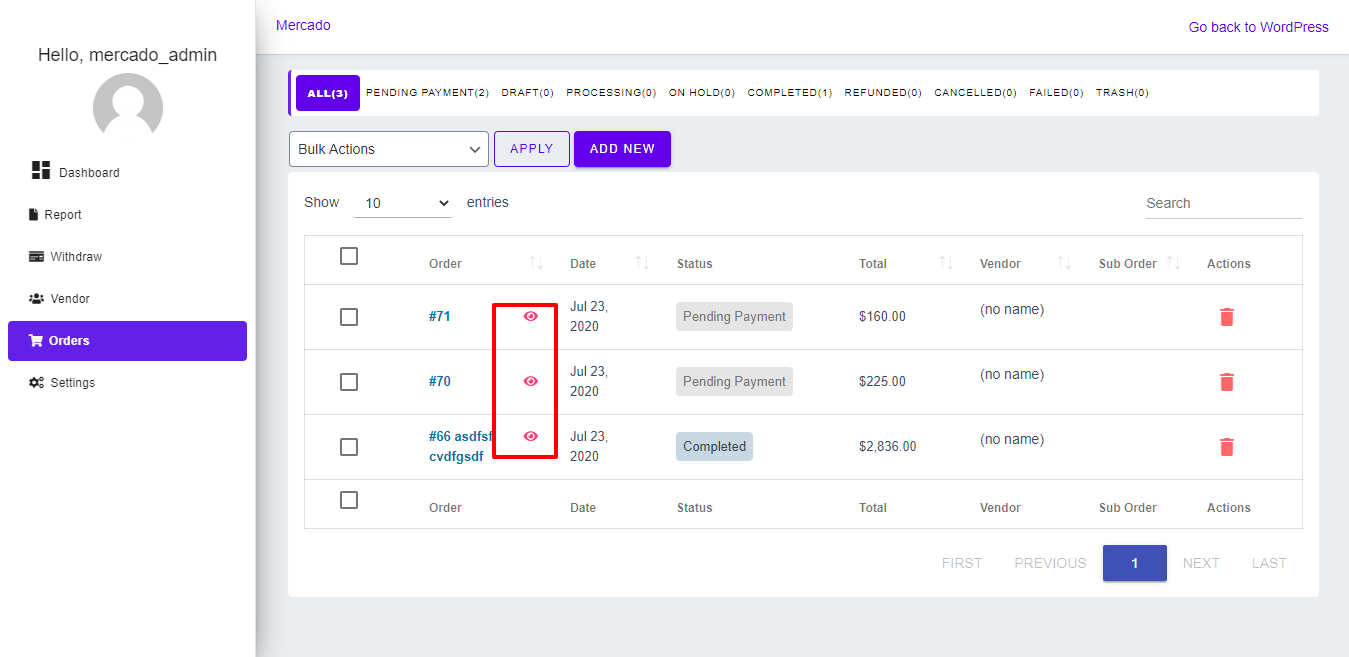
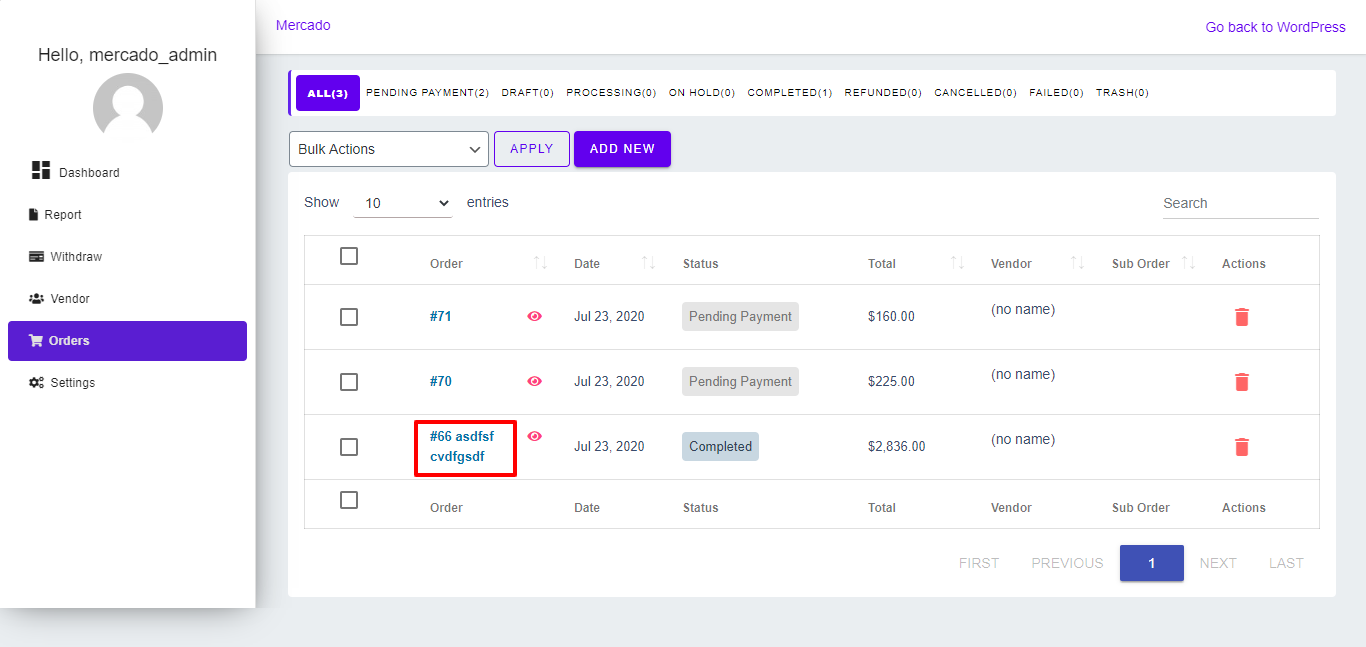
Manage Your Marketplace Orders
This section of the plugin allows you to view, create, edit, delete all of your marketplace orders. you can keep connected with all of your orders from here.
-
- Navigate to Mercado Orders, by WP Admin Dashboard -> Mercado -> Orders
-
- This is all the orders created by your marketplace customers in order column “Order id with the name of customer displayed here”, in the other hand, by clicking on the eye button. you can view information related to order.
-
- By clicking the order id or name that will allow you to edit the order, which includes you edit order status and all other information related to the order.
-
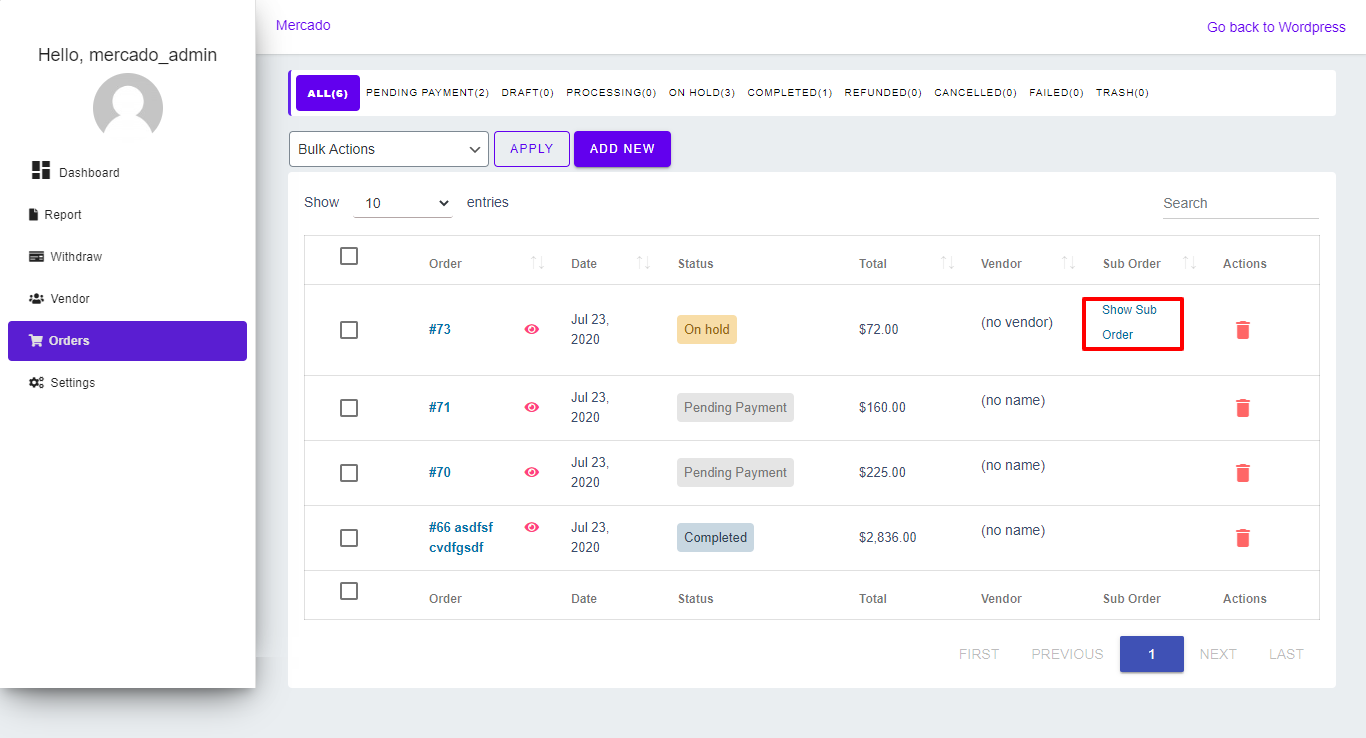
- If an order contains more than one vendor’s products that go as suborders, you will see this option, on clicking this button all the suborders will be displayed with the all orders of all vendors.
-
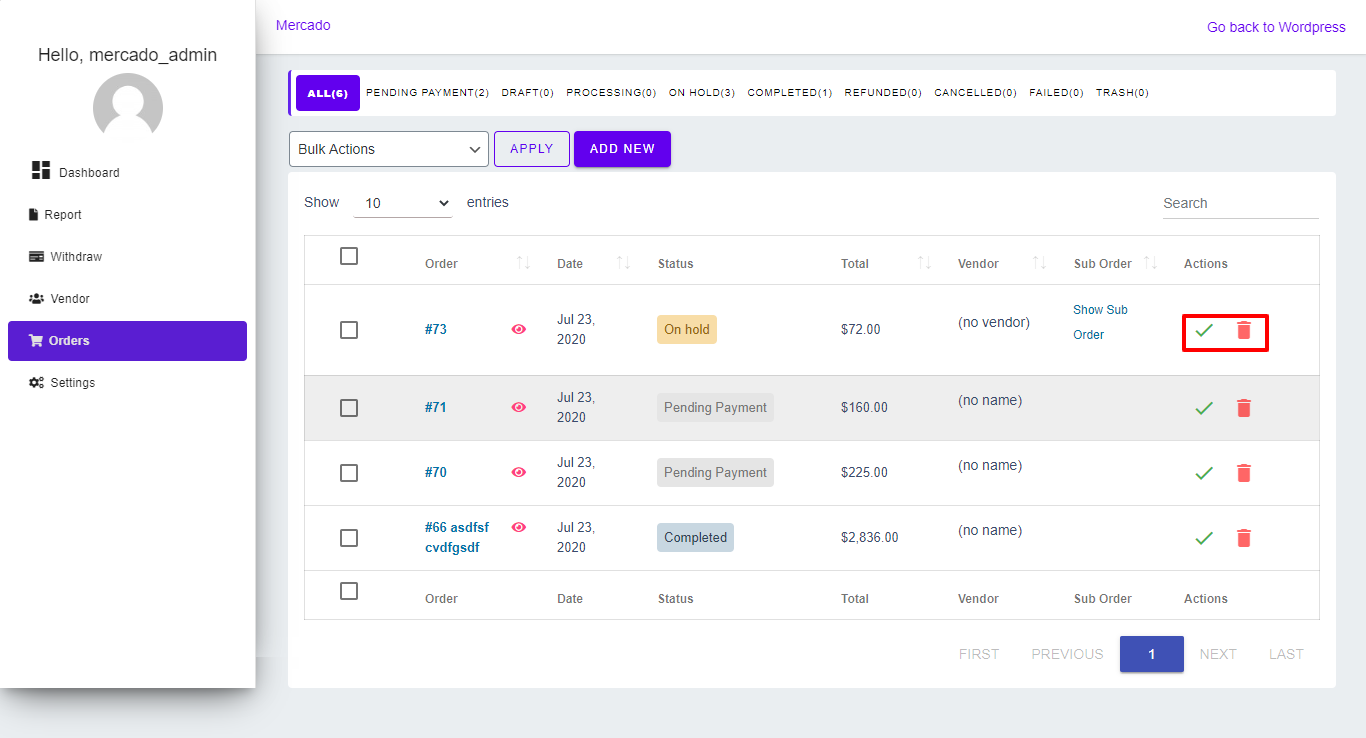
- In those buttons, the first “yes” button allows you to send payment to the vendor’s account if the order status is completed. that button only displays if you set “After admin approval” to receive a balance of orders from withdrawal options. by which vendor can receive amount to his account by which he can withdraw whenever he wants. And another “delete” button sends the order to trash or deleted as per requirement.
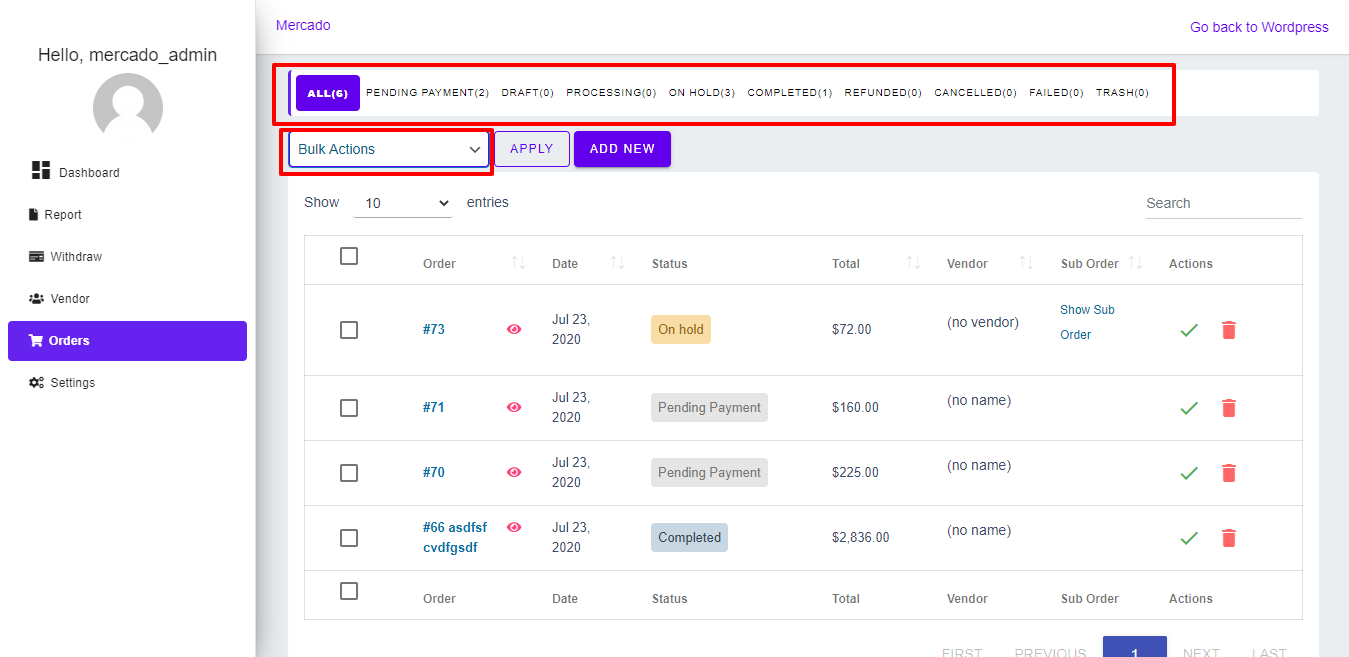
- The above rectangle shows orders according to their status. you can sort order by their status, and the next rectangle is getting you access to change multiple orders status together.
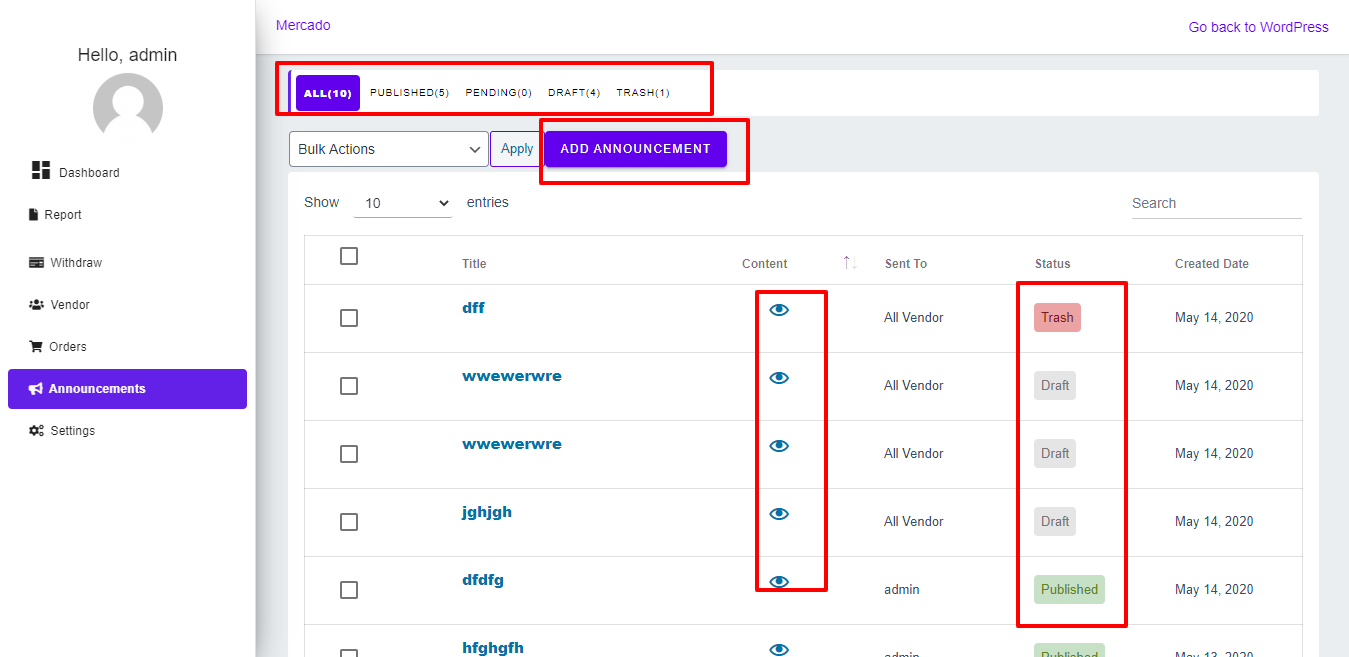
Create One Click Announcement
You can create an Announcement for vendors that maybe for all vendors or particular you choose, Announcement help you convey a message, lead through your words to vendors & any other purpose you like.
-
- Navigate to Mercado Reports, by WP Admin Dashboard -> Mercado -> Announcement
-
- Here You can view all your announcements at one place in your Marketplace. The first highlighted section allows you to sort your announcement ap per status, the second area allows you to add announcement and the third one is to view content & the fourth one shows the status of the announcement.
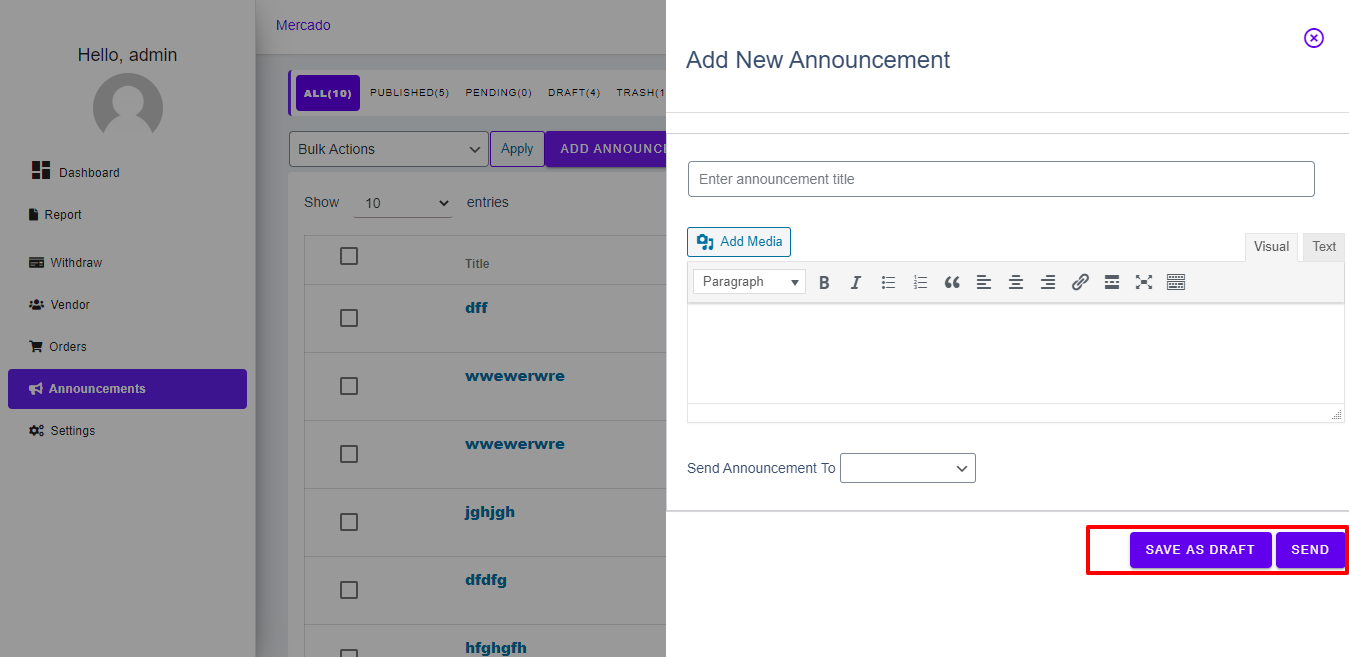
- This Section of Marketplace allows you to add a new announcement, here you can directly publish an announcement or you can save it for later to manage with more efficiency.
View Earning Reports
Earning reports shows overall earning related information(commission, products, orders) in one place. you can view all your earning related day by day.
-
- Navigate to Mercado Reports, by WP Admin Dashboard -> Mercado -> Reports ->
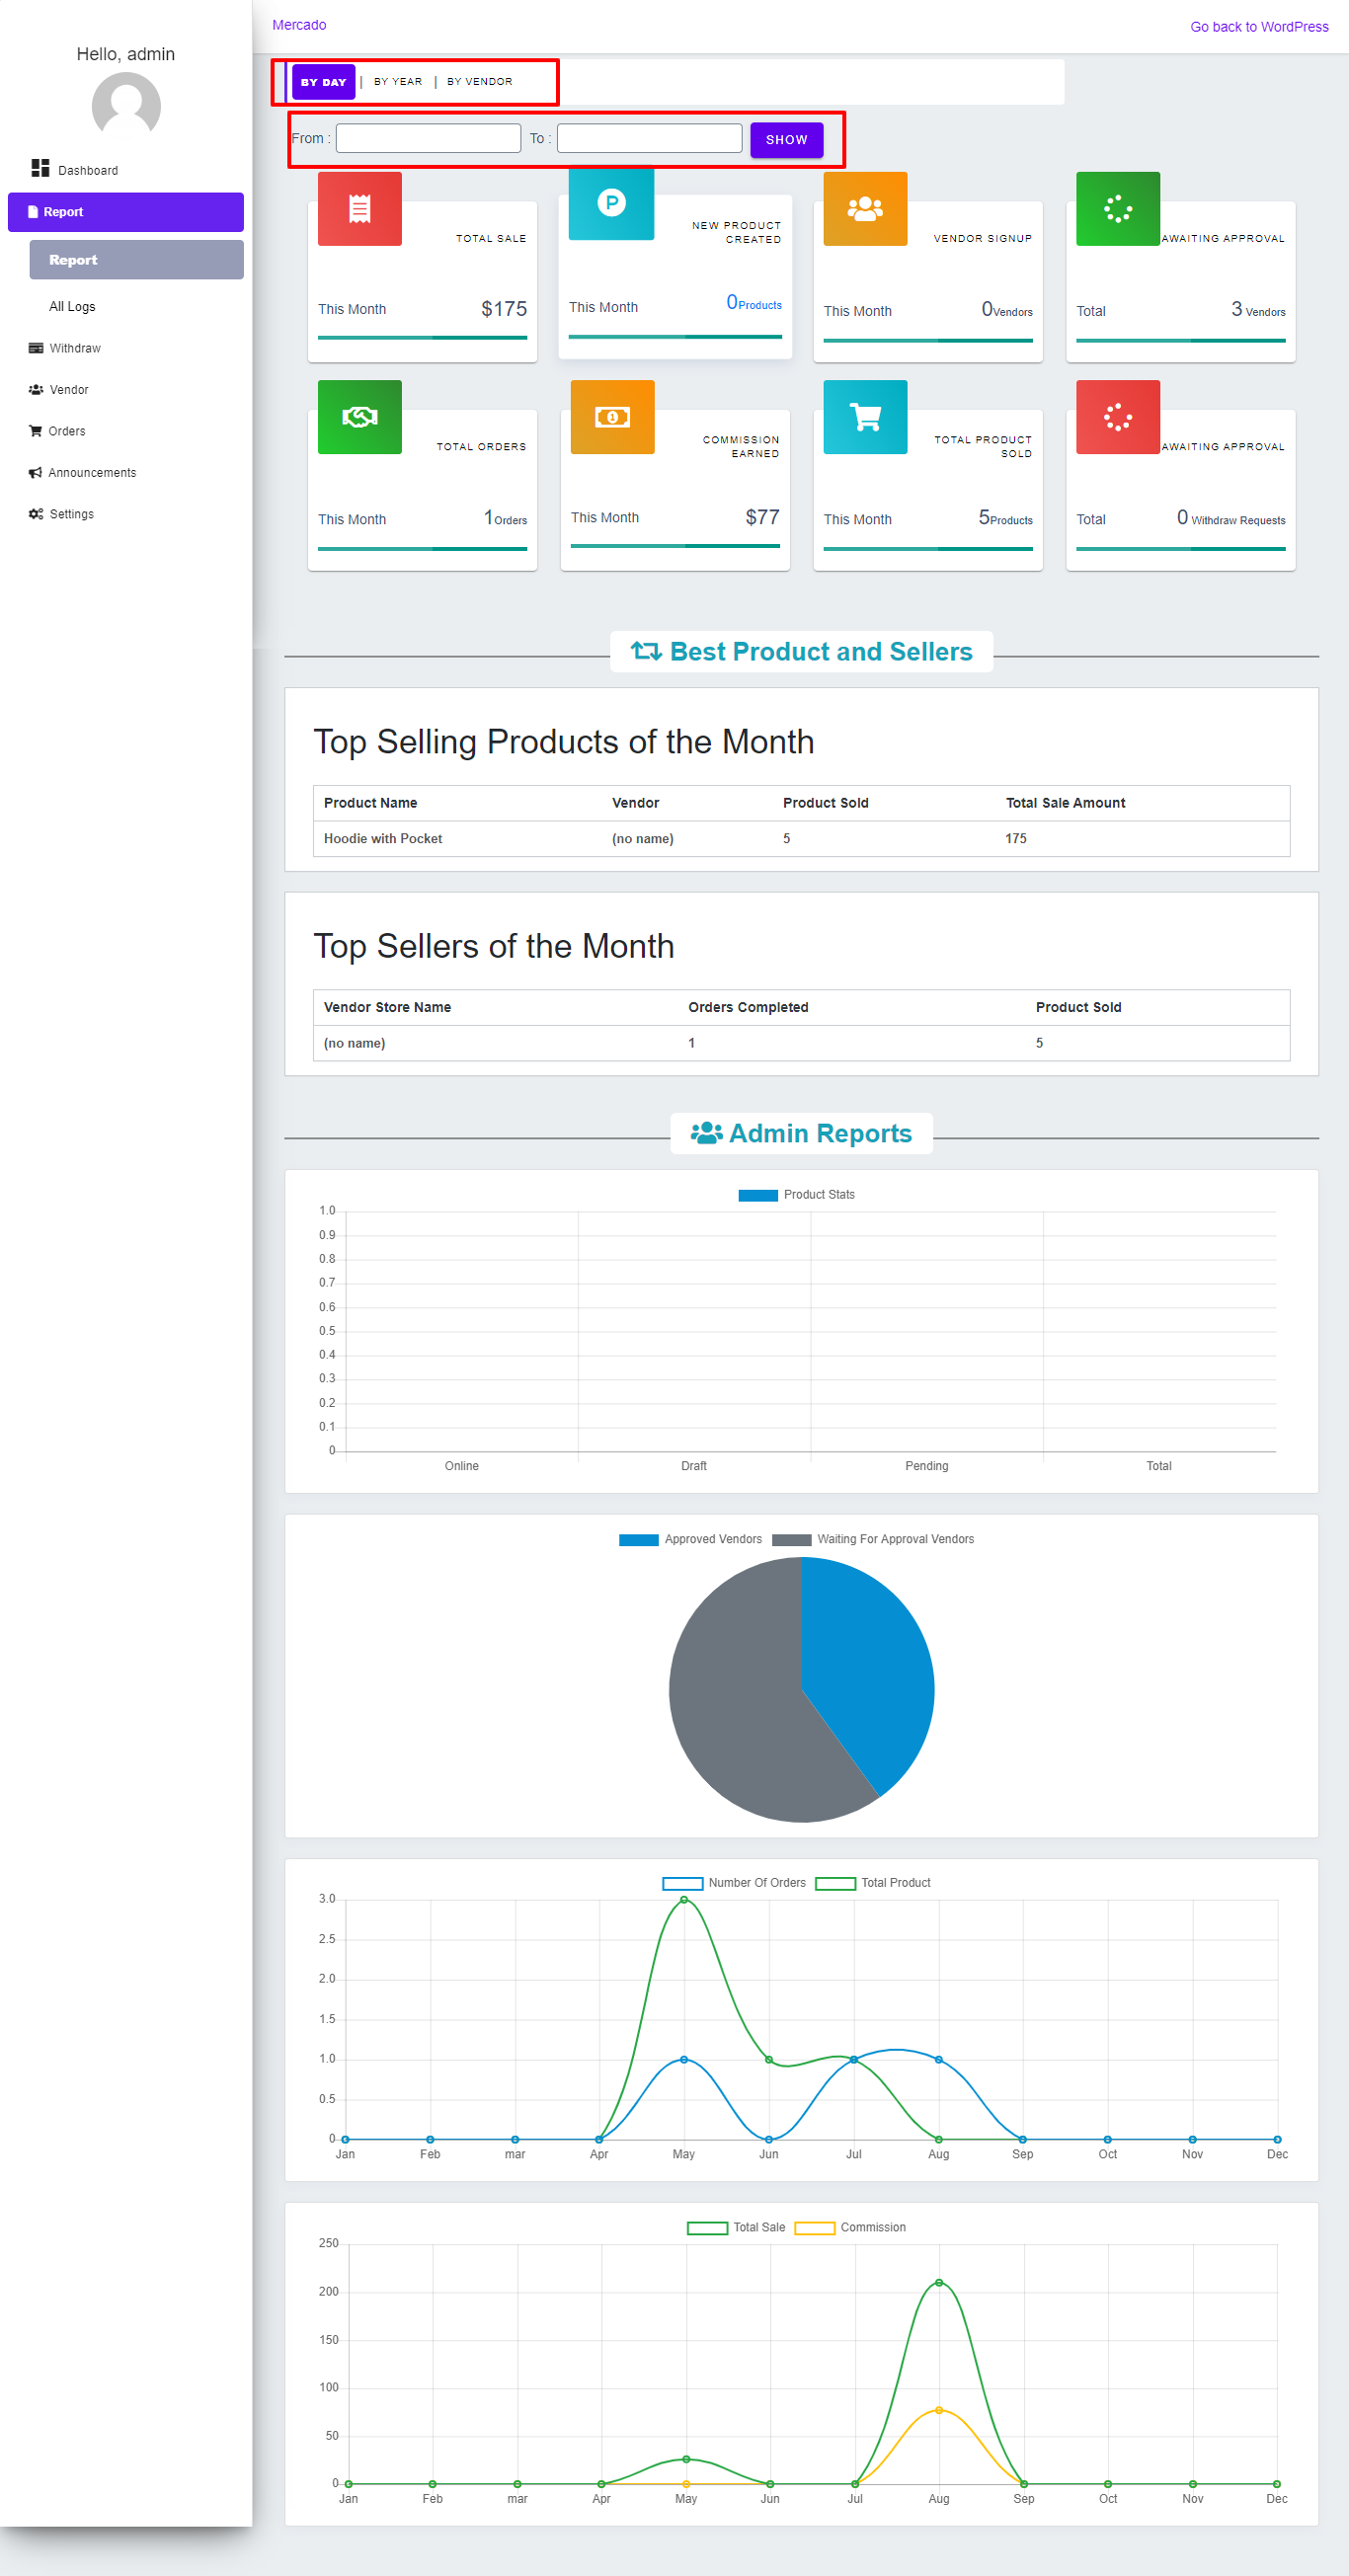
- This Section of your marketplace will work for an as third eye, which allows you to know everything related to your marketplace such as your orders, total sale, vendors, commission, withdrawals request & every important thing displays with the help of analytics. here the most important thing is you can sort reports as per day, year & vendor which provide live statics in clicks.
View All Report Logs
This Section provides you the data for the report logs, All the reports of your orders will be displayed here.
-
- Navigate to Mercado Reports, by WP Admin Dashboard -> Mercado -> Reports -> All Logs
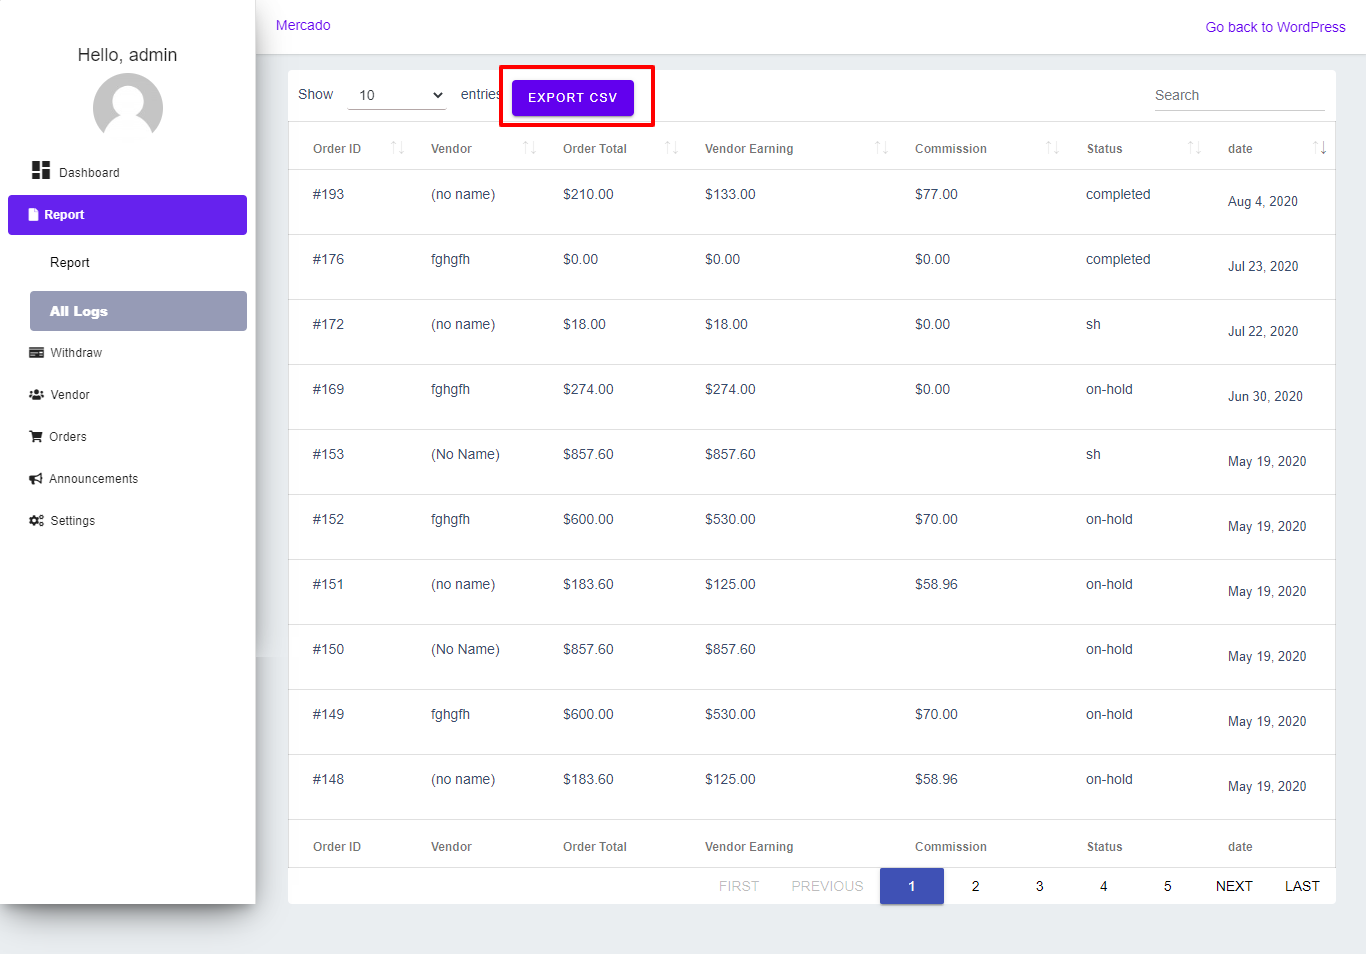
- This section helps you to see all your report data in one place, whether the first highlighted section allows you to download CSV for the chosen records.
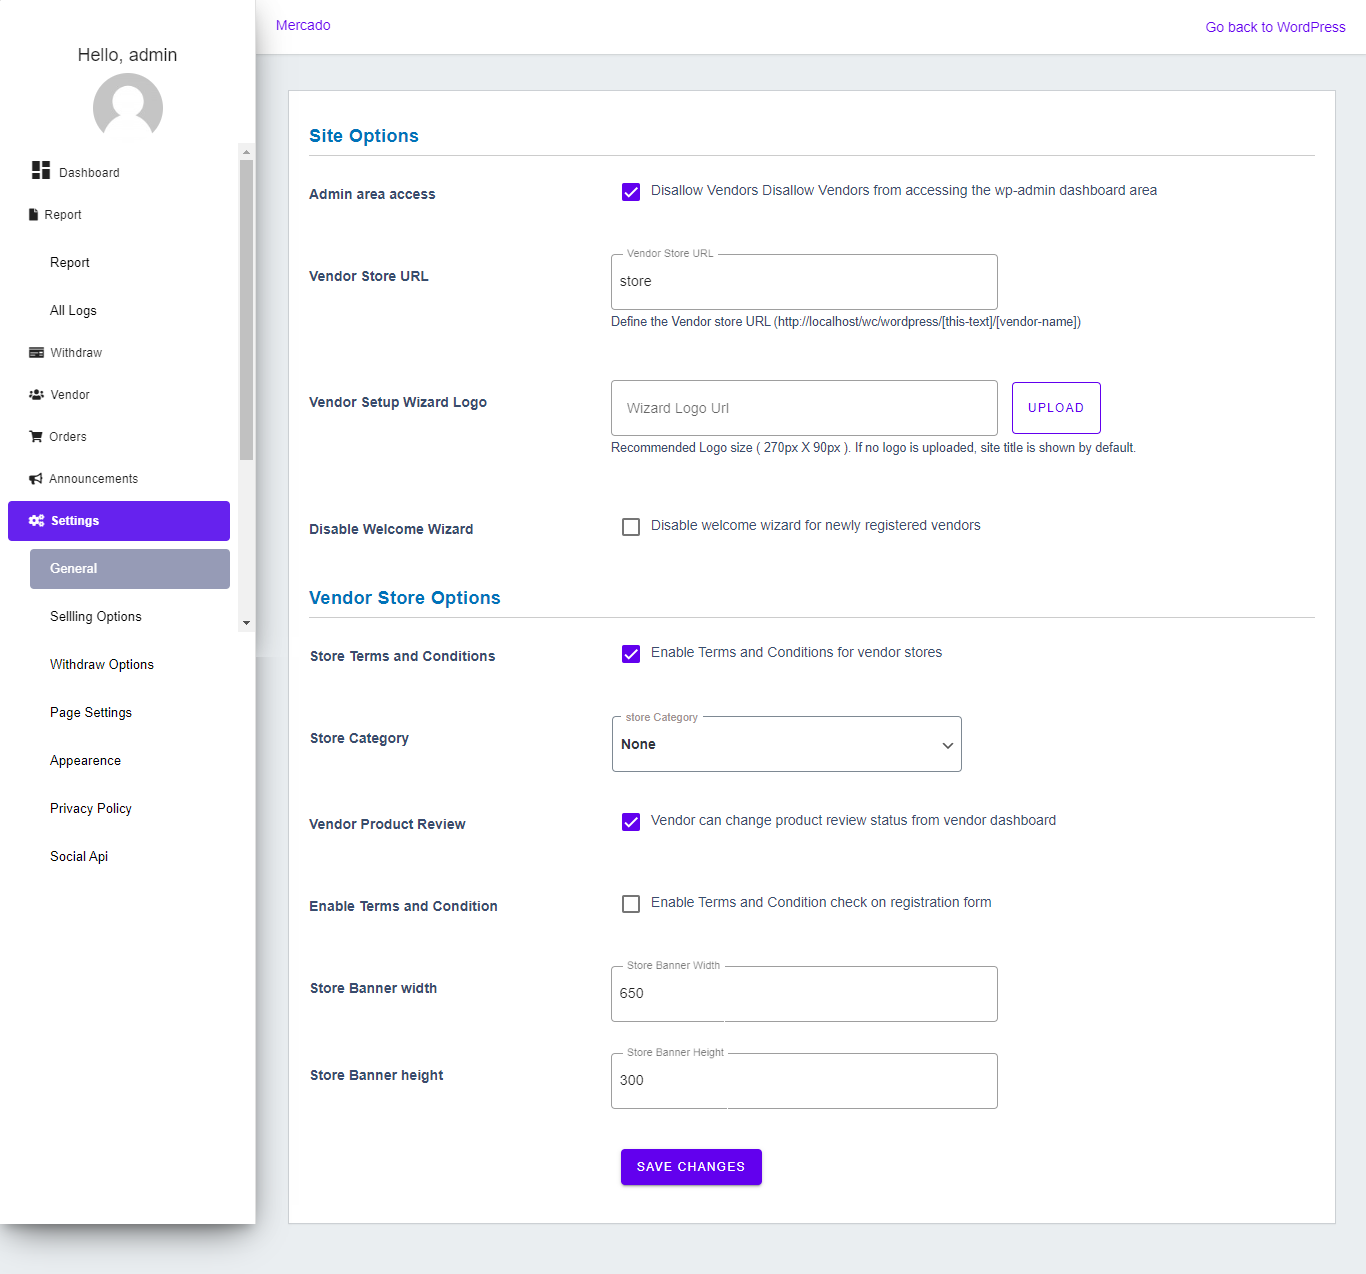
Mercado Settings
This Setting section provides you access to set your marketplace according to your need, this setting plays an important role to set you marketplace alive and healthy.
-
- Navigate to Mercado Setings, by WP Admin Dashboard -> Mercado -> Settings
-
- These settings will you to Allow/Disallow vendors to access the admin panel, Vendor store URL, Vendor’s wizard logo, Enable/Disable welcome wizards for newly registered vendors, Enable/Disable vendor store’s terms and conditions, Choose how vendors will use store category, Product review which allows product send for review or not, Enable Terms and condition for registration page, Store banner width & store banner height allows you set the height & width of vendor’s store Respectively.
-
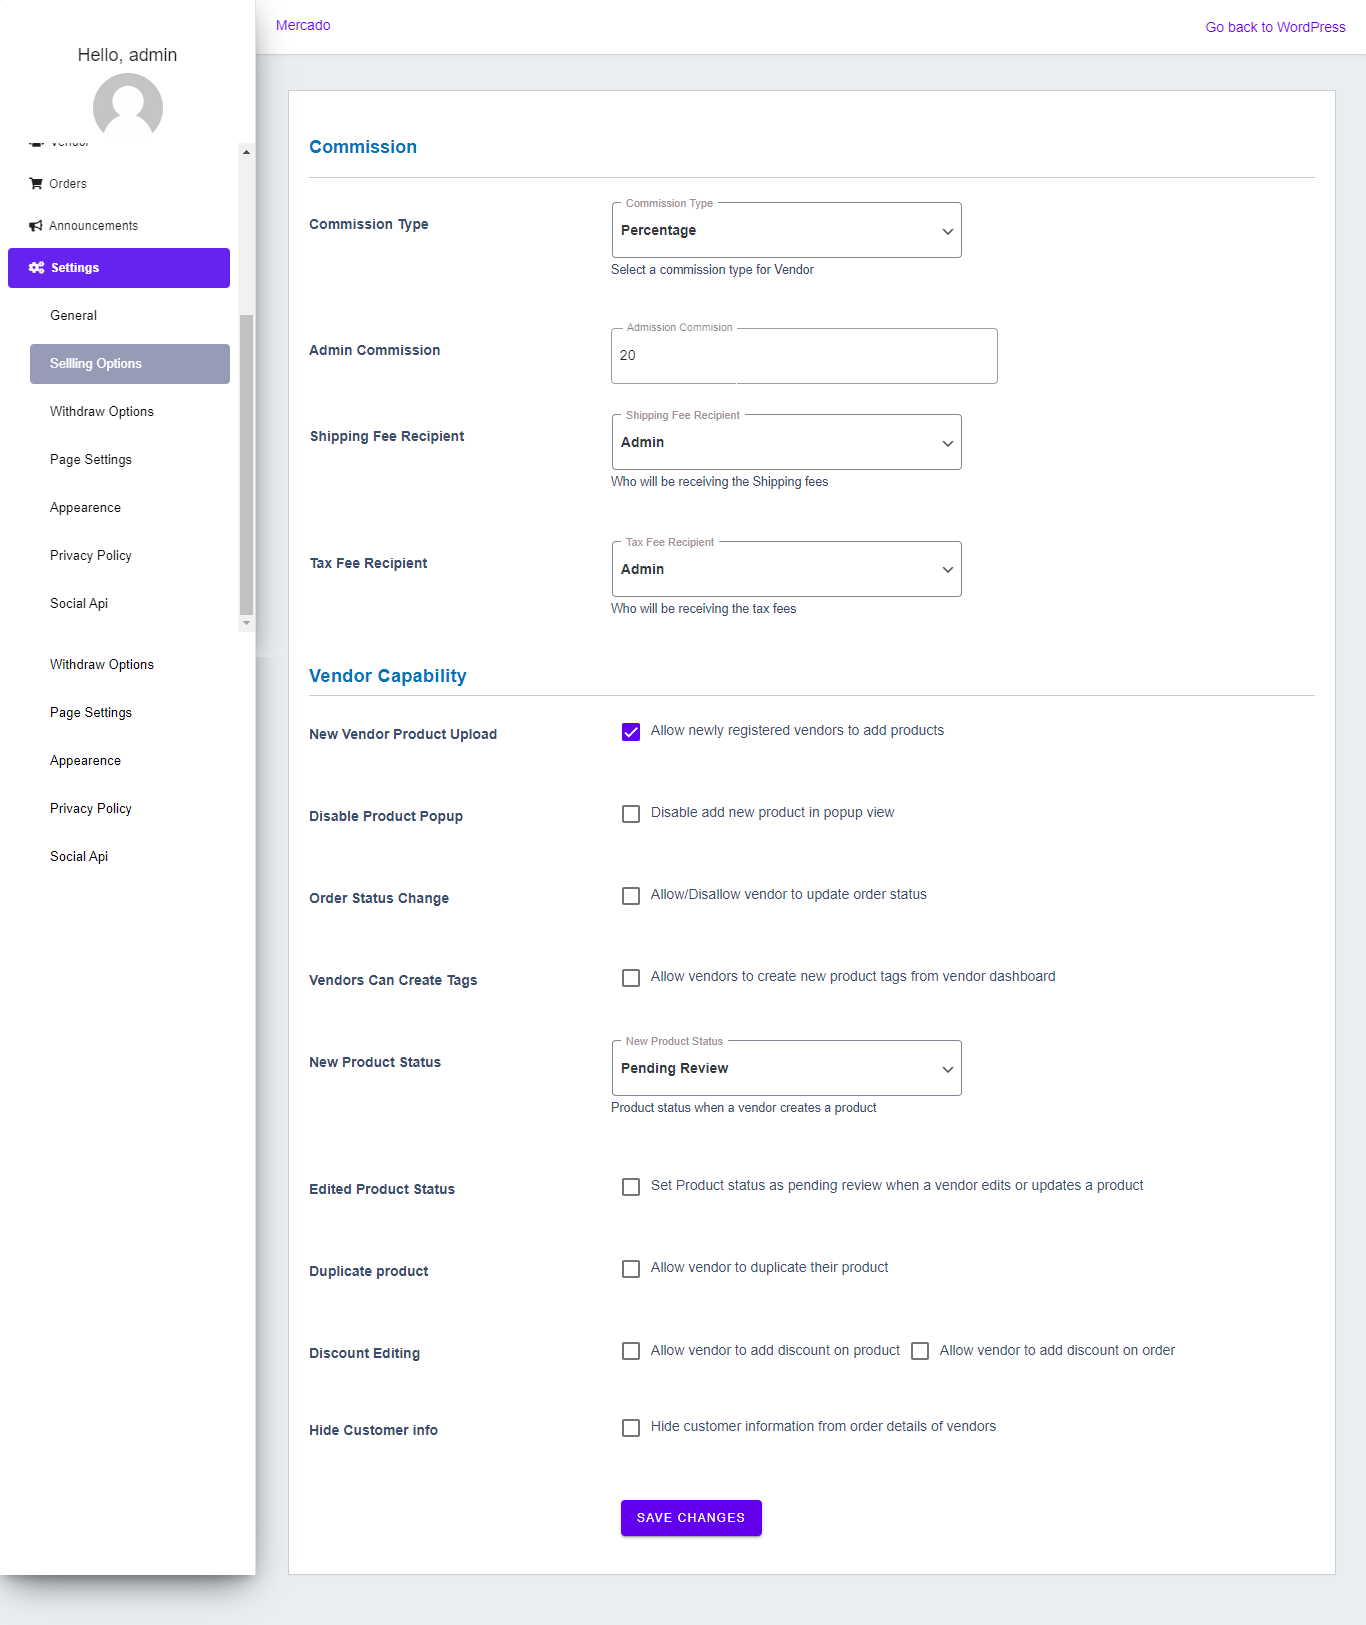
- Here, you will be able to set your commission which you will take from your vendors. Here commission type can be either Percentage, Flat or Combine, commission value which will be applied to all of your site vendors. Shipping fee recipient and Tax fee recipient can also be chosen by you which will receive the payment of the shipping fee & tax fee, Enable/Disable sellings for newly registered vendors, Enable/Disable product add in the popup view, also Allow/Disallow vendors to update order status, Allow vendors to create tag for their product or not, Set the status of the newly added product, Set edited/updated (by vendors) product status as pending, Allow/Disallow vendors to create the duplicate product. Allow/Disallow vendors add a discount on product & order and next you can hide information of customers from vendors Respectively.
-
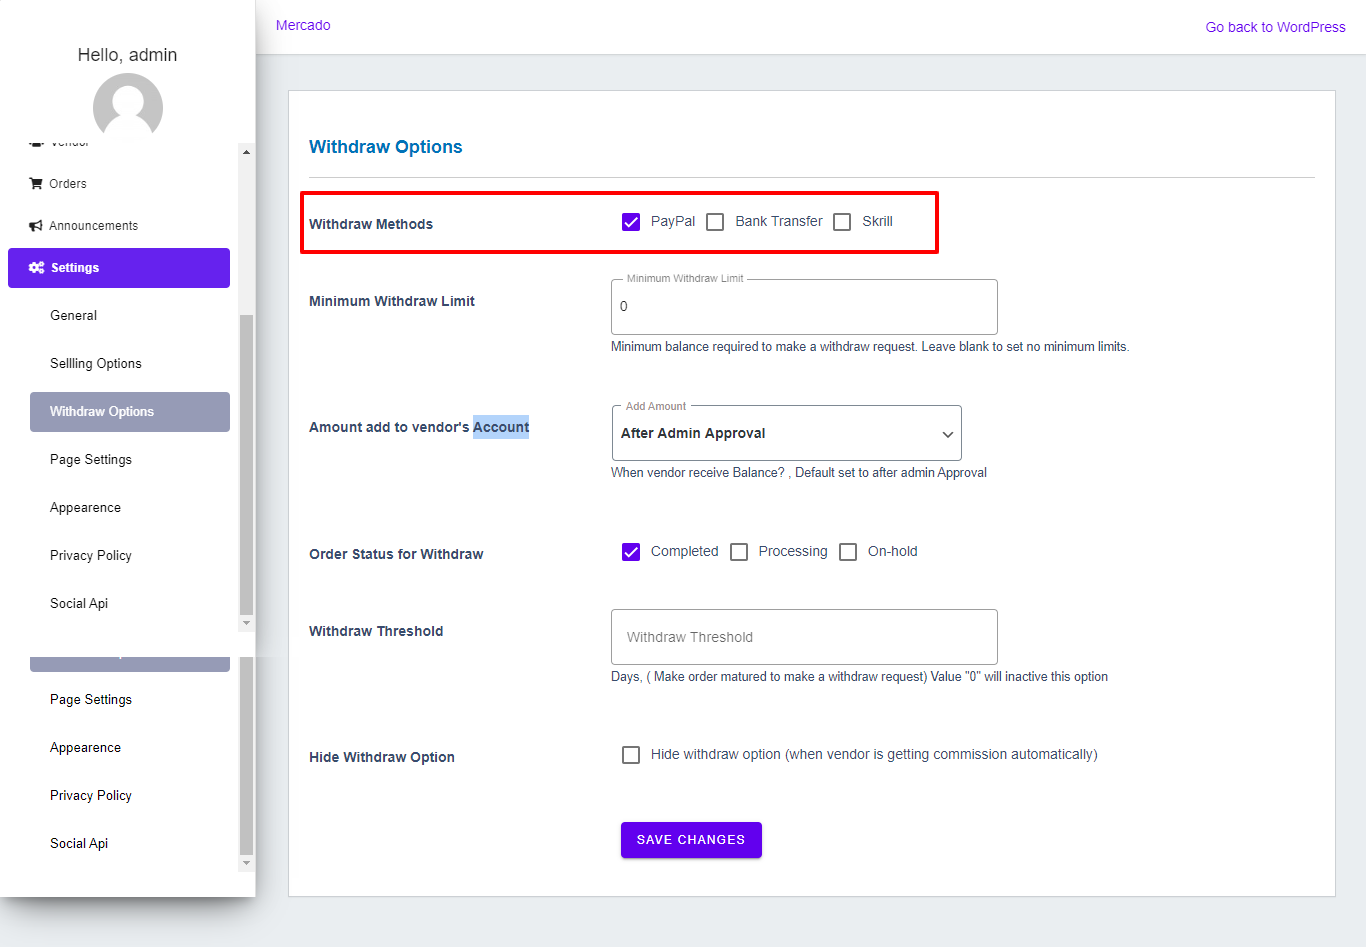
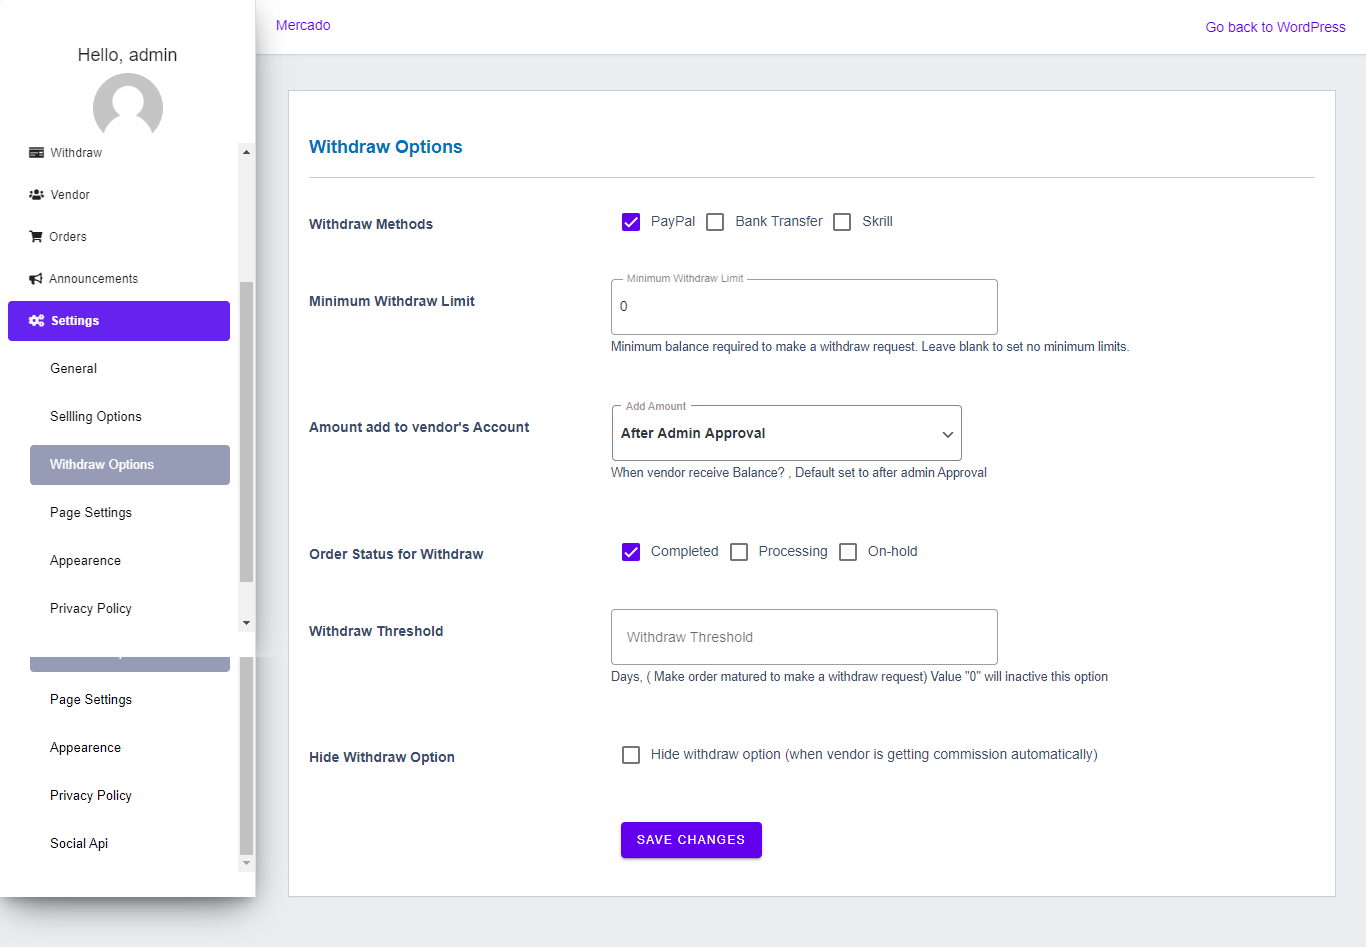
- There are withdraw methods such as Paypal, Bank Transfer & Skrill, you can select withdraw method as you like, you can also set the minimum to withdraw limit for Vendors, also set that when the vendor will receive payment of ordres, Order Status for withdraw is for on which order status vendor can send a request for withdrawals, Withdraw Threshold allows you to after no. of days vendor can request for withdrawing and last option is for to hide withdraw option from vendors end if payment is automatically transferring.
-
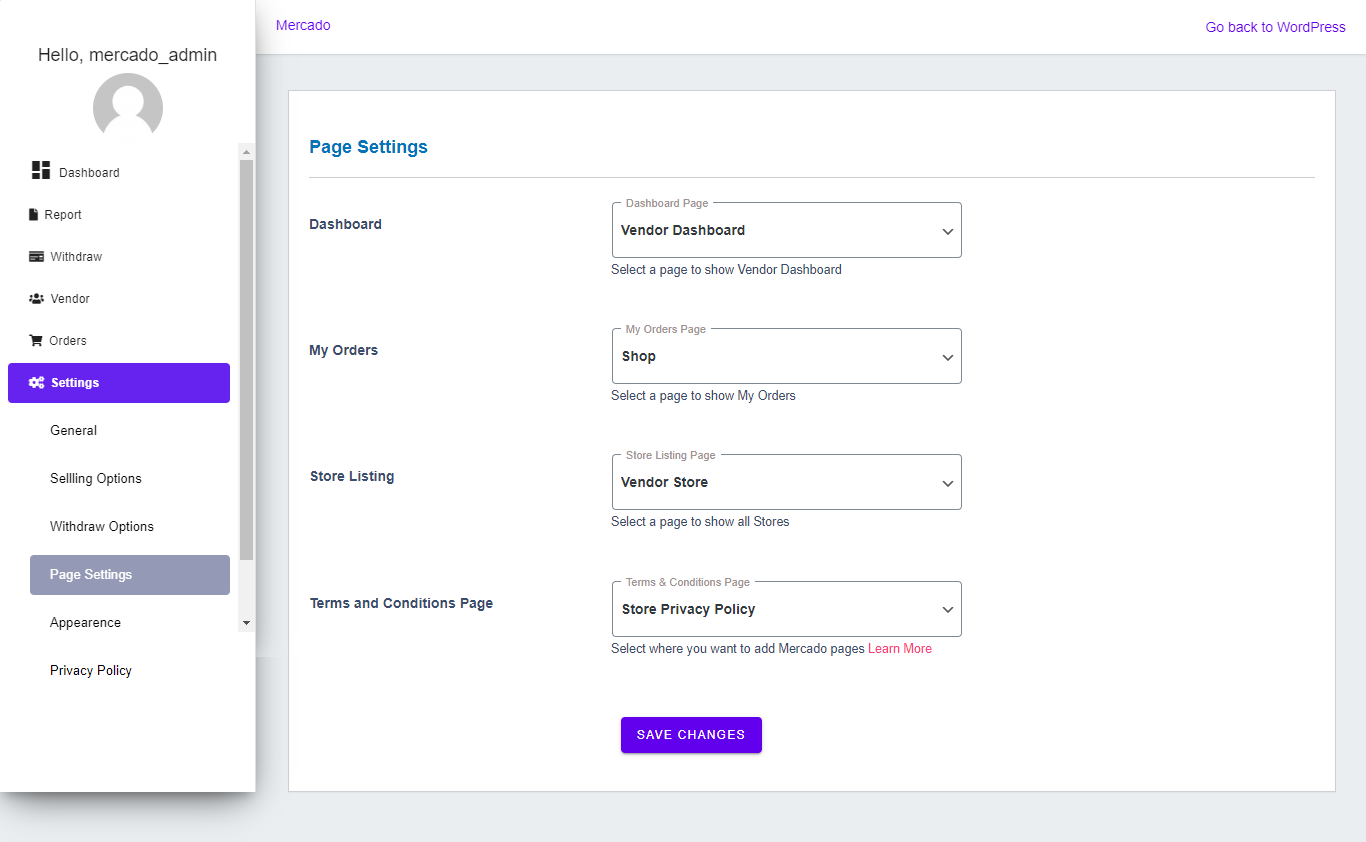
- By accessing page setting you can change where Dashboard, My orders, Store listing & Terms, and condition page should be displayed. on your selected page the perspective page will be displayed.

-
- Here you can setup map setting to the vendors that where will map appear and from you are taking map that source, Contact form of vendors to store page, Vendors opening and closing widget & Enable/Disable Sidebar for the theme.
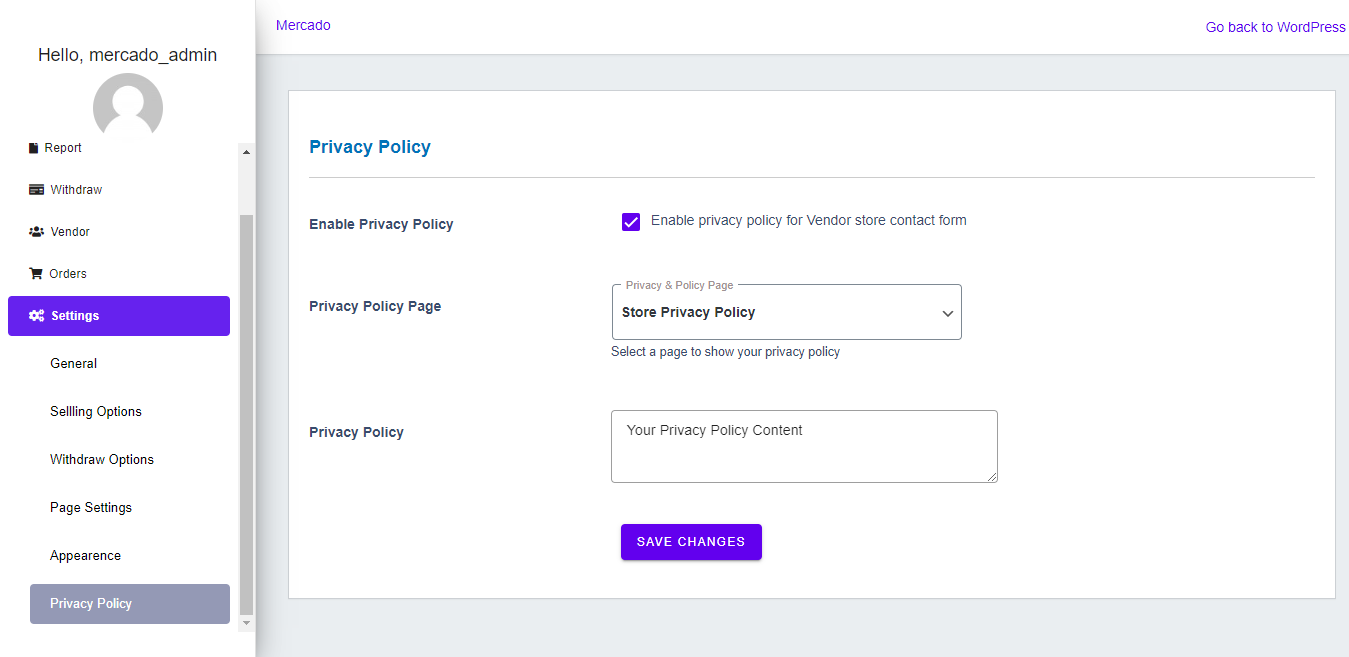
- Privacy & policy setting provides you access to Enable/Disable privacy policy page with where should be that page displayed and also allow you to put the content of your privacy policy page.
Social Login & Registration API setting
These fields of setting allow you to enter all your API details at one place by which vendors/customers can log in at WooCommerce.
-
- Navigate to Mercado Reports, by WP Admin Dashboard -> Mercado -> Settings -> Social Api
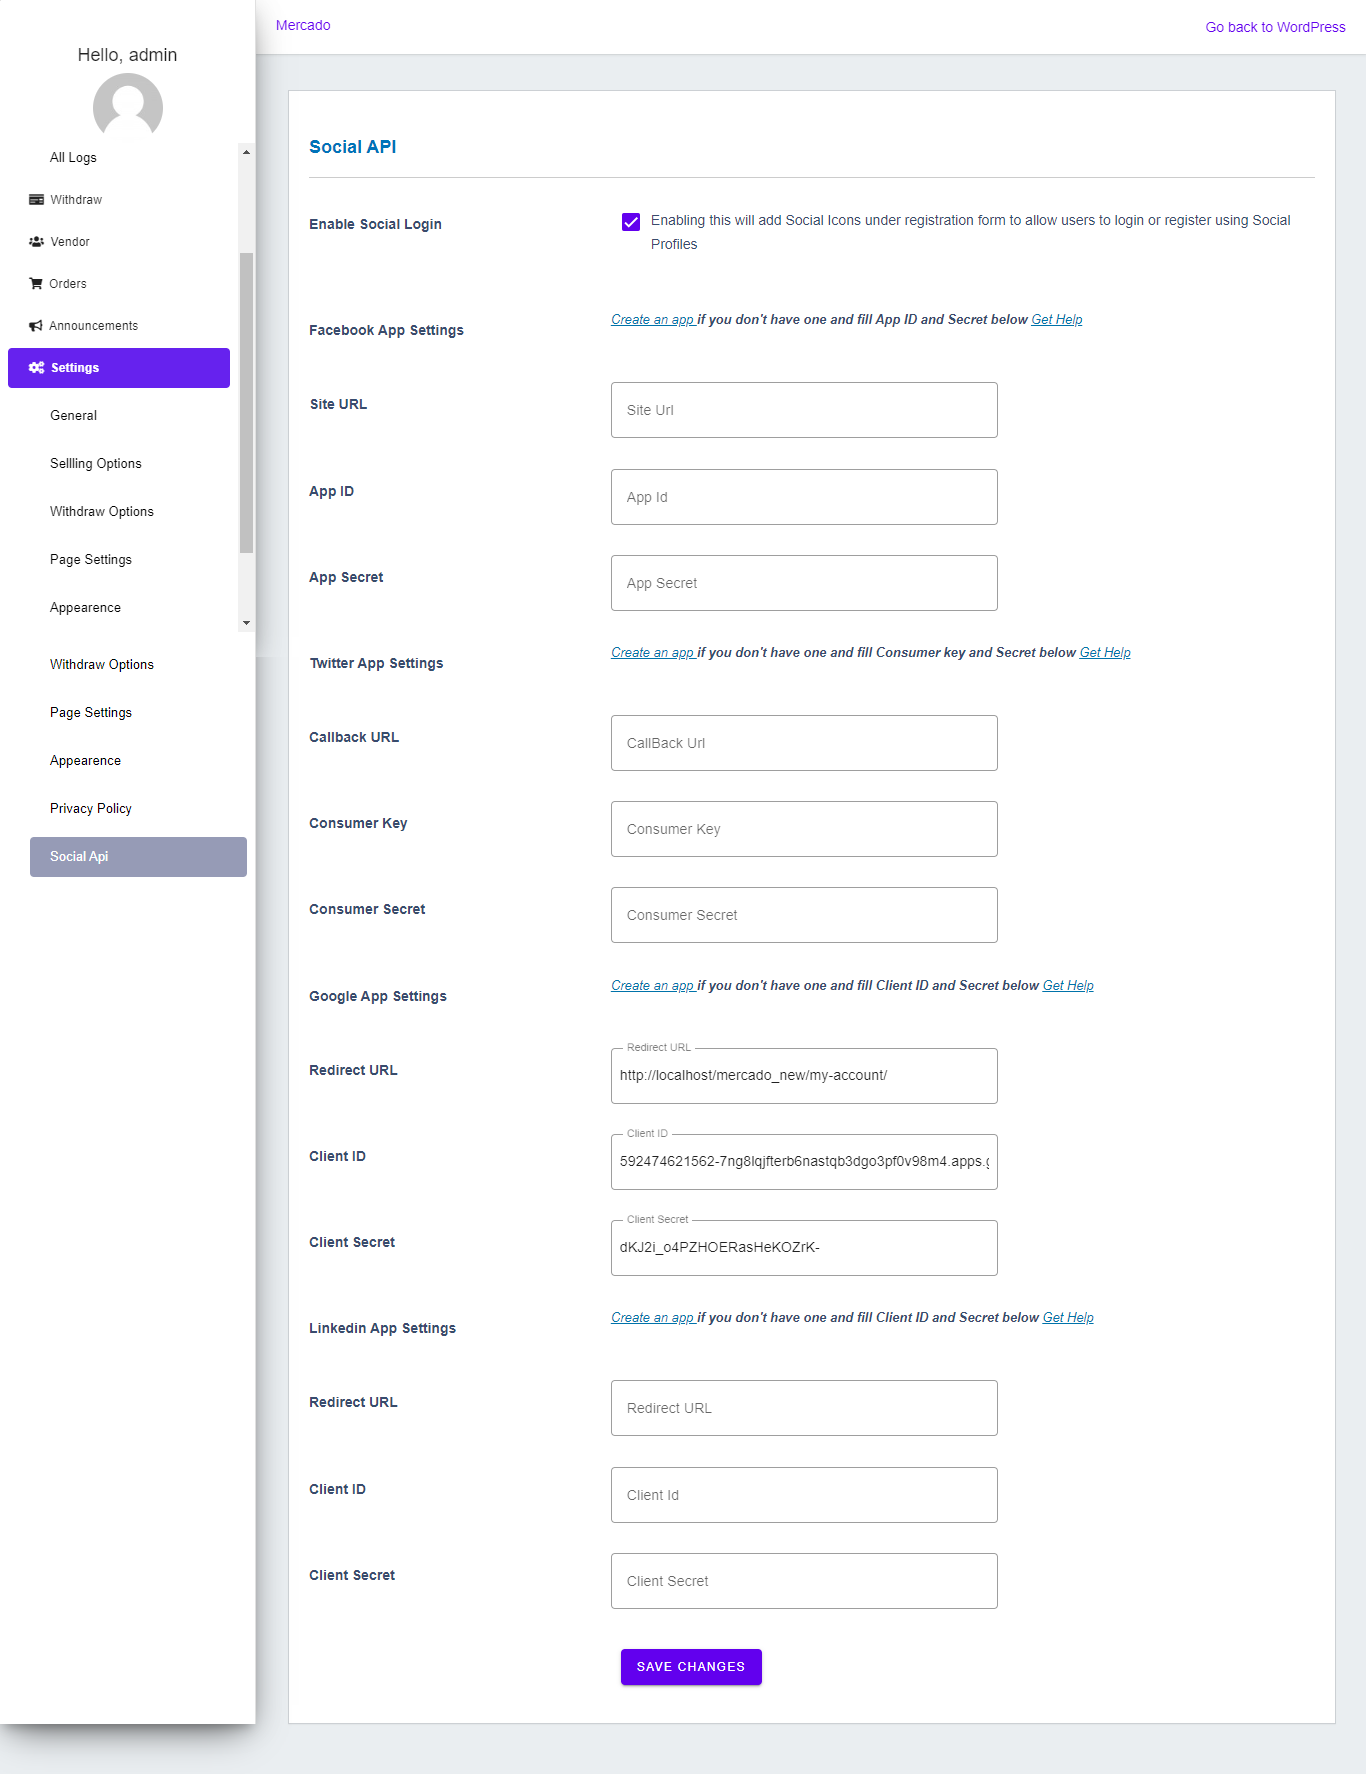
- This section of Social Api Settings, Enable/Disable Social Logins- 1) Facebook App settings – You will need to Enter Site URL, App ID, App Secret for activating Facebook Login. 2) Twitter App settings – You will need to Enter Callback URL, Consumer Key, Consumer Secret for activating Twitter Login. 3) Google App settings – You will need to Enter Redirect URL, Client ID, Client Secret for activating Google Login. 4) Linkedin App settings – You will need to Enter Redirect URL, Client ID, Client Secret for activating Linkedin Login.
Store listing Page
This page has all the stores list and this list can be filtered using the filter.The view of the list of orders can be switched from grid to list

