Bought it on the WooCommerce Marketplace?

This is the official RedefiningTheWeb documentation for Affiliate and Referral Program for WooCommerce. The WooCommerce Marketplace keeps its own copy of the documentation for the extension on WooCommerce.com: Affiliate and Referral documentation on WooCommerce.com.

Official Documentation

Affiliate Plugin for WooCommerce Documentation & Setup Guide

Welcome to the official documentation for Affiliate Plugin for WooCommerce. Learn how to configure your affiliate program, customer referral system, commission rules, MLM, wallet, payouts, reports, integrations, and advanced settings through easy step-by-step guides.

Complete Documentation

Everything in one place.

Developer Support

Need help? Our support team is here.

Getting Started

Introduction to Affiliate Plugin for WooCommerce

Use this guide to install the plugin, set up the pages your affiliates use, choose a starting commission rule, and test the complete referral flow before inviting affiliates.

Overview

An affiliate promotes a store link. When a customer purchases through that link, the plugin records a referral for the store administrator to review. Approved referrals create the commission that an affiliate can later use or withdraw, depending on your settings.

Prerequisites

  • You can sign in to WordPress as an administrator.
  • WooCommerce is installed and active.
  • You have the Affiliate Plugin for WooCommerce ZIP file ready to upload.

Navigation Path

Step-by-step Configuration

  1. Install and activate the plugin. This adds the affiliate features to your WooCommerce store.
  2. Configure your first commission rule. Start with a simple commission for all products.
  3. Create or select the affiliate page. Affiliates use this page to access their dashboard and tools.
  4. Generate and share a referral link. An affiliate shares the link with a customer.
  5. Review the referral. After the customer purchases, approve or reject the referral from the admin area.
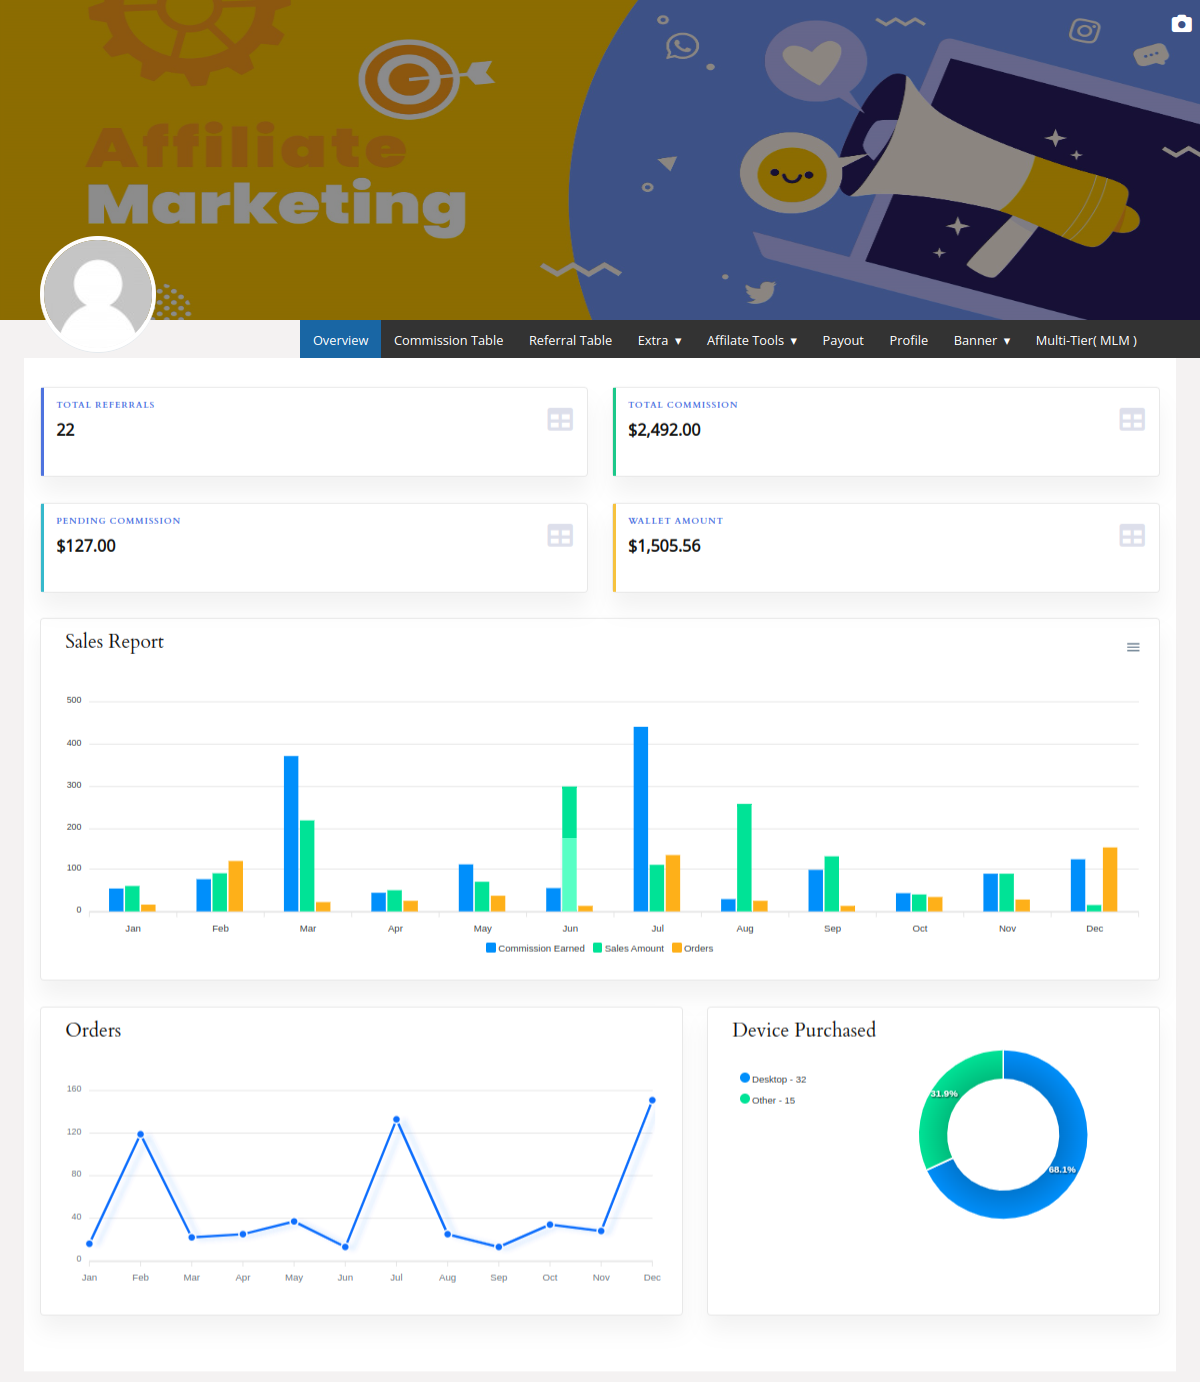
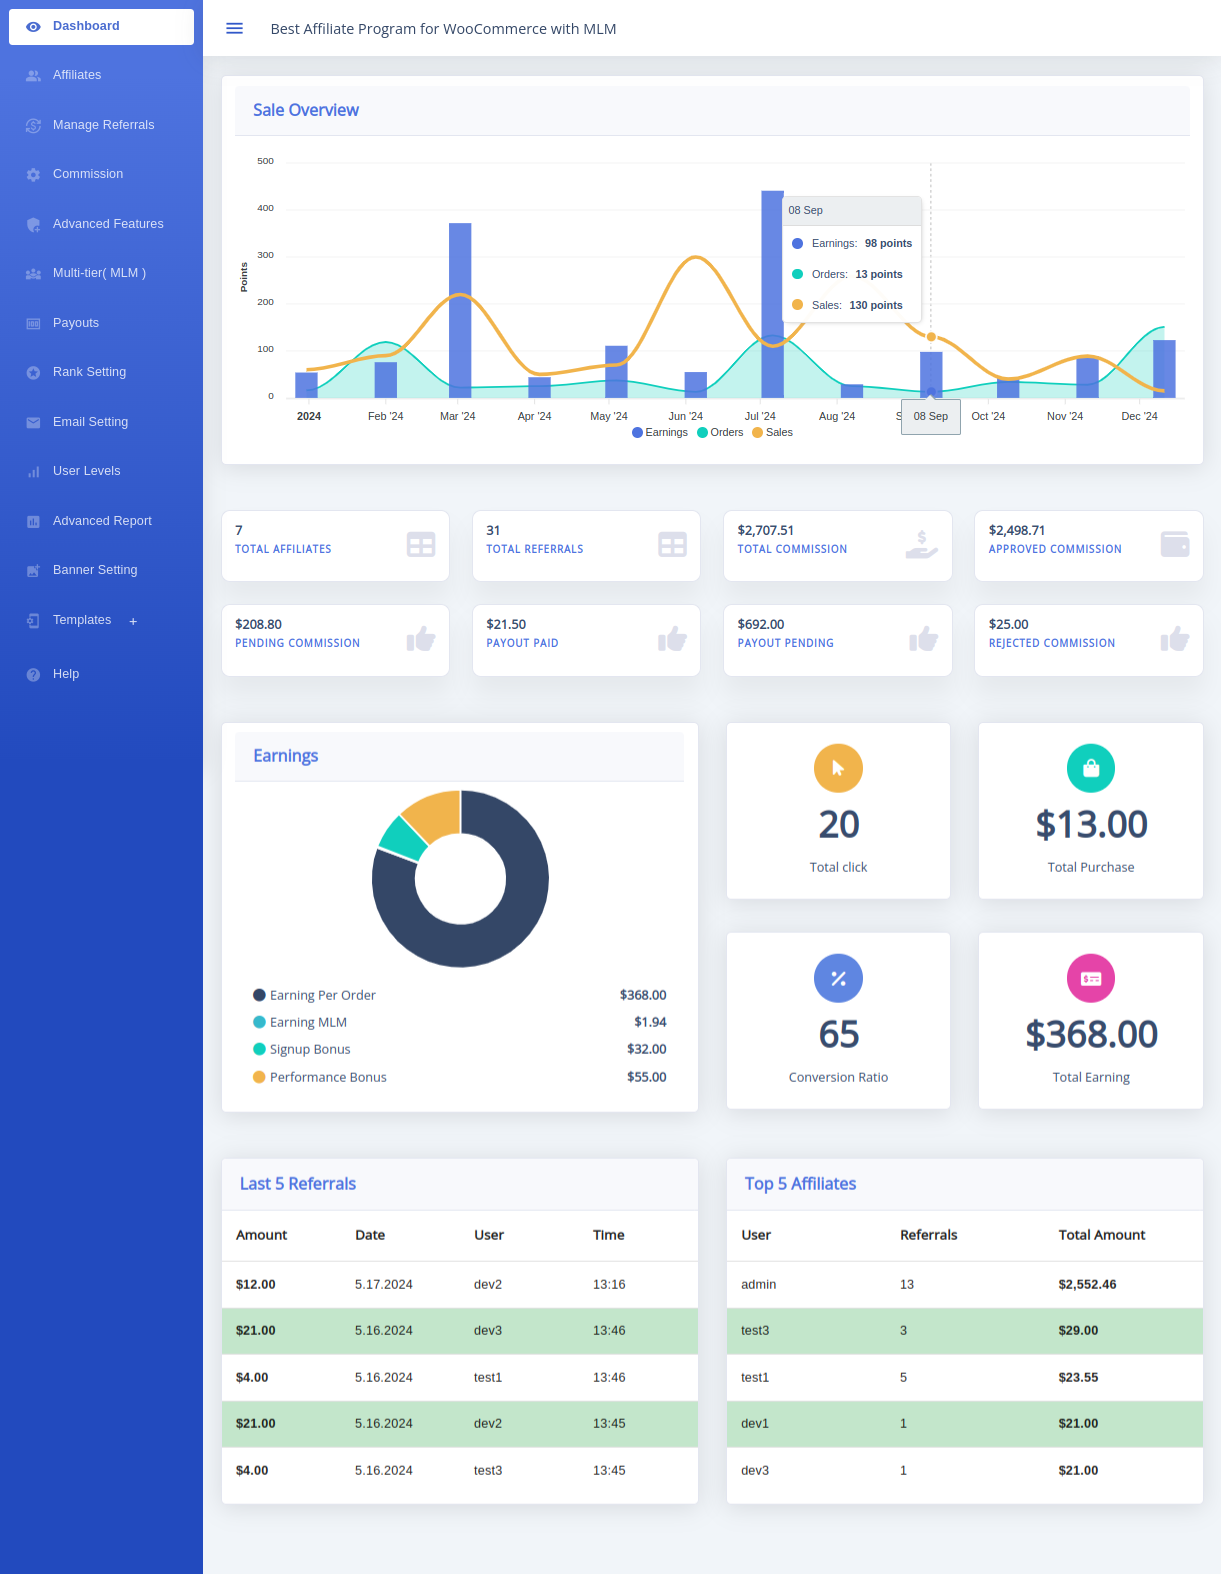
Affiliate dashboard overview showing referrals, commission, wallet amount, and sales reports
After setup, affiliates use their dashboard to view referrals, commissions, wallet balance, and reports.
Start simple

Complete one test referral before enabling advanced options such as MLM, bonuses, or payment integrations. It is the quickest way to confirm that your pages, links, and commission settings work together.

Expected Result

At the end of Getting Started, your store will have an active plugin, an affiliate page, a basic commission rule, and a clear path to test a referral.

Notes

The first configuration is intentionally minimal. Configure advanced commission rules, payouts, emails, and MLM only after the basic referral flow is working.

Tips

Keep a test affiliate account separate from your store administrator account so you can follow the affiliate experience exactly as users will see it.
Related Articles

Requirements

Minimum System Requirements

Check your WordPress site before installing the plugin. Meeting these requirements helps avoid activation and compatibility issues.

Overview

The plugin runs inside WordPress and WooCommerce. Confirm that your store and hosting meet the documented baseline before you upload the ZIP file.

Prerequisites

You need administrator access to WordPress and access to your hosting or a hosting provider who can confirm the server version.

Navigation Path

Step-by-step Configuration

  1. Check WordPress and WooCommerce. Use the latest stable, compatible versions available for your store.
  2. Check your PHP version. The existing documented baseline is PHP 7.4 or higher. Ask your host to update it if it is lower.
  3. Check your database version. Use MySQL 5.7 or a compatible MariaDB version.
  4. Back up your store. Take a database and file backup before installing or updating any plugin on a live store.
ComponentDocumented baselineWhy it matters
WordPressLatest stable version recommendedProvides the plugin framework and security fixes.
WooCommerceLatest compatible version recommendedSupplies products, orders, and customer accounts.
PHP7.4 or higherEnsures the server can run the plugin code.
DatabaseMySQL 5.7+ or compatible MariaDBStores referral, commission, and configuration data.

Expected Result

Your site is ready for plugin installation, and you have a recent backup in case you need to restore the store.

Notes

Server requirements can change with a future plugin release. Confirm the release notes supplied with your downloaded plugin before updating a production store.

Tips

Record your current WordPress, WooCommerce, PHP, and database versions before contacting support. This makes compatibility questions much faster to resolve.

Related Articles

Recommendation

Update WordPress, WooCommerce, and the plugin in a staging site first whenever possible. This protects your live store while you check compatibility.

Installation

Install Affiliate Plugin for WooCommerce

Upload the plugin ZIP file from your purchase download. Activation is covered in the next article.

Overview

Install the ZIP file through the standard WordPress Plugins screen. Do not unpack the plugin folder before uploading it unless your hosting workflow specifically requires it.

Prerequisites

  • You have completed the requirements check.
  • You have downloaded the plugin ZIP file from your purchase account.
  • You have a current backup of your WordPress site.

Navigation Path

Step-by-step Configuration

  1. Open Add New Plugin. In the WordPress admin menu, select Plugins → Add New.
  2. Select Upload Plugin. Choose the upload option at the top of the screen.
  3. Choose the ZIP file. Select the Affiliate Plugin for WooCommerce ZIP file you downloaded.
  4. Install the plugin. Select Install Now and wait until WordPress confirms that installation has completed.
Installation screenshot

An installation-screen capture is not included in the supplied asset library. This article intentionally does not substitute an unrelated screenshot; add a verified Plugins → Upload Plugin capture before publishing the final offline bundle.

Expected Result

WordPress displays a successful installation message and offers an Activate Plugin button.

Notes

Installation only copies the plugin files. The plugin is not available to configure until you complete the activation step.

Tips

If WordPress reports that the destination folder already exists, do not overwrite files blindly. Confirm whether an earlier version is already installed, then use your normal update process.

Related Articles

Activation

Activate the Plugin

Activation makes the affiliate settings available in your WordPress administration area.

Overview

Activate the plugin immediately after installation. You can activate it from the completion screen or from the Plugins list.

Prerequisites

The plugin installation must have completed successfully.

Navigation Path

Step-by-step Configuration

  1. Select Activate Plugin. If you are on the installation completion screen, select Activate Plugin.
  2. Confirm the plugin is active. From Plugins → Installed Plugins, find Affiliate Plugin for WooCommerce and confirm that the action is now Deactivate.
  3. Open the plugin settings. Go to WooCommerce → Affiliate and Referral to begin configuration.
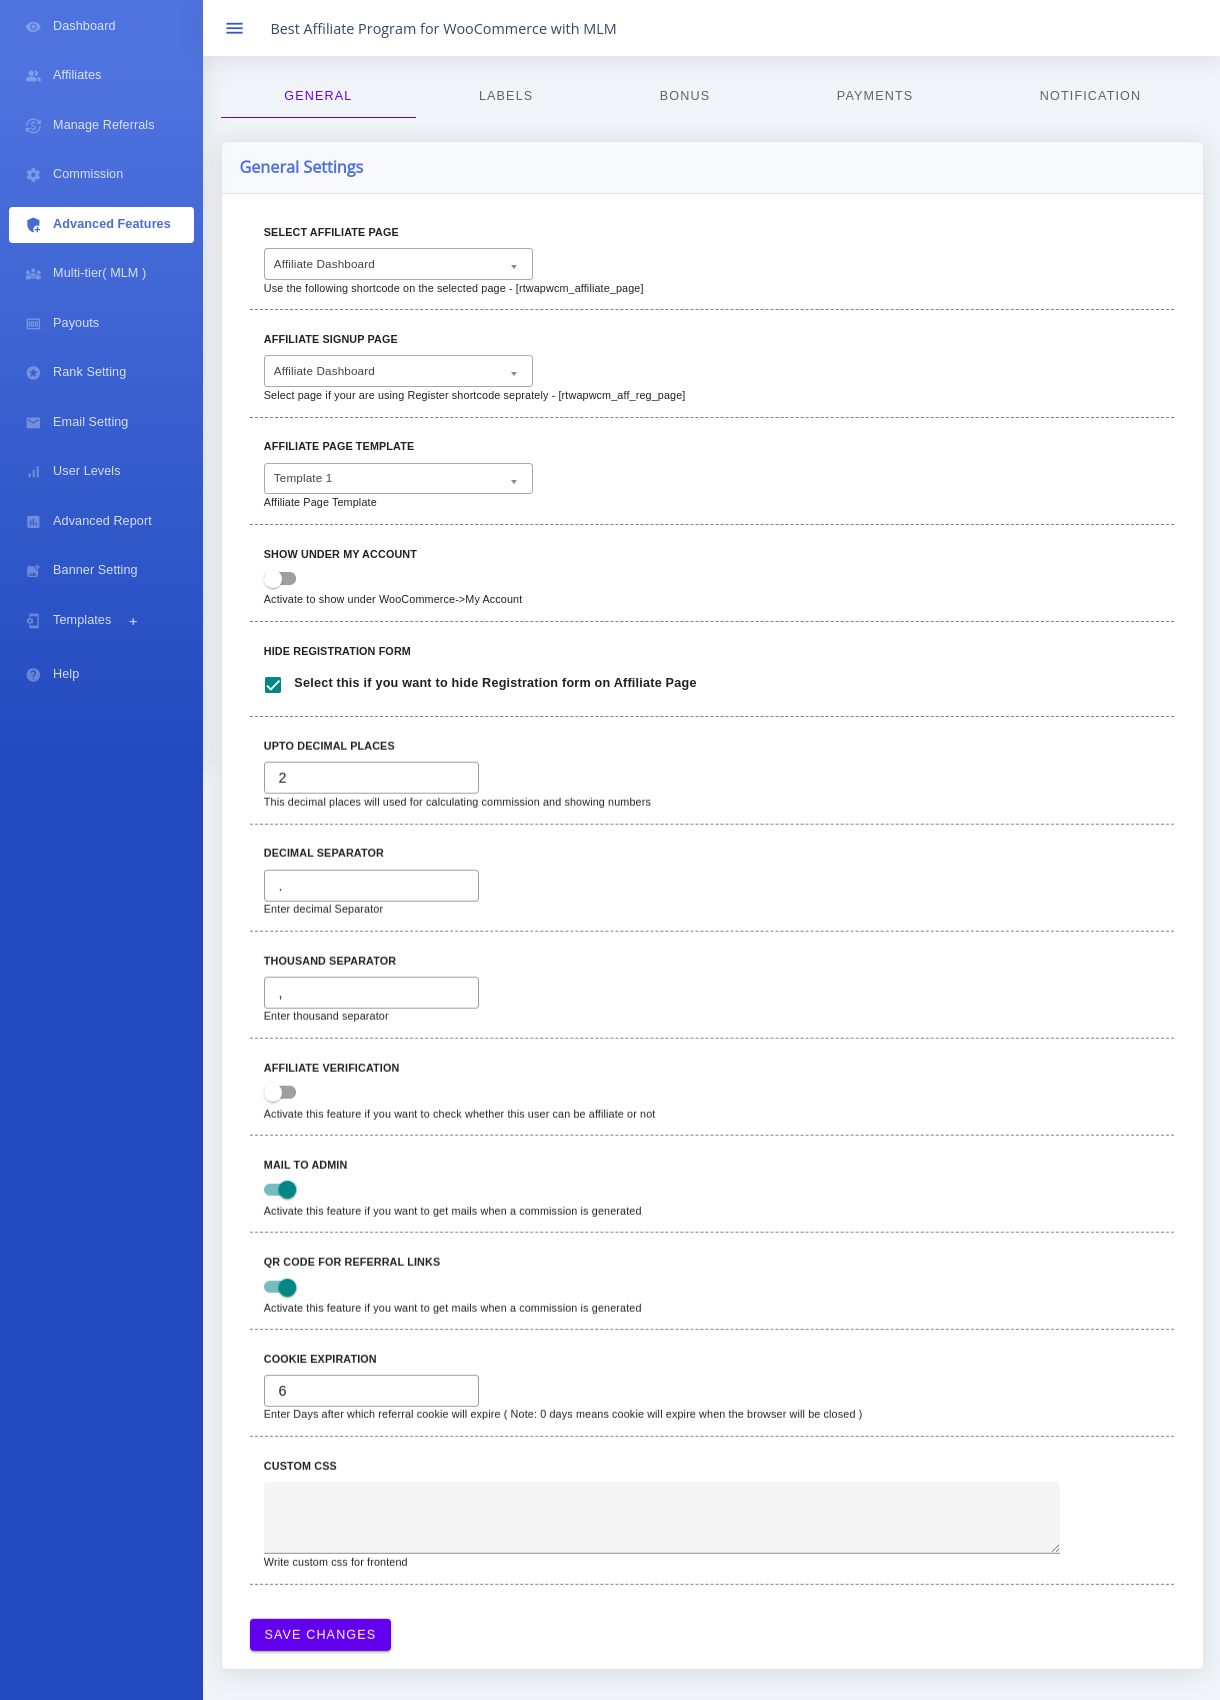
Affiliate Plugin for WooCommerce Advanced Features General settings page available after plugin activation
After activation, the Affiliate and Referral settings are available from the WooCommerce administration area.

Expected Result

You can open WooCommerce → Affiliate and Referral and see the plugin’s administration screens.

Notes

If the settings menu is not available, return to Plugins → Installed Plugins and confirm that both WooCommerce and Affiliate Plugin for WooCommerce are active.

Tips

After activation, open the settings once before continuing. This confirms that your administrator account can access the plugin configuration screens.

Related Articles

Setup Wizard

Initial Setup Wizard

The plugin does not use a separate guided setup wizard. Complete the first configuration steps in this guide instead.

Overview

Instead of a wizard, use the Getting Started articles as a safe configuration sequence. They set up only the essentials required for your first referral test.

Prerequisites

  • The plugin has been installed and activated.
  • You are signed in as a WordPress administrator.

Navigation Path

Step-by-step Configuration

  1. Complete Plugin Requirements and Installation.
  2. Complete Activation and confirm the Affiliate and Referral menu is available.
  3. Complete First Configuration to select your pages and save a starting commission.
  4. Complete Quick Start to test one referral from link generation through approval.

Expected Result

You have followed the same ordered setup outcome a wizard would provide, while keeping control over each setting.

Advanced Features General screen used during the first manual setup sequence
The General screen is the first configuration location after activation.

Notes

This setup sequence replaces a wizard; the plugin does not show a separate guided onboarding screen.

Tip

Do not enable advanced features until the basic referral test succeeds. This makes it easier to identify which setting needs attention if a referral is not recorded.

Related Articles

Quick Setup

First Configuration

Configure the pages and basic commission settings required for a first referral test. Leave advanced features disabled until this foundation works.

Overview

Your first configuration has two goals: give affiliates a place to access their dashboard, and define a simple commission rule that can be tested safely.

Prerequisites

  • The plugin is active.
  • You have one published WordPress page available for the affiliate dashboard.
  • You know the starting commission type and amount you want to test.

Navigation Path

Step-by-step Configuration

  1. Select the affiliate page. In Advanced Features → General, choose the page that will display the affiliate dashboard. The screen shows the shortcode required for the selected page.
  2. Select the affiliate signup page. Choose the page used for affiliate registration when you use a separate signup page.
  3. Decide whether to show the dashboard in My Account. Enable Show Under My Account if affiliates should find their dashboard in their WooCommerce account.
  4. Set a cookie duration. Set the number of days a referral cookie should remain active, then save your changes.
  5. Set a starting commission. Open the Commission tab and set a simple percentage or fixed commission for all products. Save the change.
Advanced Features General settings showing affiliate page, signup page, My Account option, and cookie expiration fields
Select the affiliate and signup pages, then review the My Account and cookie settings before saving.
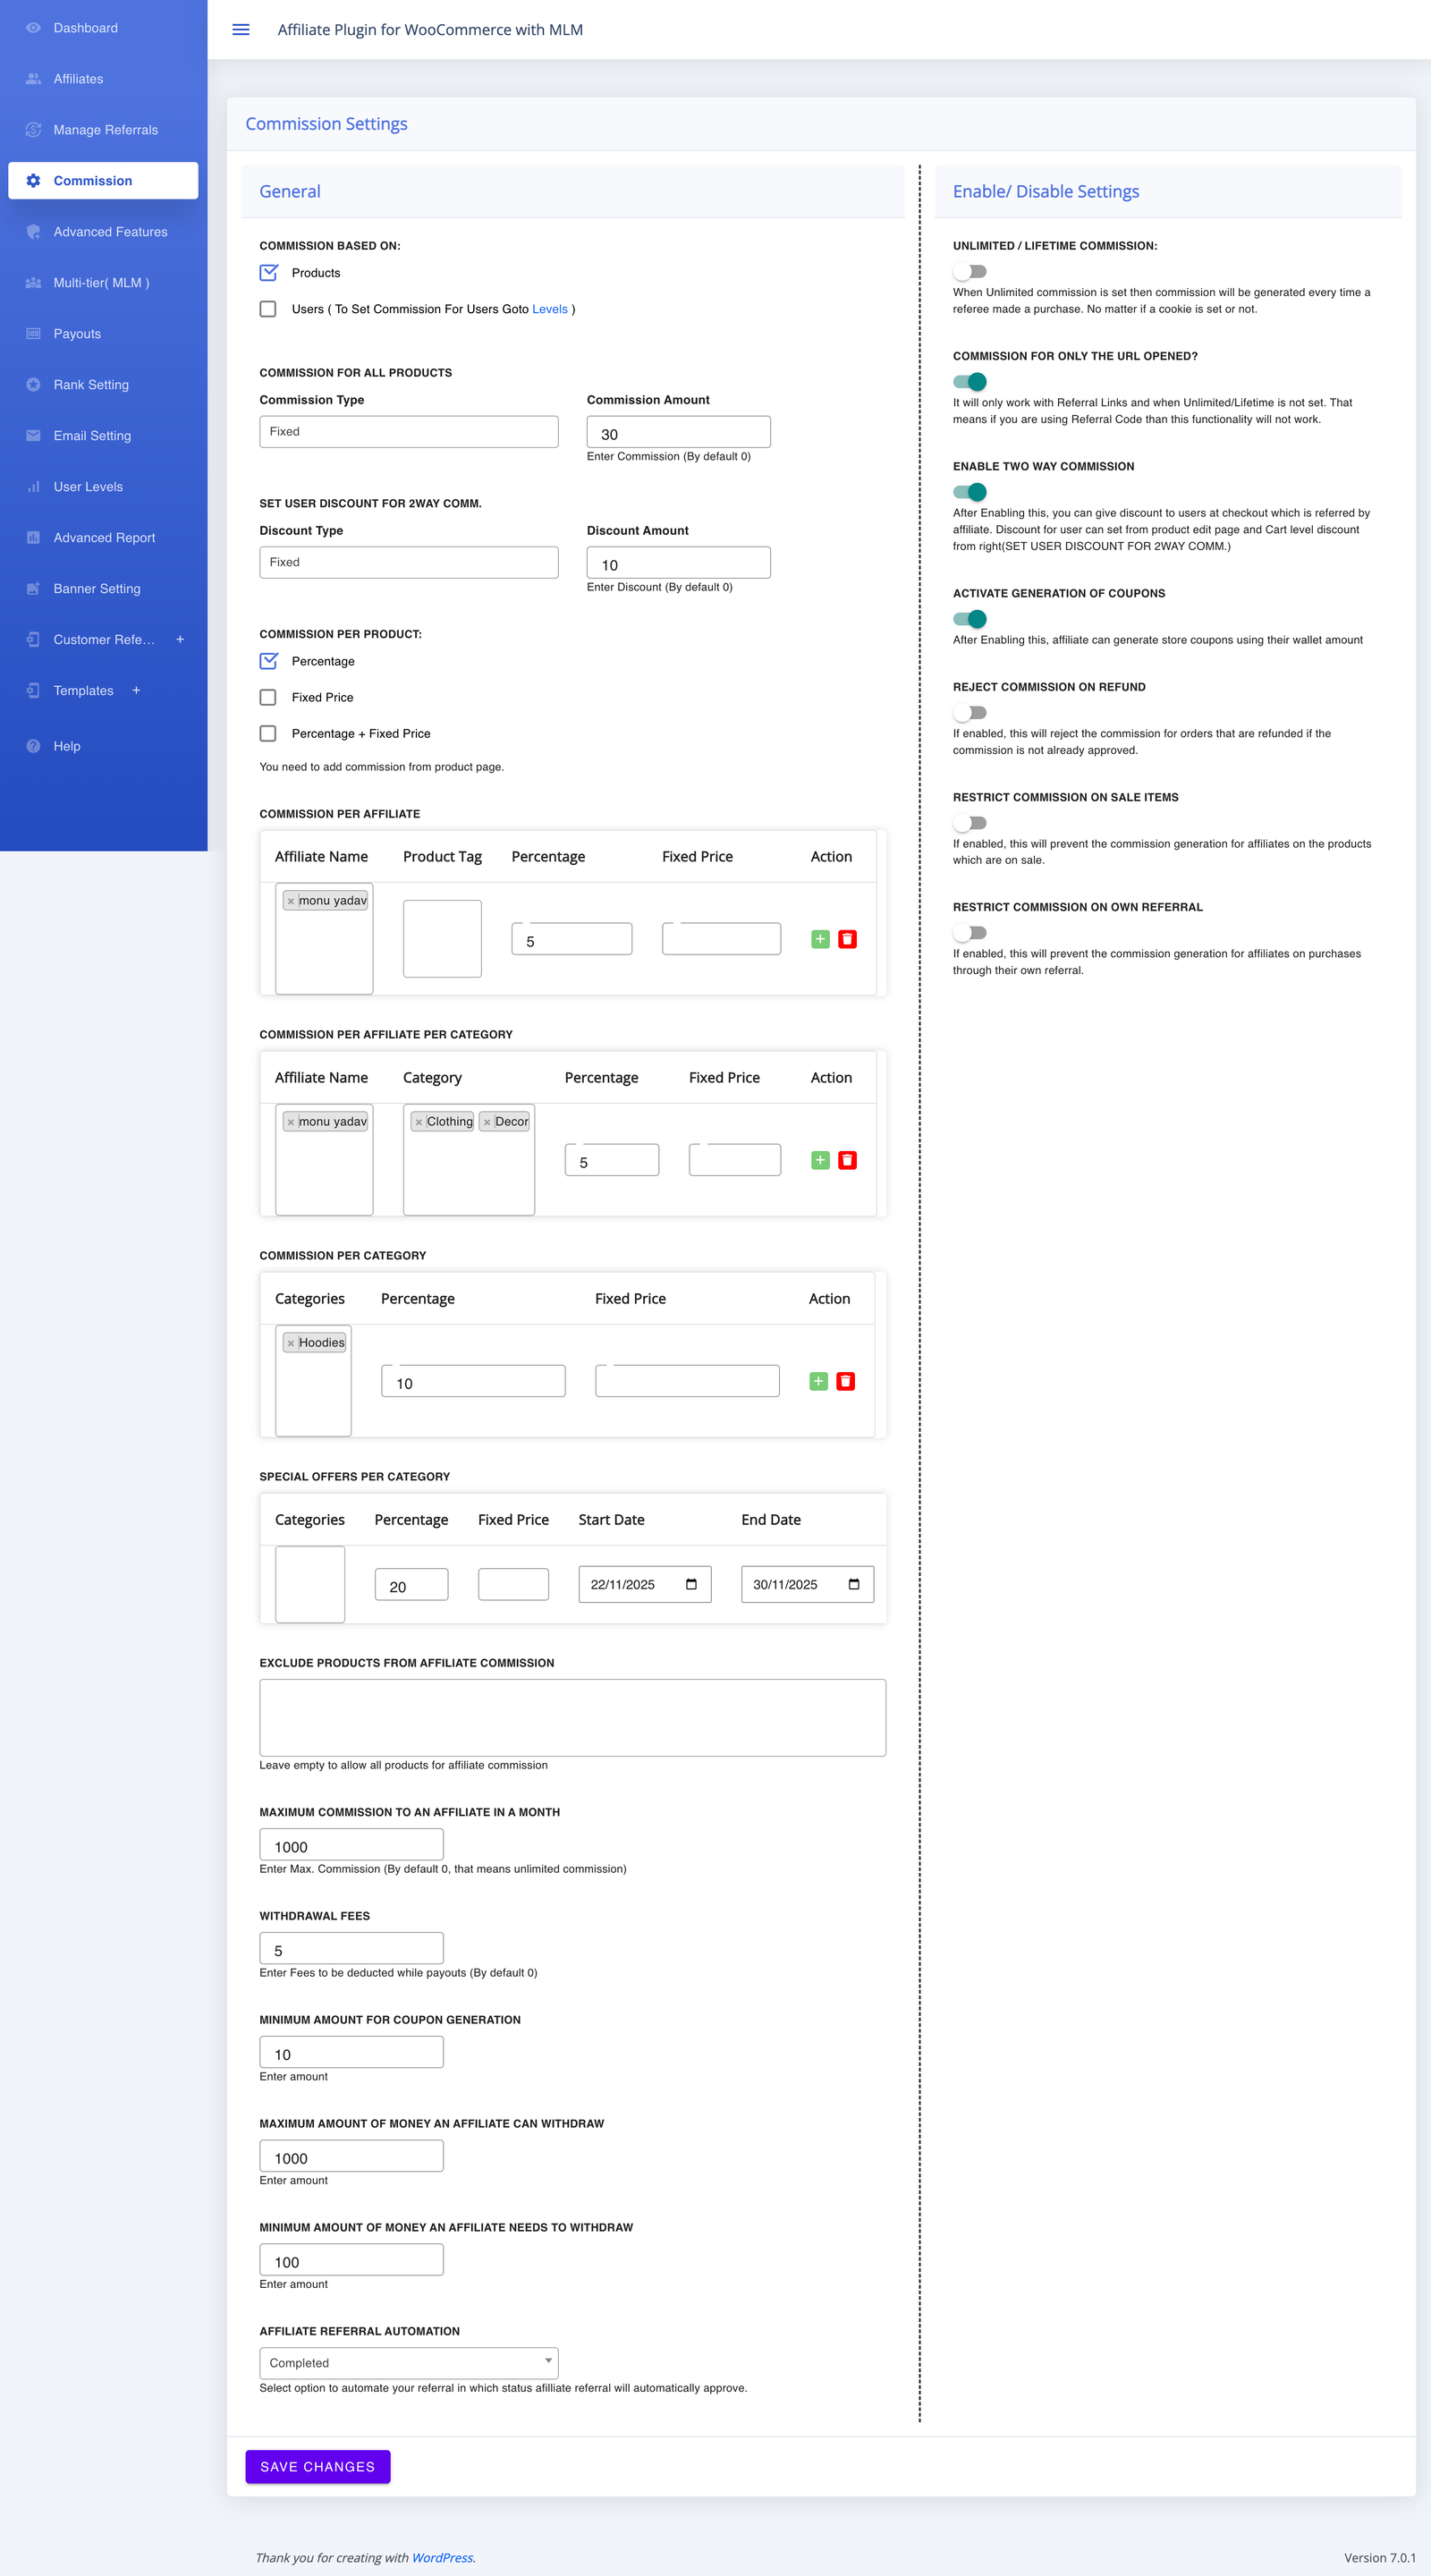
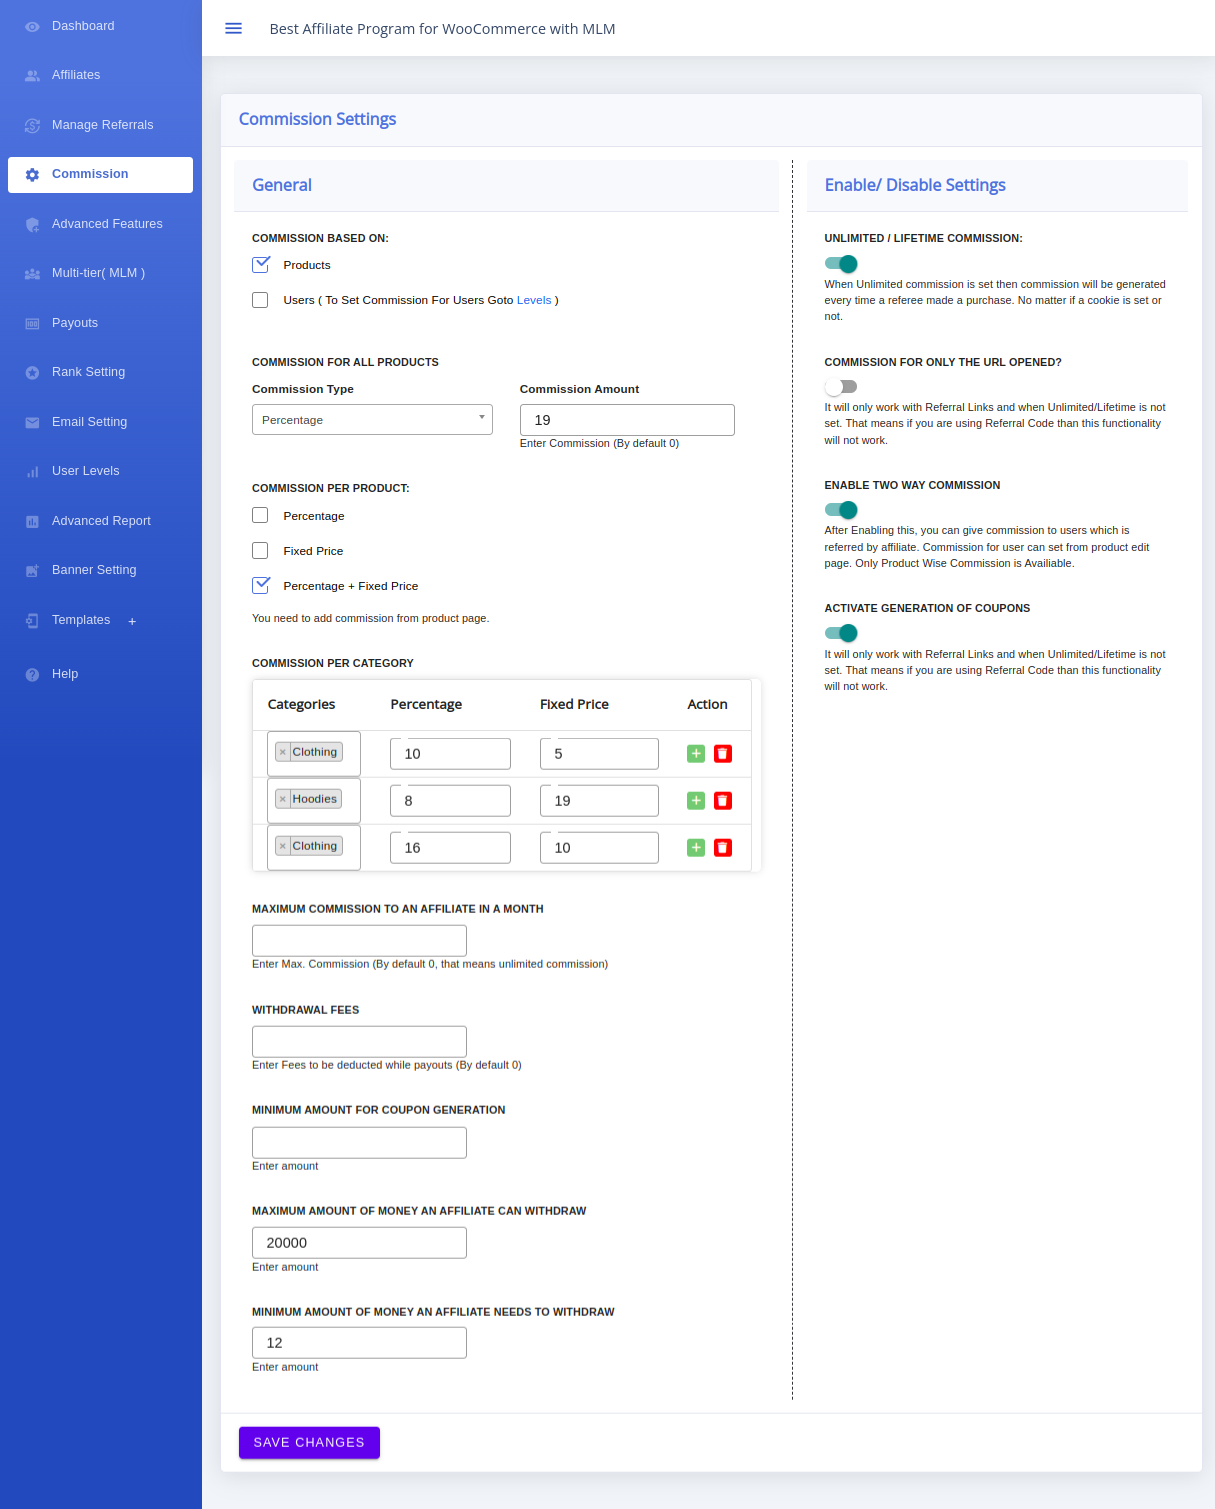
Commission Settings page showing commission for all products and related affiliate commission options
Set a simple starting commission for all products before testing your first referral.

Expected Result

An affiliate can access the selected dashboard page, and a qualifying test purchase can create a referral using your saved commission rule.

Notes

Affiliate verification, QR codes, coupon generation, payment methods, bonuses, and MLM are optional. Configure them after your first referral test is successful.

Tips

Use a modest commission value and a short test flow first. You can refine product, category, level, recurring, or lifetime commission rules later.

Related Articles

Quick Start

Run Your First Affiliate Referral Test

Follow this short checklist after your first configuration. It confirms that a link can be generated, a purchase can be tracked, and a referral can be reviewed.

Overview

Use a test account and a small test order to verify your initial configuration before you invite real affiliates.

Prerequisites

  • The plugin is active and your first commission rule is saved.
  • An affiliate dashboard page is selected in Advanced Features → General.
  • You can place a WooCommerce test order.

Navigation Path

Step-by-step Configuration

  1. Open the affiliate dashboard. Sign in as an affiliate or use a test affiliate account.
  2. Generate a referral link. Enter a product URL in Affiliate Tool, then select Generate Link.
  3. Open the generated link in a private browser window. Add the linked product to the cart and complete a test order.
  4. Review the referral. Return to WordPress Admin → WooCommerce → Affiliate and Referral → Referral and review the new record.
  5. Approve or reject the referral. Approve a valid test referral to confirm that the commission is recorded correctly.
Affiliate Tool screen used to enter a product URL and generate a referral link
Generate a referral link from the Affiliate Tool before testing a purchase.

Expected Result

A referral record appears for the test order. After approval, the affiliate can see the associated commission in their dashboard.

Notes

Do not use a real customer order for this first test. A low-value test product or a staging site makes it easier to review and reverse the result.

Tip: use a private browser window

This reduces the chance that an earlier login or referral cookie affects your test.

Related Articles

Affiliate Program

Affiliate Program Overview

Set up a clear referral journey: an affiliate shares a link, a customer purchases, and an administrator reviews the resulting referral.

Overview

The affiliate program connects WooCommerce orders to the affiliate who referred the customer. A commission is created from your saved rules and is reviewed in the Referral area.

Purpose

Use this workflow to reward affiliates for valid referrals while retaining administrator control over approval.

Prerequisites

  • The plugin is active.
  • WooCommerce has at least one product available for a test purchase.
  • You can access WooCommerce → Affiliate and Referral.

Navigation Path

Step-by-step Configuration

  1. Configure an affiliate dashboard and registration page.
  2. Set a starting commission rule from the Commission tab.
  3. Approve or manage affiliates from the Affiliates screen.
  4. Ask an affiliate to generate a referral link and share it.
  5. Review the recorded referral from Manage Referrals and approve or reject it.

Expected Result

You have an end-to-end affiliate workflow with a defined administrator review point before commission is finalised.

Notes

The administrator setup and affiliate dashboard are separate experiences. Affiliates do not need WordPress administrator access to generate their links or view their activity.

Tips

Complete one test referral before inviting affiliates so you can validate your selected pages, cookie duration, and commission rule.

Related Articles

Previous: Quick StartNext: Pages & Registration
Registration

Configure Affiliate Pages and Registration

Assign the pages used for the affiliate dashboard and registration, then choose the template that fits your store.

Overview

Affiliate pages provide the front-end location where a user can become an affiliate and access the Affiliate Dashboard.

Purpose

Assigning the correct pages ensures that affiliates have a predictable place to register and manage their referral activity.

Prerequisites

  • The plugin is active.
  • You have created or selected published WordPress pages for the dashboard and, if required, registration.

Navigation Path

Step-by-step Configuration

  1. Select the page in Select Affiliate Page. The screen displays the affiliate-page shortcode for that page.
  2. Select the page in Affiliate Signup Page when you use registration separately.
  3. Choose an Affiliate Page Template.
  4. Optionally enable Show Under My Account to show the affiliate area in WooCommerce My Account.
  5. Save the changes.
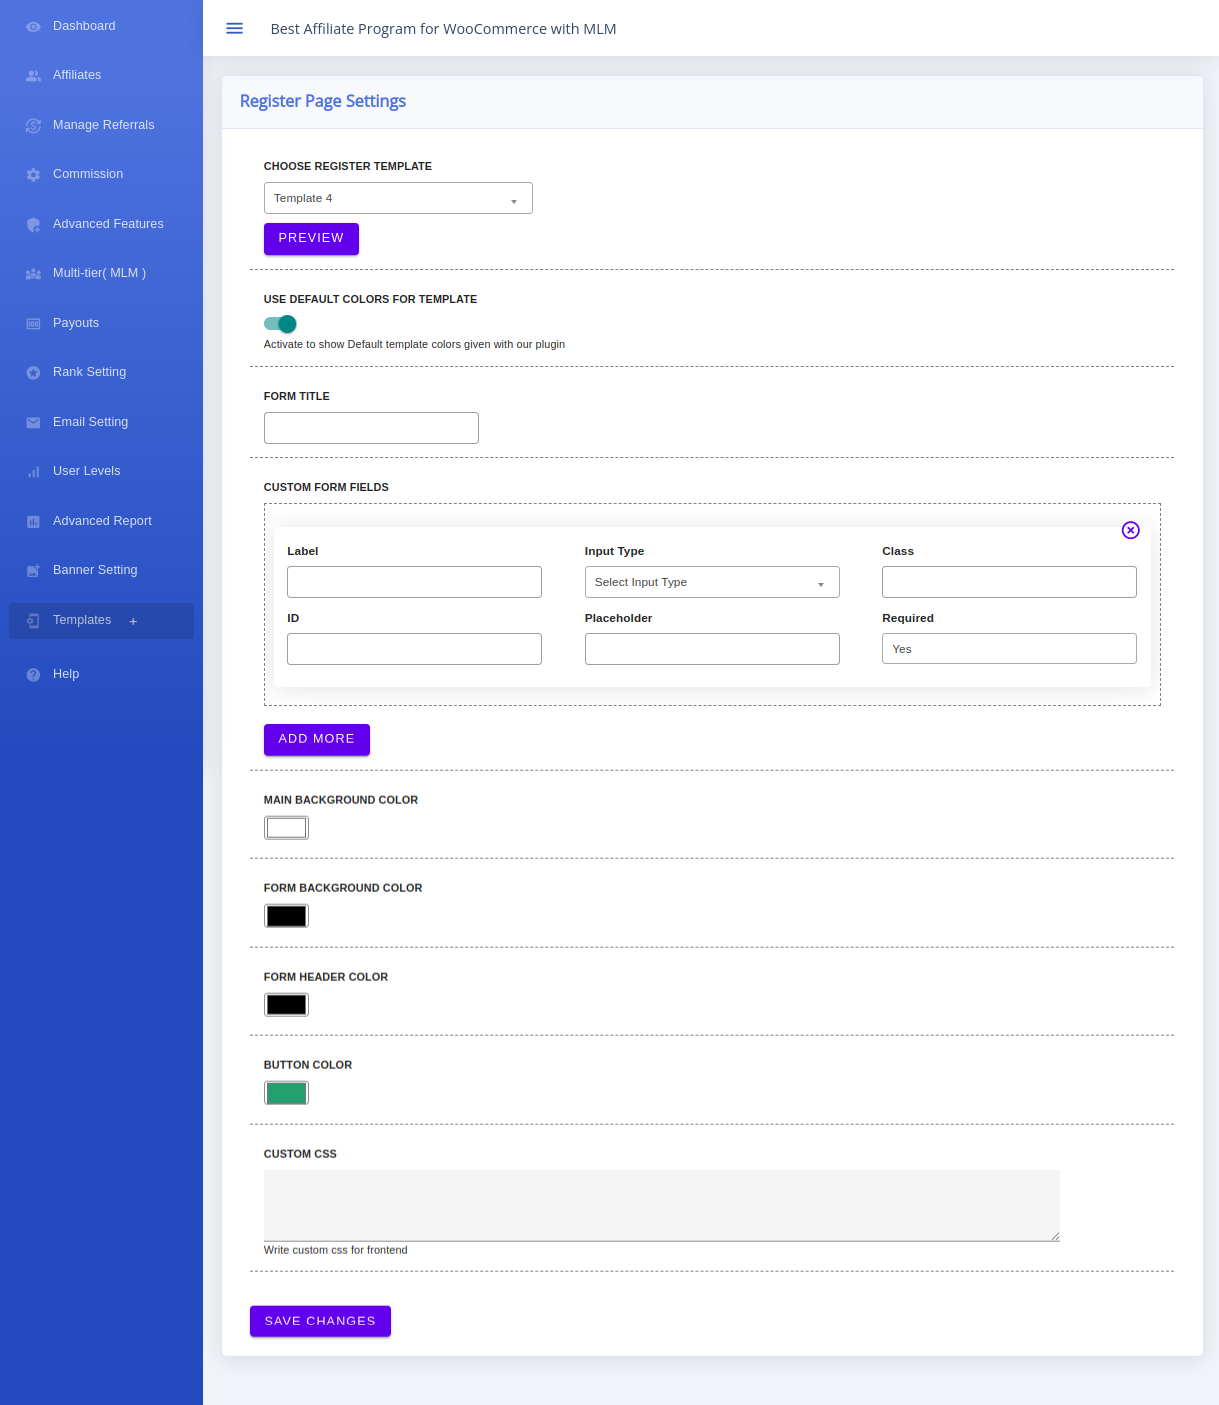
Affiliate registration template settings in the WordPress administration area
Choose and configure the registration template after assigning the relevant pages.

Expected Result

The selected pages are ready to show the affiliate registration and dashboard experience.

Notes

The supplied source confirms affiliate verification can be enabled or disabled. It does not establish that every customer automatically becomes an affiliate, so this guide does not make that claim.

Tips

Open the selected pages in a private browser window before sharing them with affiliates.

Related Articles

Previous: Program OverviewNext: Manage Affiliates
Affiliate Management

Affiliate Approval and Management

Review affiliates from the administration screen, inspect their records, and approve marked affiliates when appropriate.

Overview

The Affiliates screen lists affiliate accounts and their referral-related information.

Purpose

Use this screen to review affiliates and keep your program membership accurate.

Prerequisites

At least one user has become or been added as an affiliate.

Navigation Path

Step-by-step Configuration

  1. Open the Affiliates screen.
  2. Use the list and search field to locate an affiliate.
  3. Select the eye icon to inspect an affiliate record, or expand the row where available.
  4. To approve multiple selected affiliates, use Approve All Marked Affiliates.
  5. Use the available record actions to update or remove an affiliate only after reviewing the effect on their program access.
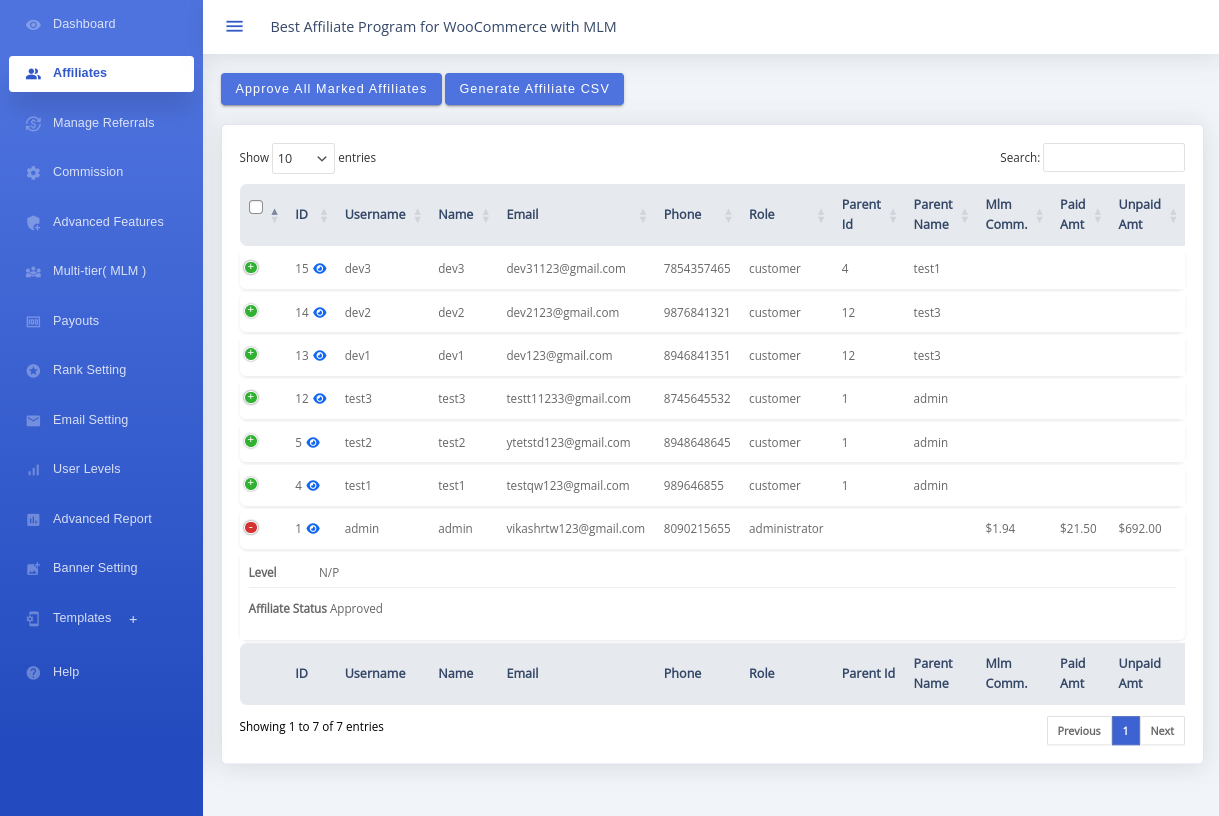
Affiliates administration screen with search, affiliate records, and Approve All Marked Affiliates button
Review affiliate records and use Approve All Marked Affiliates only for selected accounts.

Expected Result

You can find an affiliate record, inspect its displayed information, and approve marked affiliates from the administration interface.

Notes

The source documentation confirms view, edit/delete, add-new, and bulk approval capabilities. Activation/deactivation is documented for members in an affiliate chain from the user-edit context; it is not presented here as a universal list action.

Tips

Use the CSV generation option as an administrative record export when you need an offline review of the affiliate list.

Related Articles

Previous: Pages & RegistrationNext: Manage Referrals
Referral Management

Manage Referrals and Approve or Reject Commissions

Review recorded referrals after a customer completes a purchase through an affiliate referral link.

Overview

A referral is recorded when the affiliate referral flow leads to a purchase. The administrator reviews each referral from the Referral tab.

Purpose

Approval gives you a controlled step before a commission is accepted for a valid referral.

Prerequisites

  • An affiliate has shared a generated referral link.
  • A customer has placed an order using that link.
  • A commission rule is configured.

Navigation Path

Step-by-step Configuration

  1. Ask the affiliate to generate and share a referral link.
  2. Complete a test or customer purchase through that link.
  3. Open the Referral tab and locate the new referral record.
  4. Review the affiliate, order/reference ID, earned amount, and status.
  5. Select Approve for a valid referral or Reject when it does not meet your criteria. Bulk approve/reject actions are available for marked referrals.
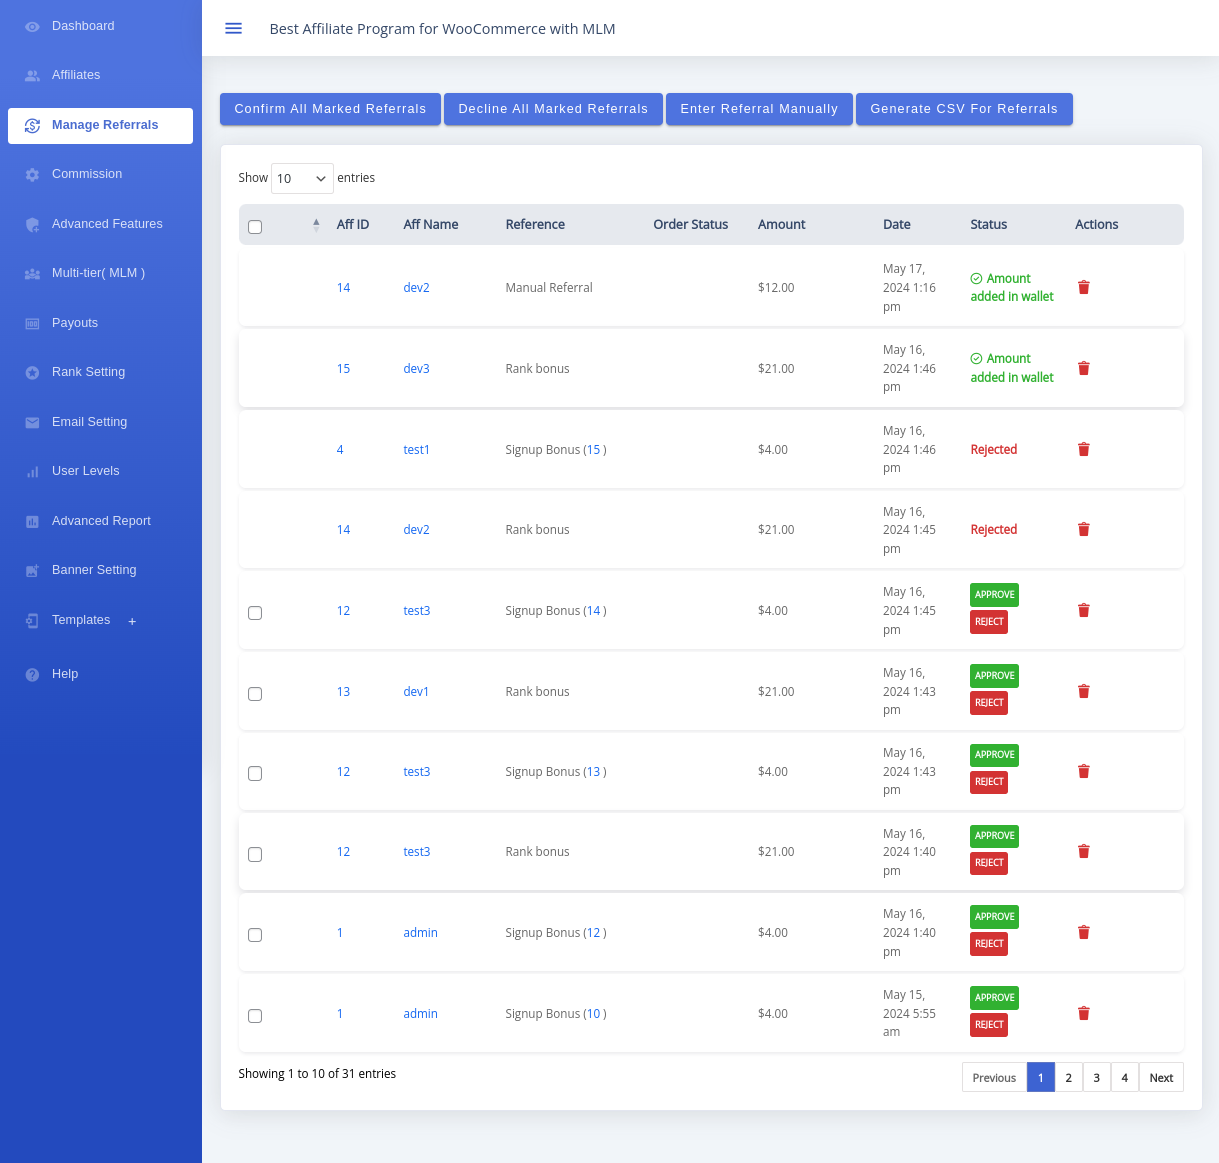
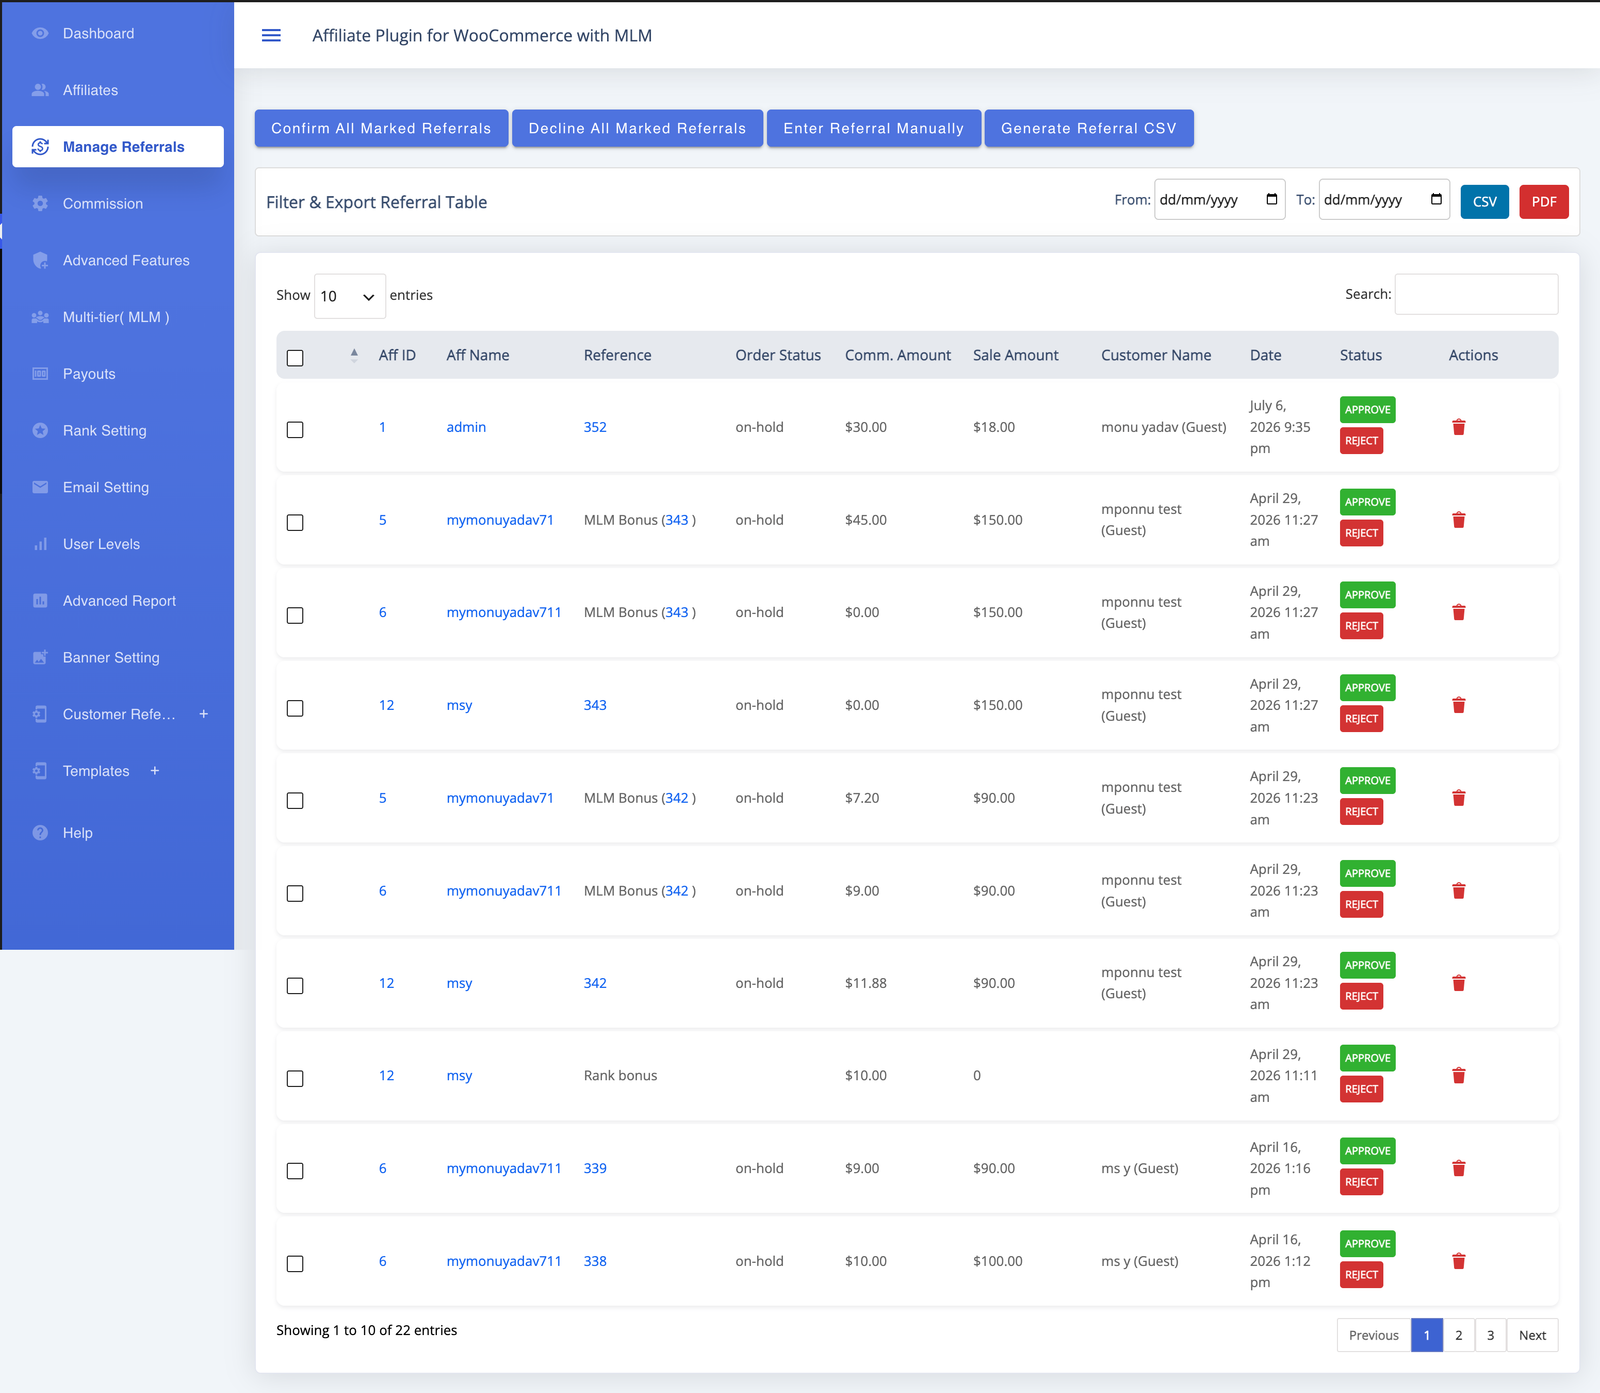
Manage Referrals screen showing referral records, statuses, and approve or reject actions
Review the referral record before selecting Approve or Reject.

Expected Result

The referral record reflects the administrator decision and the commission is updated according to that decision.

Notes

The source documentation confirms that an administrator can approve or decline referrals and enter a rejection reason when declining. Record a clear reason so the affiliate can understand the outcome.

Warnings

Review before approving

Confirm the order and referral details before approval. Commission and payout handling are covered later in the Wallet and Payouts documentation.

Related Articles

Previous: Manage AffiliatesNext: Affiliate Dashboard
Affiliate Dashboard

Affiliate Dashboard Overview

Help affiliates understand the information and tools available in their front-end dashboard.

Overview

The Affiliate Dashboard is the affiliate-facing area for viewing activity and accessing tools. Administrators configure it; affiliates use it without WordPress administration access.

Purpose

Use the dashboard to review referral totals, commission totals, pending commission, wallet amount, and reports.

Prerequisites

You must be signed in to an affiliate account and the administrator must have assigned the affiliate page.

Navigation Path

Step-by-step Configuration

  1. Sign in to your affiliate account.
  2. Open the Affiliate Dashboard page.
  3. Review the Overview tab totals and sales report.
  4. Use the Commission Table, Referral Table, Affiliate Tools, Payout, Profile, and Banner areas as enabled by the administrator.
Affiliate dashboard Overview tab showing referral, commission, wallet, and sales report information
The Overview tab presents referral totals, commission totals, wallet amount, and reports.

Expected Result

You can locate your program activity and open the available tools from the affiliate dashboard.

Notes

Dashboard labels can be customised by the administrator. The exact labels may therefore differ from the examples in this guide.

Tips

Start with Overview, then use Affiliate Tools to create a link for a specific product or page.

Related Articles

Previous: Manage ReferralsNext: Referral Links
QR Code

QR Code Sharing

Enable QR codes in Advanced Features before affiliates create, download, and share a QR code for a generated referral link.

Overview

QR codes turn a generated referral link into a scannable code for offline or mobile sharing.

Purpose

Enable affiliates to share their referral link in printed materials or channels where a QR code is more convenient than a long URL.

Prerequisites

An administrator must enable QR codes before an affiliate can generate one.

Navigation Path

Step-by-step Configuration

  1. Administrator: In Advanced Features → General, enable QR Code for Referral Links and save changes.
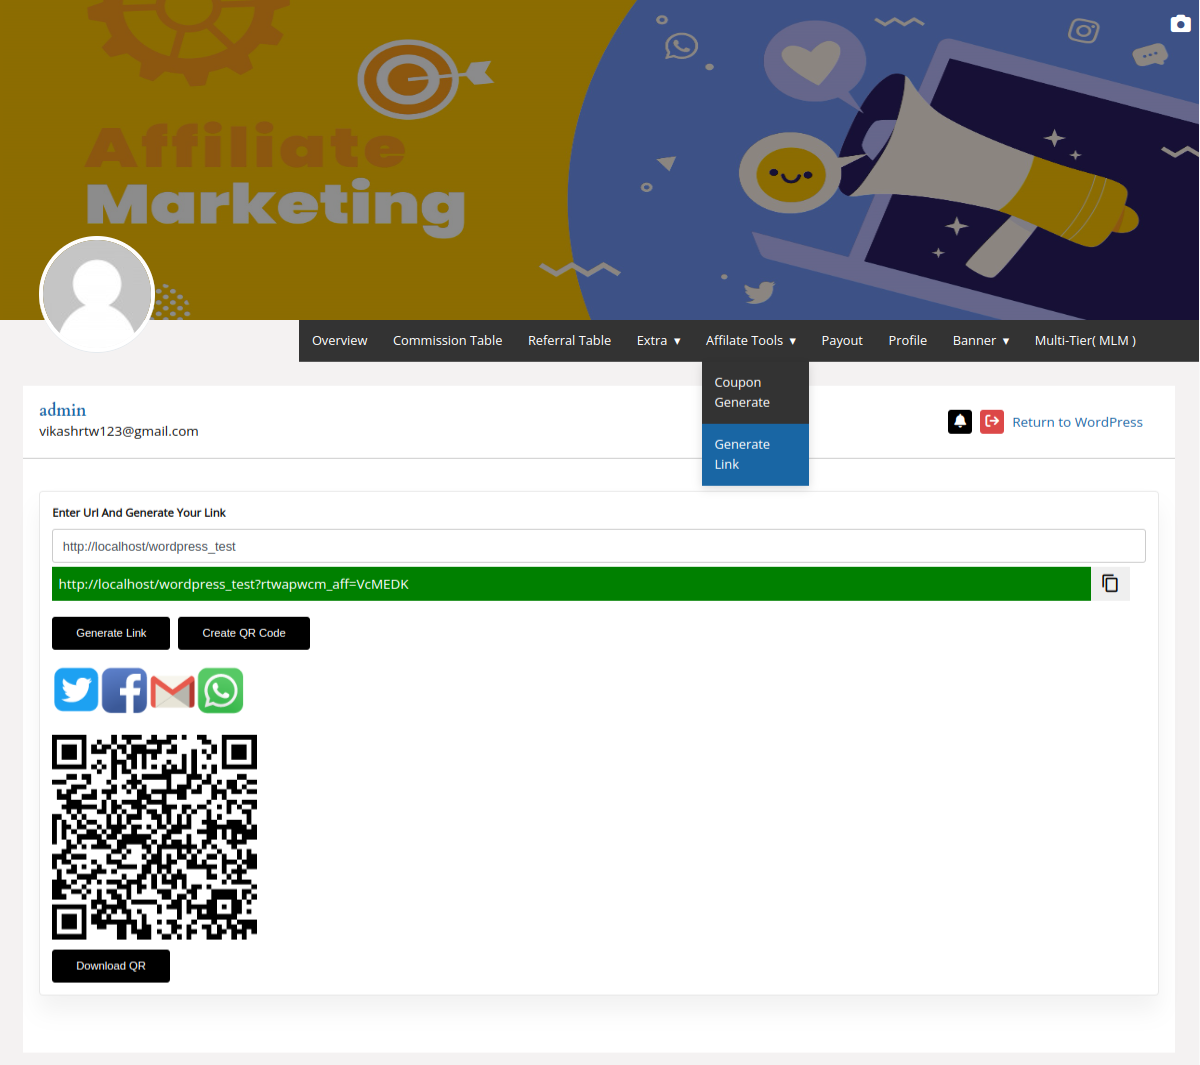
  2. Affiliate: Open Affiliate Tools and generate a referral link.
  3. Select Create QR Code next to the generated link.
  4. Use Download QR to save the code, then share it with customers.
Affiliate Tools screen showing Generate Link, Create QR Code, QR code preview, and Download QR button
Generate a link first, then create and download the QR code from Affiliate Tools.

Expected Result

The affiliate can download a QR code that sends customers to the generated referral link.

Notes

The QR option is enabled from Advanced Features → General, not from the affiliate dashboard.

Tips

Scan the downloaded code with a phone before printing or sharing it, then confirm that it opens the intended product or page.

Related Articles

Previous: Referral LinksNext: Referral Coupons
Referral Coupons

Referral Coupons

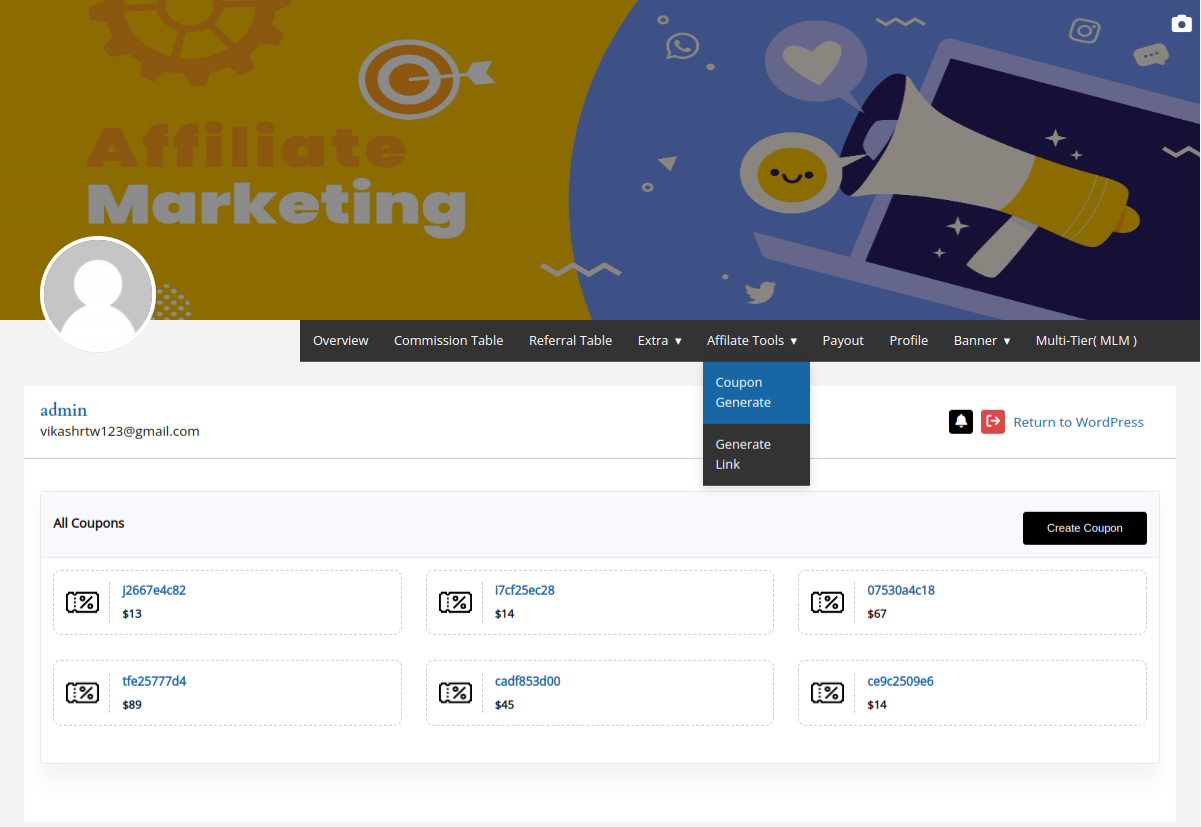
Affiliate Tools includes a Coupon Generate option when coupon generation is enabled in the commission settings.

Overview

Affiliates can generate coupons from their earnings when the administrator enables coupon generation.

Purpose

Use a generated coupon for eligible WooCommerce purchases according to the store’s configuration.

Prerequisites

  • The administrator has enabled Activate Generation of Coupons in Commission settings.
  • Your available earnings meet the configured minimum amount for coupon generation.

Navigation Path

Step-by-step Configuration

  1. Open Affiliate Tools.
  2. Select Coupon Generate.
  3. Follow the available coupon-generation controls and review the generated coupon before using it at checkout.
Affiliate Tools menu showing Coupon Generate and Generate Link options
Coupon Generate is available from Affiliate Tools when enabled by the administrator.

Expected Result

A coupon is generated only when the administrator’s coupon rules and the affiliate’s available earnings allow it.

Notes

Coupon generation is an affiliate feature verified in the source documentation. Coupon configuration and administrator-side processing are documented later with Commission and Wallet settings.

Tips

If Coupon Generate is unavailable, ask the administrator to confirm the commission setting and minimum coupon amount.

Related Articles

Previous: QR CodesNext: Records
Affiliate Records

Affiliate Commission and Referral Records

Use the affiliate-facing tables to understand referrals and the commission rules that apply to them.

Overview

Commission Table and Referral Table provide the affiliate’s view of commission information and referral activity.

Purpose

Use these records to understand which referrals were recorded and the commissions associated with the store’s configured rules.

Prerequisites

You are signed in as an affiliate and at least one referral or commission record exists.

Navigation Path

Step-by-step Configuration

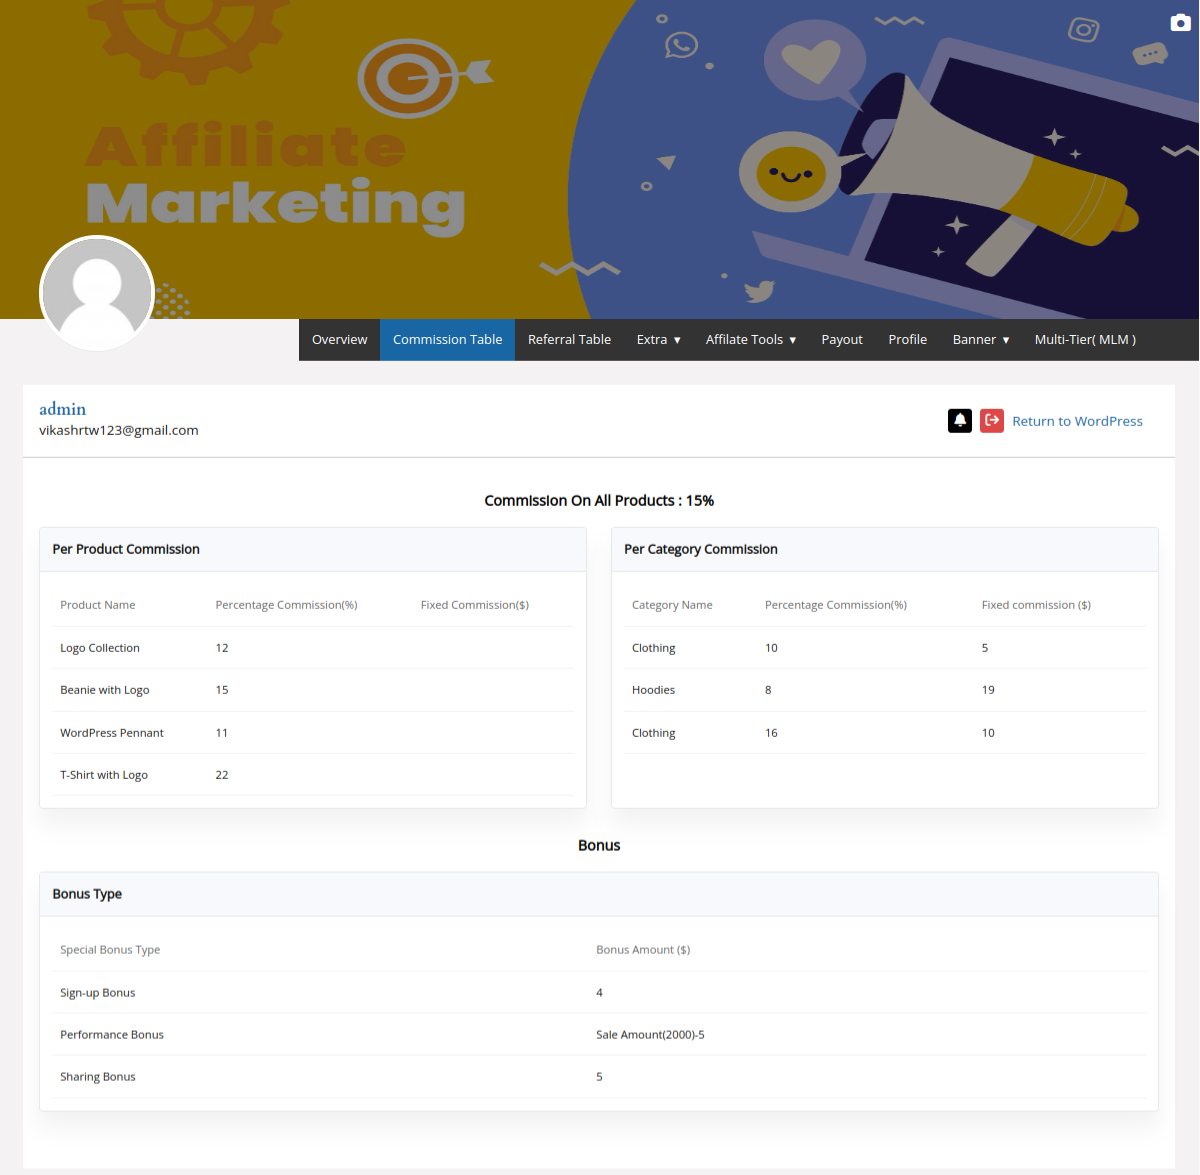
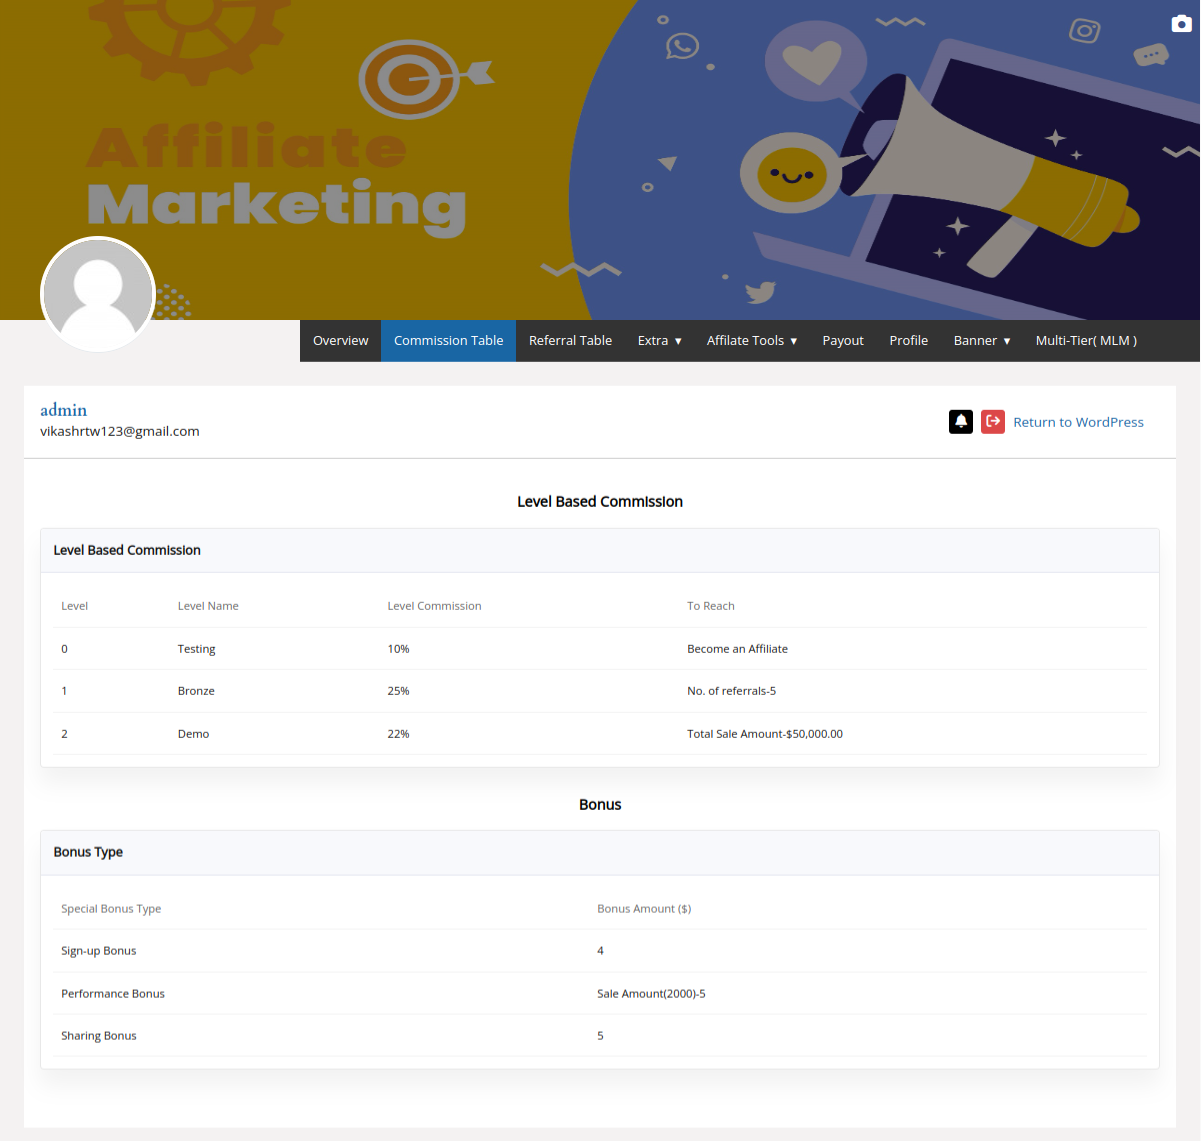
  1. Open Commission Table to review product, category, dynamic/conditional, and commission-type information where configured.
  2. Open Referral Table to review referrals recorded for your account.
  3. Use the displayed status and any rejection information to understand whether a referral was approved.
Affiliate Commission Table displaying commission information
Use the Commission Table to review the commission information made available to the affiliate.
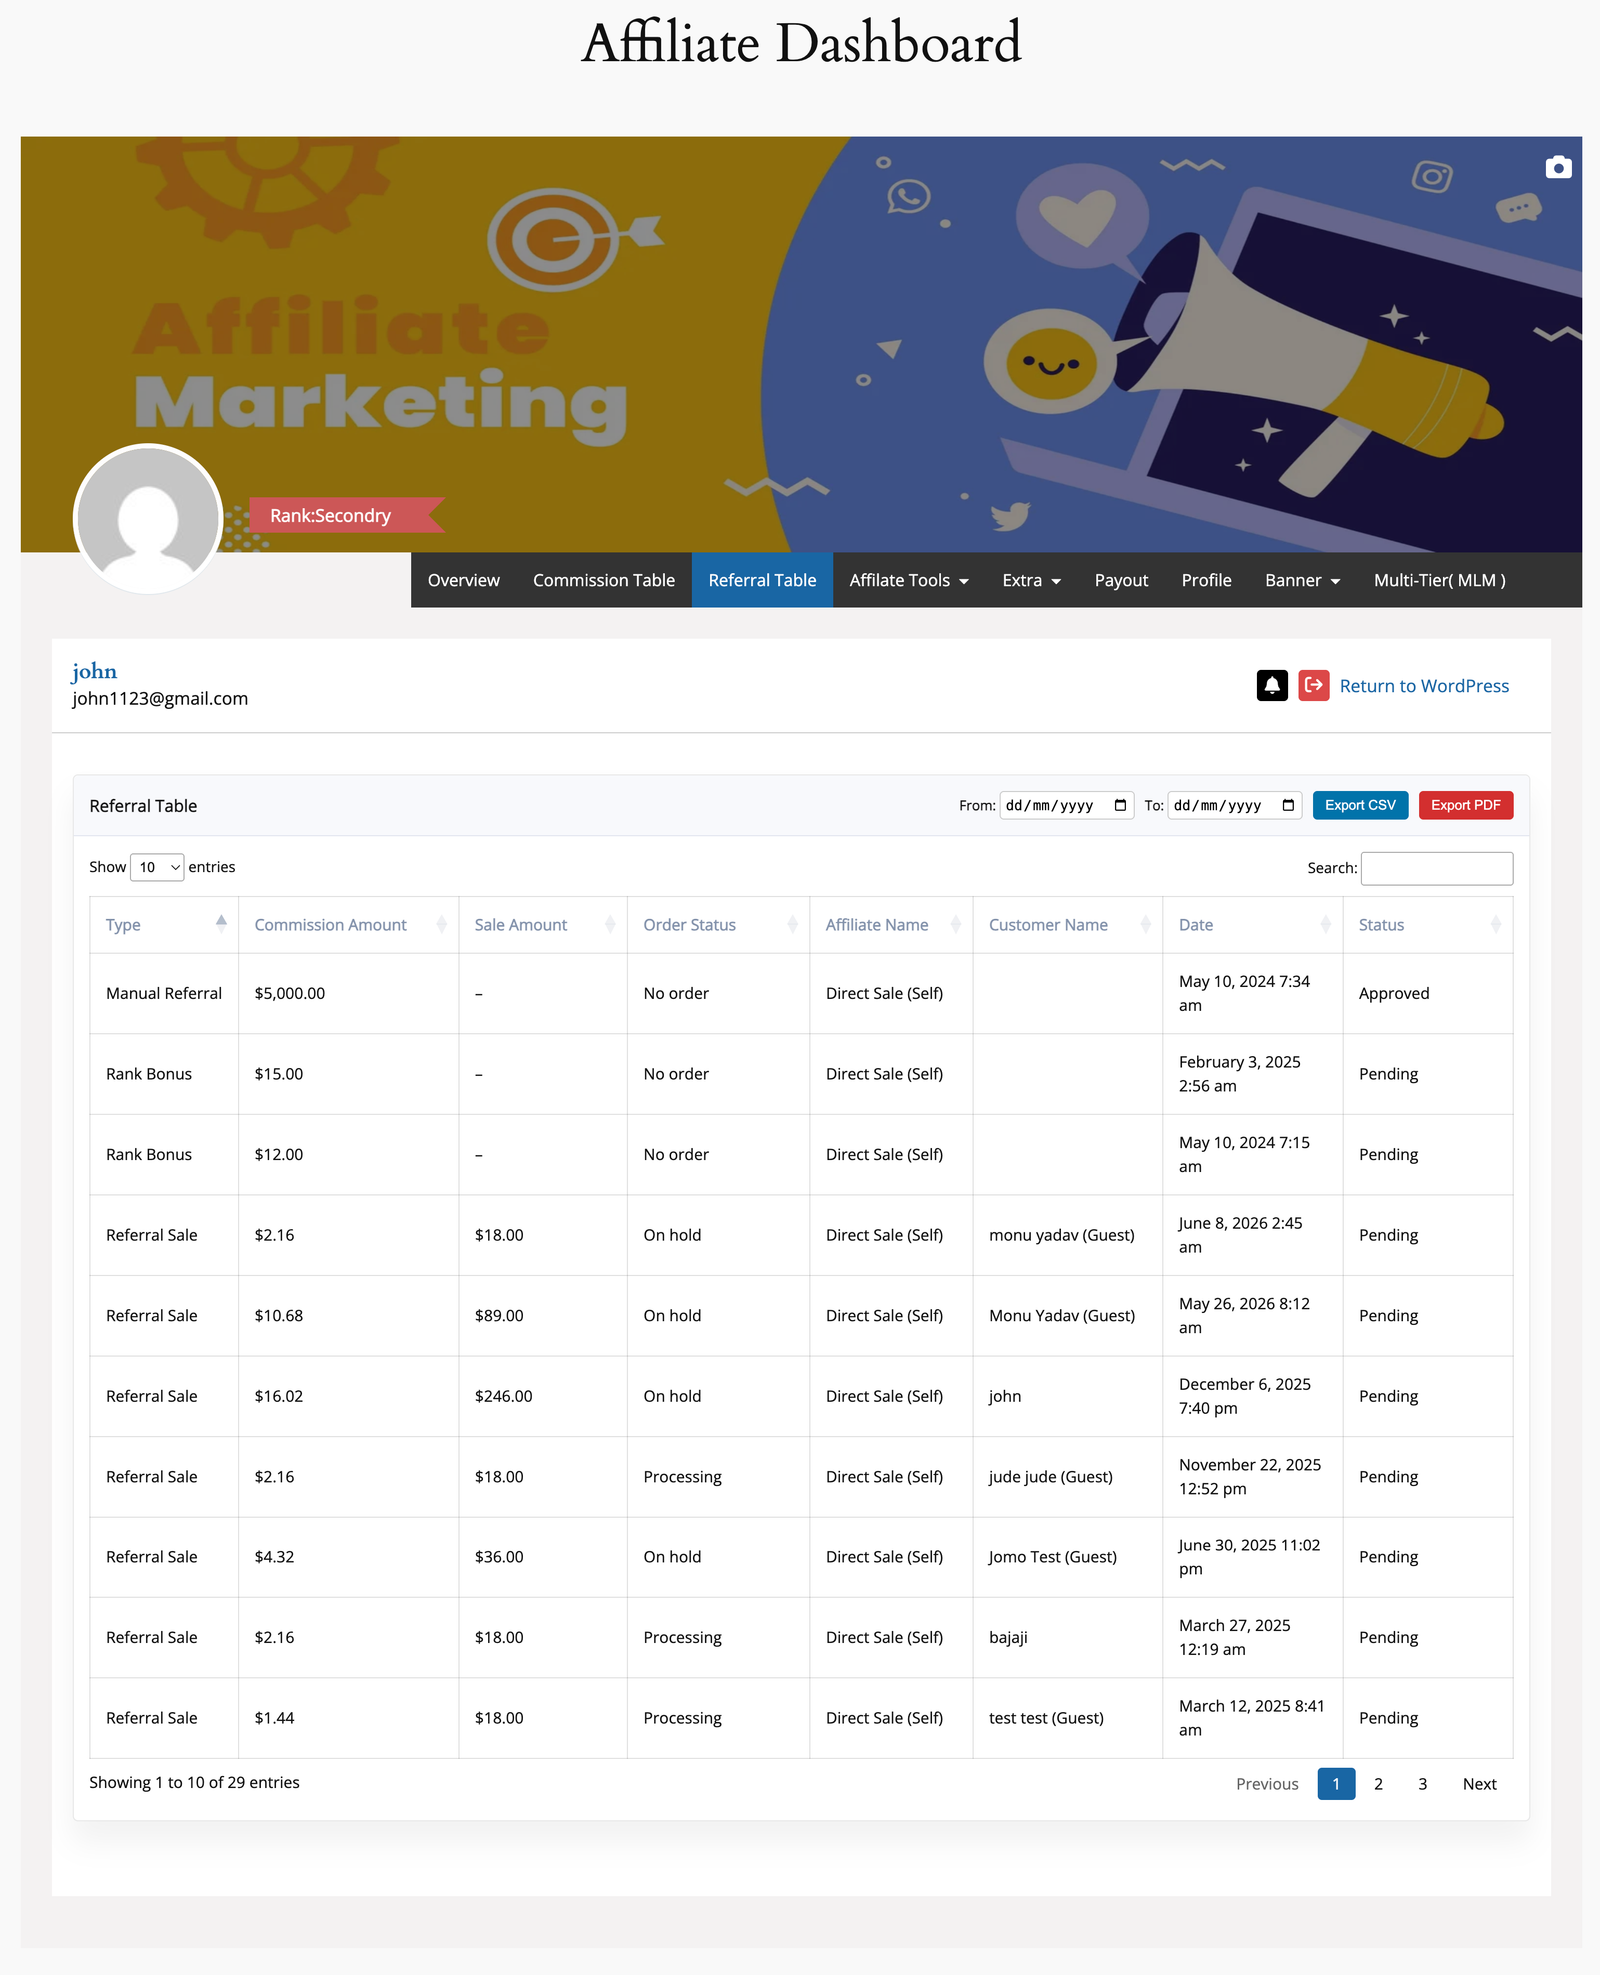
Affiliate Referral Table displaying recorded referral information
Use the Referral Table to review your recorded referrals.

Settings Reference

RecordWhat it helps you check
Commission TableCommission information for products, categories, and other configured rules.
Referral TableRecorded referrals and their available status information.

Expected Result

You can distinguish your commission information from the referrals that generated it.

Notes

Administrators configure commission rules and make approval decisions. This article describes the affiliate-facing records only.

Tips

Ask the administrator about a rejected referral when a rejection reason is shown, rather than attempting to recreate the order.

Related Articles

Previous: Referral CouponsNext: Reports & Downloads
Reports & Downloads

Affiliate Reports and Downloads

Review affiliate performance and download product referral information when the Download tab is available.

Overview

The affiliate dashboard includes report information and a Download area for referral links and commission details by category.

Purpose

Use these areas to understand activity and prepare promotional information for a selected product category.

Prerequisites

You are signed in as an affiliate and the relevant dashboard tabs are enabled.

Navigation Path

Step-by-step Configuration

  1. Open the Report area to review the available affiliate activity information.
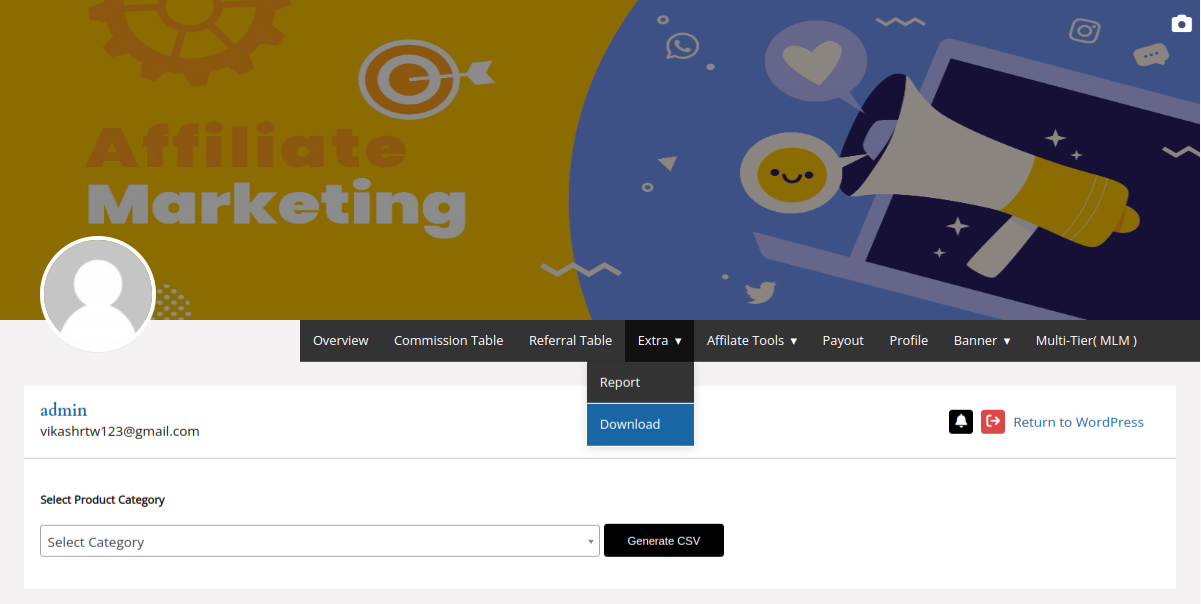
  2. Open Download.
  3. Select the relevant category and generate the available file containing referral links and commission details.
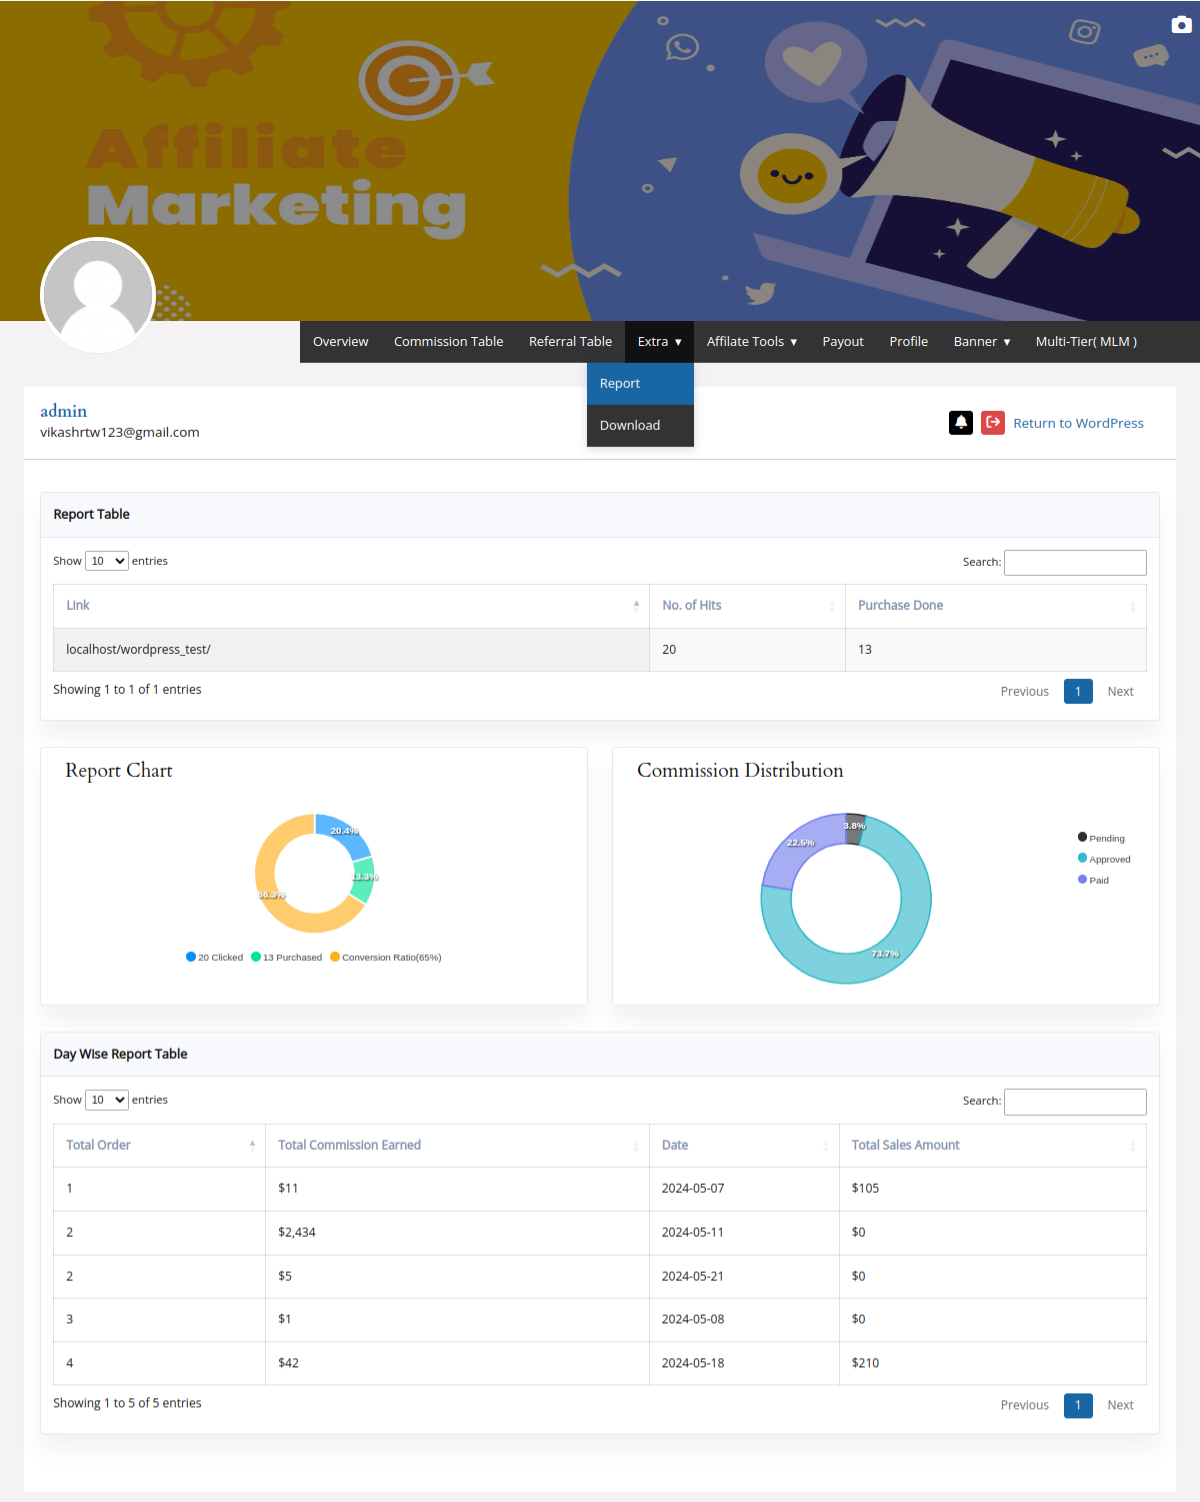
Affiliate Download tab used to generate a file of referral links and commission details
Use Download to create the available product-category referral-link and commission file.

Data Definitions

AreaContent
ReportAffiliate activity information made available in the dashboard.
DownloadA file compiling referral links and commission details for products in a category.

Expected Result

You can review available performance information and download the supported category file.

Notes

Export formats and available fields must match the installed plugin release; do not assume a CSV export unless the dashboard presents one.

Tips

Open the downloaded file before sharing links to confirm the category and products are correct.

Related Articles

Previous: RecordsNext: Payout & Profile
Payout & Profile

Update Payout Method and Affiliate Profile

Update affiliate profile details and use the affiliate-side Payout area to manage the information available for payouts.

Overview

The Profile area lets affiliates view and update personal details. The Payout area provides payout communication preferences and payment-method setup where enabled.

Purpose

Keep account and payment details current so the administrator can process approved earnings correctly.

Prerequisites

You are signed in to the Affiliate Dashboard.

Navigation Path

Step-by-step Configuration

  1. Open Profile and review the displayed account details.
  2. Update the available personal details, then select Save.
  3. Open Payout and select or update the available payout method and related preferences.
  4. Save the changes.
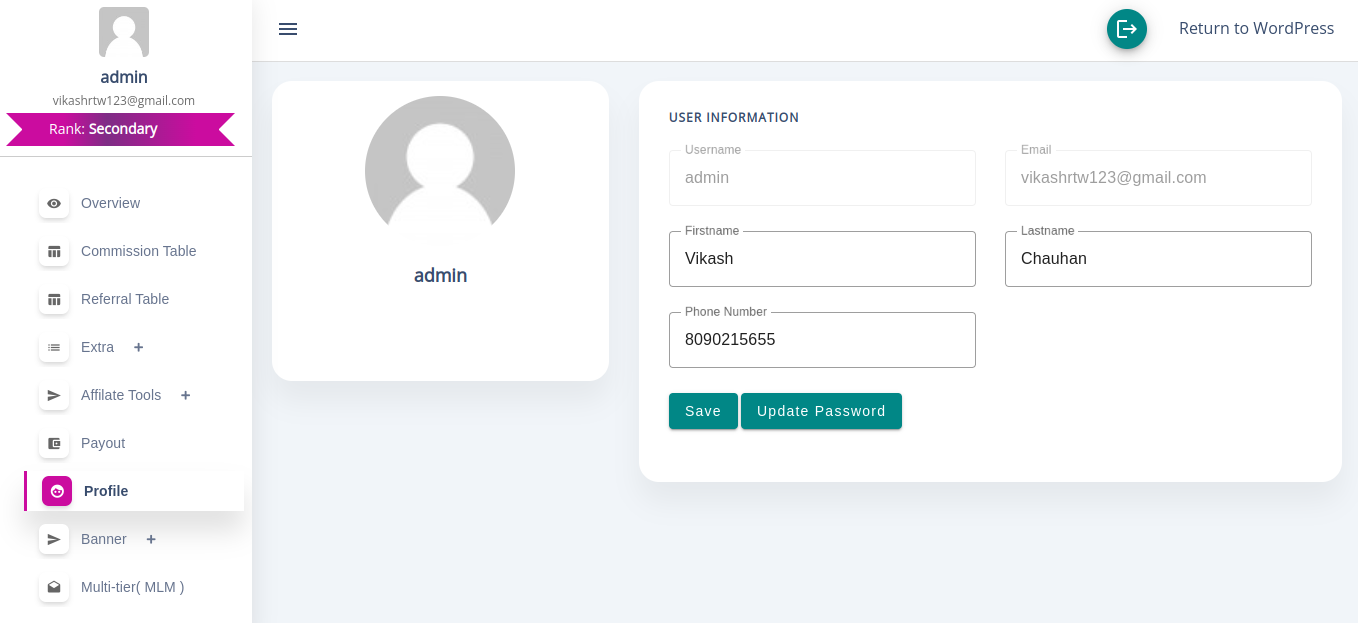
Affiliate Profile screen with user information fields and Save button
Update the available profile fields, then select Save.

Expected Result

Your profile and available payout details are saved for the administrator’s payout process.

Notes

This article covers affiliate-side details only. Administrator payout approval and processing are documented later in Wallet and Payouts.

Tips

Update payout details before requesting or expecting a payout, and keep your contact details accurate.

Related Articles

Previous: Reports & DownloadsNext: Banners & Templates
Marketing Assets

Banners, Templates, and Marketing Assets

Administrators configure registration templates and banners; affiliates use the Banner area to access the marketing assets made available to them.

Overview

Registration templates and promotional banners are different workflows. Templates control the registration presentation; banners provide product-focused promotional material.

Purpose

Provide affiliates with consistent assets that lead customers to the correct product or store page.

Prerequisites

Administrators need a prepared banner image and target URL. Affiliates need access to the Banner area.

Navigation Path

Step-by-step Configuration

  1. Administrator: Open Banner Setting and select Add New Banner.
  2. Add the banner image and its target link, then save it.
  3. Affiliate: Open the Banner area in the Affiliate Dashboard and use the available banner for promotion.
  4. Configure registration templates separately from the Templates area when adjusting registration presentation.
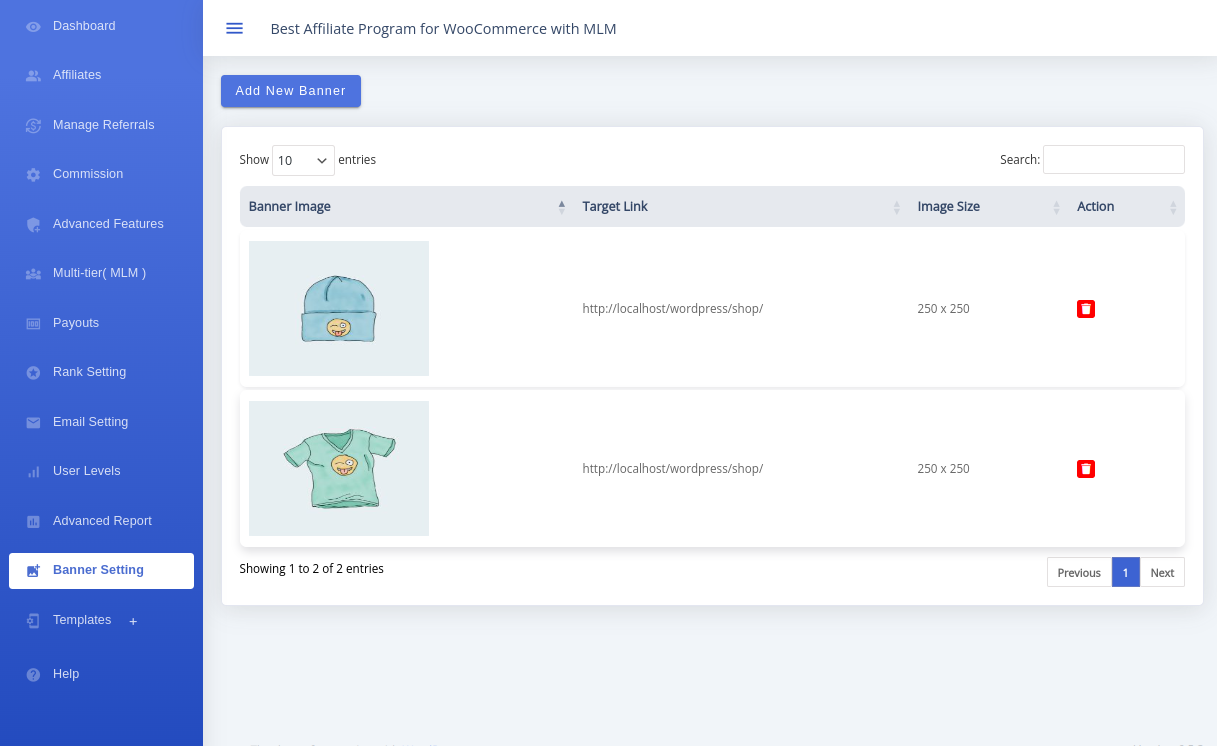
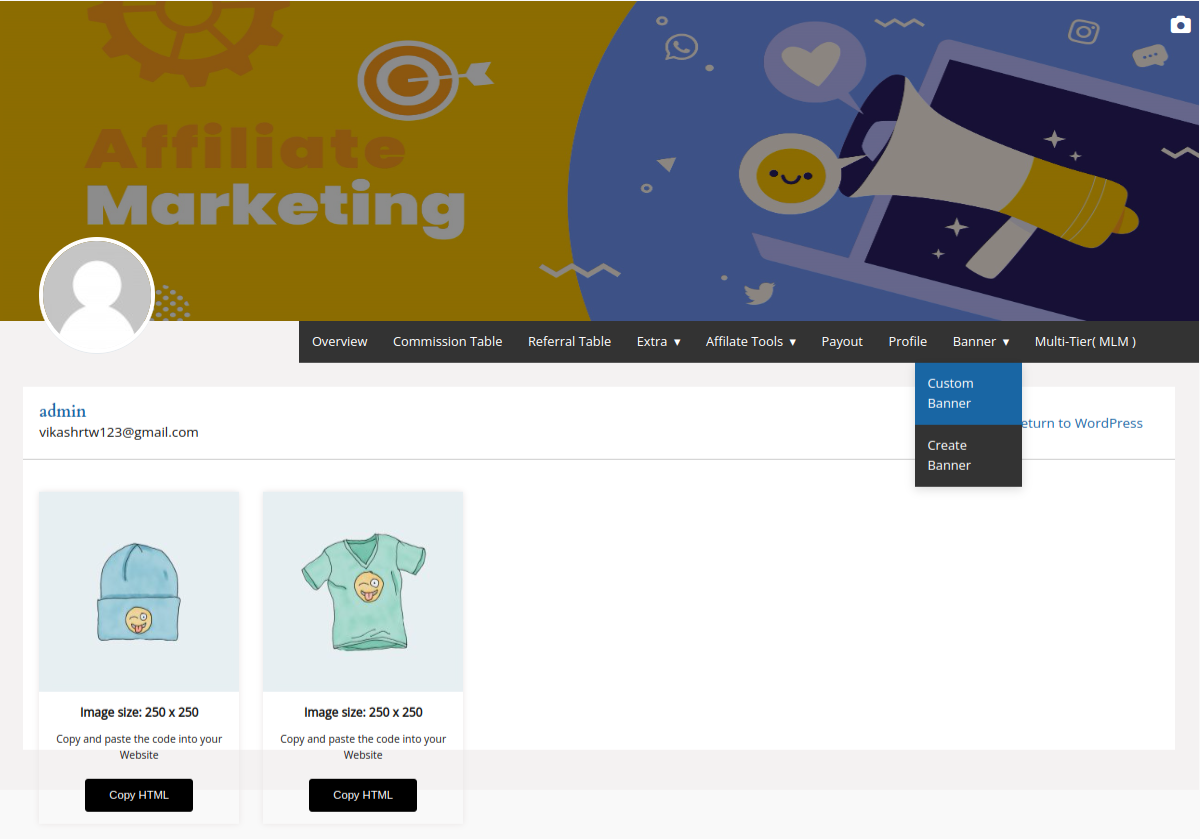
Banner Setting administration screen showing Add New Banner and configured banner target links
Administrators manage promotional banner images and target links from Banner Setting.

Expected Result

Configured banners are available to the intended affiliates, while registration templates remain managed separately.

Notes

Do not use a registration template as a promotional banner. These features serve different parts of the affiliate journey.

Tips

Use a target link that matches the campaign or product shown in the banner, then test it before sharing the asset.

Related Articles

Previous: Payout & ProfileNext: Customer Referral
Customer Referral

Customer Referral Overview

Set up a customer-to-customer referral program in which existing customers share a referral link and the store can reward the referrer and discount the friend.

Overview

Customer Referral is separate from the Affiliate Program. It is for store customers who refer friends, rather than external affiliates who join an affiliate program.

Purpose

Use it when you want existing customers to share the store with friends and earn customer rewards or credits.

Prerequisites

  • WooCommerce and the plugin are active.
  • You can access WooCommerce → Affiliate & Referral → Customer Referral.
  • You have decided on the customer reward and friend discount.

Referral Flow

Customer shares link → friend uses link → referral is recorded → administrator or automation reviews it → reward becomes available.

Affiliate Program vs Customer Referral

AreaAffiliate ProgramCustomer Referral
Who joinsAffiliates enrolled in the affiliate program.Store customers using Refer & Earn.
Who earnsThe affiliate.The referring customer.
DashboardAffiliate Dashboard.Customer Referral / Refer & Earn area.
Referral LinkAn affiliate referral link.A customer referral link using the configured slug.
RewardAffiliate commission under affiliate rules.Customer reward and optional friend discount under Customer Referral settings.
PayoutAffiliate payout process.Customer credits or coupons where enabled.
Typical Use CasePartners, creators, and promoters.Existing customers inviting friends.

Step-by-step Instructions

  1. Choose Customer Referral when the people sharing the store are customers.
  2. Use the Affiliate Program when you need affiliate-specific onboarding, commission records, and payouts.
  3. Continue with Enable Customer Referral before sharing any referral link.

Expected Result

You can choose the correct program and understand the customer referral journey before configuring it.

Notes

A customer referral reward is not an affiliate commission. Configure and manage each feature in its own area.

Tips

Use a simple first offer, then test it with a customer account before announcing the program.

Warning

Do not direct customers to the Affiliate Dashboard when you intend to use Customer Referral.

Related Articles

Previous: Banners & TemplatesNext: Enable Customer Referral
Customer Referral

Enable Customer Referral

Activate the Customer Referral System before configuring rewards, links, or customer access.

Overview

The Enable Customer Referral System switch turns on the customer-to-customer referral program.

Purpose

Allow customers to refer friends through referral links so friends can receive the configured discount and customers can receive credits for coupons.

Prerequisites

You are signed in as a WordPress administrator.

Navigation Path

Step-by-step Instructions

  1. Open Customer Referral from WooCommerce → Affiliate & Referral.
  2. Open Settings.
  3. Turn on Enable Customer Referral System.
  4. Select Save Changes.
Customer Referral Settings page showing Enable Customer Referral System and Save Changes
Enable the Customer Referral System, then save the settings before configuring the customer reward and friend discount.

Expected Result

Customer Referral remains enabled after the page is reloaded and its settings are available to configure.

Notes

Save before testing the customer-facing Refer & Earn experience.

Tips

Configure rewards and the referral slug immediately after enabling the program.

Warning

Enabling the program without a clear reward and discount can create an incomplete customer experience.

Related Articles

Previous: OverviewNext: Configure Settings
Settings

Configure Customer Referral Settings

Set the customer reward, friend discount, referral link, Refer button, automation status, and button colours from the Customer Referral Settings screen.

Overview

Customer Referral Settings contains the controls for the Customer Referral System and its customer-facing referral experience.

Purpose

Configure the complete customer referral offer before making it visible.

Prerequisites

Customer Referral System is enabled.

Navigation Path

Settings Reference

Visible settingUse
Enable Customer Referral SystemActivates customer referral links, friend discounts, and customer credits for coupons.
Customer Commission Type / AmountSets the type and amount of the customer reward.
Friends Discount Type / AmountSets the type and amount of the referred friend’s discount.
Slug in Customer Referral LinkReplaces the slug used in the customer referral link.
Enable Referral Button ShortcodeDisables the default Refer & Earn button and enables the shortcode placement option.
Customer Referral AutomationSelects the status at which a customer referral is automatically approved.
Refer Button Background Color / Text ColorSets the button’s background and text colours.
Use Default ColorUses the default Refer button colour setting.

Step-by-step Instructions

  1. Set Customer Commission Type and Customer Commission Amount.
  2. Set Friends Discount Type and Friends Discount Amount.
  3. Set the Slug in Customer Referral Link.
  4. Choose whether to enable Referral Button Shortcode.
  5. Choose the approval status in Customer Referral Automation.
  6. Set Refer Button Background Color and Refer Button Text Color, or enable Use Default Color.
  7. Select Save Changes.
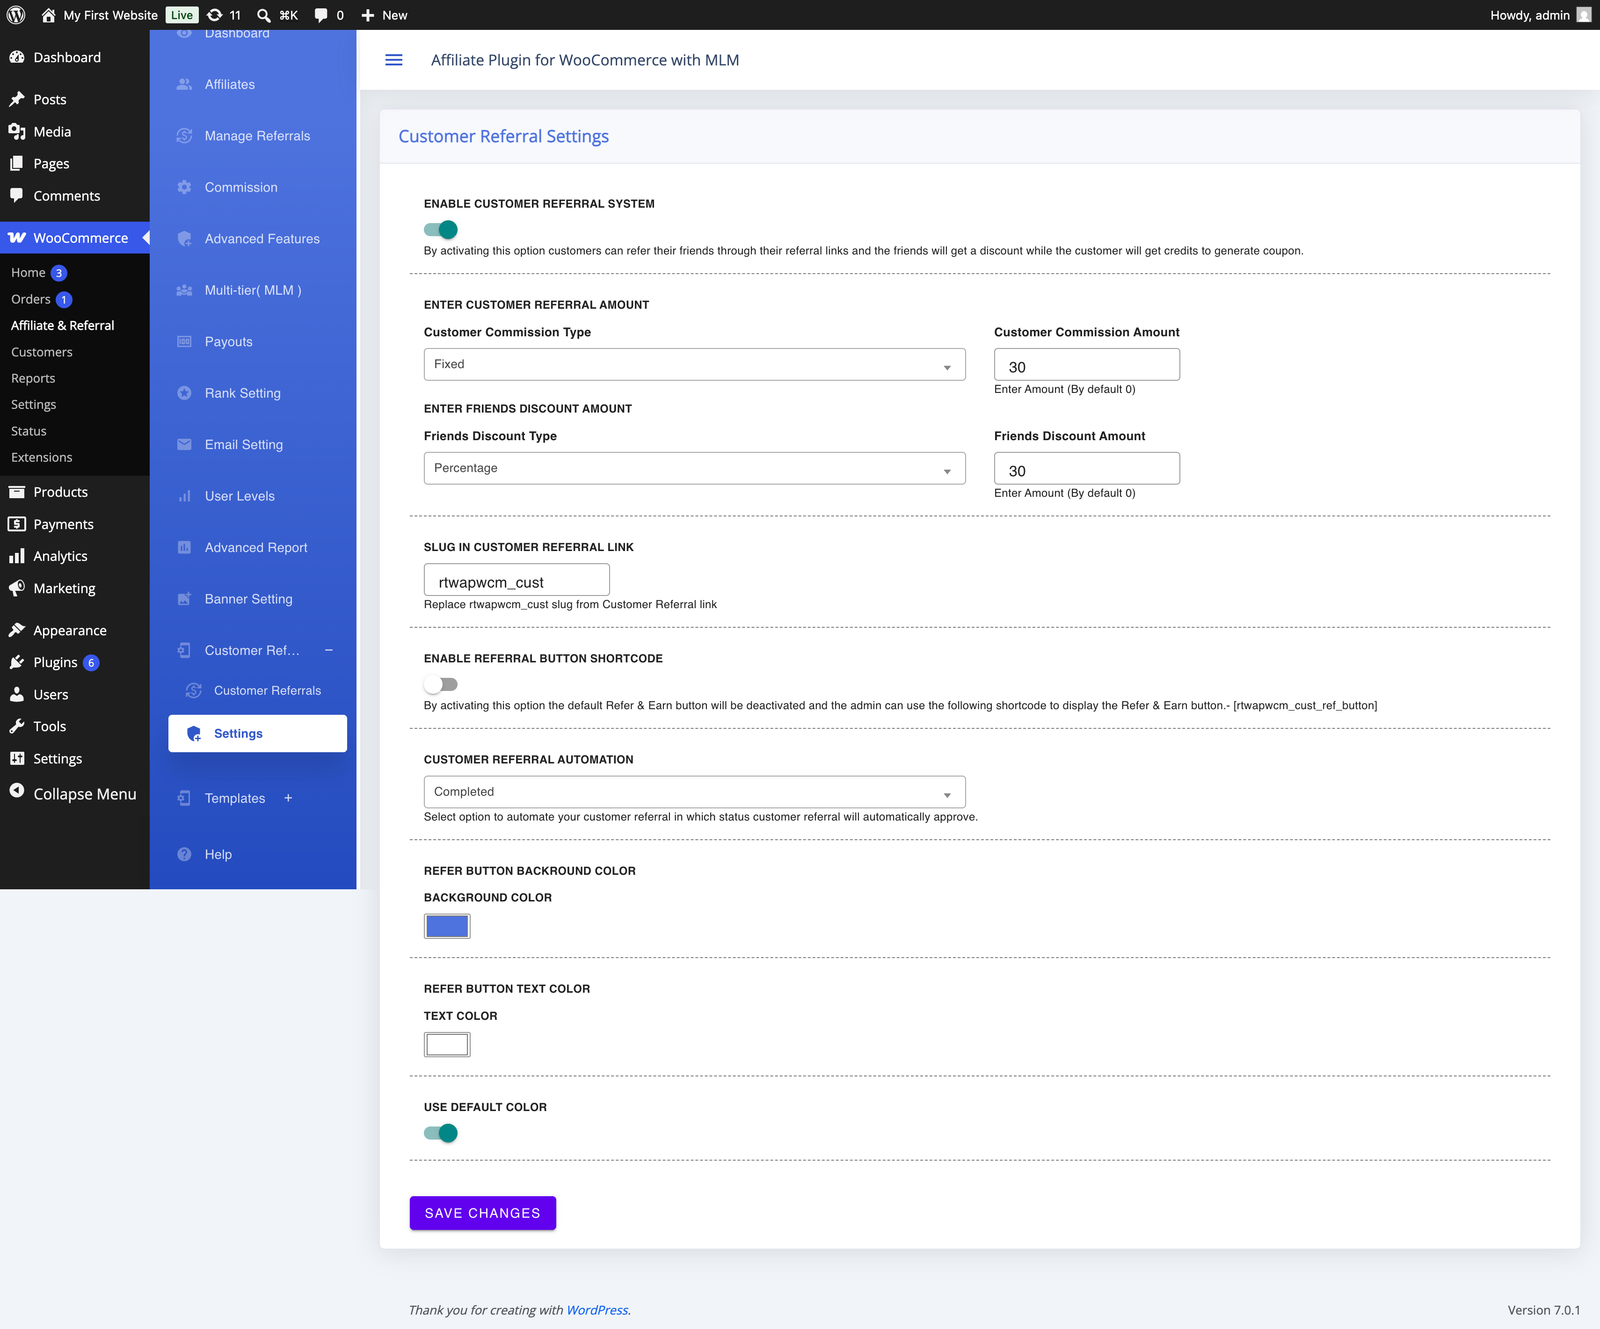
Customer Referral Settings showing reward, friend discount, referral slug, shortcode, automation, colour, and save controls
Configure the reward, friend discount, link slug, button option, automation status, and colours, then select Save Changes.

Expected Result

Your customer reward, friend discount, link slug, automation choice, and button appearance are saved together.

Notes

Turning on Enable Referral Button Shortcode deactivates the default Refer & Earn button. Use [rtwapwcm_cust_ref_button] where you want the button to appear.

Tips

Keep the referral slug short and readable, then test a newly generated link after saving.

Warning

Changing the slug, automation status, or reward values can change future referral behaviour. Test the complete flow before publishing it.

Related Articles

Previous: Enable Customer ReferralNext: Reward Configuration
Rewards

Reward Configuration

Choose a fixed or percentage-based reward for the customer and a matching discount for the referred friend.

Overview

Customer Commission Type and Amount define the reward. Friend Discount Type and Amount define the friend’s offer.

Purpose

Create an offer customers can understand and the store can sustain.

Prerequisites

Customer Referral is enabled.

Navigation Path

Step-by-step Instructions

  1. Choose a fixed reward when every qualifying referral should earn the same amount.
  2. Choose a percentage reward when the reward should vary with the qualifying purchase amount.
  3. Enter the matching Customer Commission Amount.
  4. Choose the Friend Discount Type and enter the Friend Discount Amount.
  5. Save, then place a controlled test referral order.

Examples

ApproachExample
Fixed rewardA customer reward of 10 store-credit units and a friend discount of 10 store-credit units.
Percentage rewardA customer reward and friend discount calculated as a percentage of the qualifying order.

Expected Result

The customer and friend values match the reward rules you saved.

Notes

The table examples explain calculation styles only; choose values that match your store currency, margins, and policy.

Tips

Use a fixed value for a simple, easy-to-explain first program.

Warning

Do not promise a reward publicly until you have tested its calculation and approval path.

Related Articles

Previous: Configure SettingsNext: Referral Link & Slug
Refer Button

Floating Refer Button

Use the default floating Refer button or enable its shortcode option when you need to place the customer entry point in page content.

Overview

The Refer button gives customers an entry point to Refer & Earn. Its shortcode option and colours are configured in Customer Referral Settings.

Purpose

Make the referral program easy for customers to find without creating a separate workflow.

Prerequisites

Customer Referral is enabled.

Navigation Path

Step-by-step Instructions

  1. Review the default floating Refer button in the customer-facing store.
  2. Enable Enable Refer Button Shortcode when you need the shortcode option.
  3. Set Button Background Colour and Button Text Colour.
  4. Use Default Colours when you want to restore the available defaults.
  5. Save, then open the chosen customer-facing placement and test the button.

Expected Result

The Refer entry point uses the saved colours and opens the Customer Referral experience in the intended placement.

Notes

Use the actual shortcode supplied by the installed Settings screen; this documentation does not assume a shortcode string.

Tips

Choose colours with enough contrast for readable button text.

Warning

Do not hide the button behind cookie banners, chat widgets, or other fixed elements.

Related Articles

Previous: Referral Link & SlugNext: Referral Automation
Automation

Customer Referral Automation

Select the status at which a Customer Referral is automatically approved, or manage referrals manually.

Overview

Customer Referral Automation selects the status in which the customer referral will automatically approve. The supplied Settings screen shows Completed as a selectable example.

Purpose

Choose the store event that approves a customer referral automatically, or leave decisions to Customer Referrals actions.

Prerequisites

Customer Referral rewards have been configured.

Navigation Path

Step-by-step Instructions

  1. Open Settings and locate Customer Referral Automation.
  2. Select the status at which a customer referral should automatically approve.
  3. Select Save Changes.
  4. For manual review, use Customer Referrals and its Approve or Reject actions.
  5. Run a test referral and confirm the resulting status.
Customer Referral Settings showing the Customer Referral Automation status selector
Select the status that automatically approves a Customer Referral, then save the setting.

Workflow

StatusWhat to check
PendingThe referral is waiting for the next configured action or review.
ProcessingThe referral is in progress according to the configured workflow.
CompletedUse this selectable status when you want referral approval to occur at completion.

Expected Result

New referral records follow the saved automation or manual-review approach.

Notes

Status labels describe the state shown in the referral workflow; verify the final reward result with a test order.

Tips

Start with manual approval if you need to validate the offer or fraud controls.

Warning

Do not enable automatic handling before a test confirms that the qualifying conditions produce the expected reward.

Related Articles

Previous: Floating Refer ButtonNext: Manage Customer Referrals
Customer Referrals

Manage Customer Referrals

Use the Customer Referrals table to review individual records and take the available approval, rejection, or bulk actions.

Overview

Customer Referrals is the administrator work area for referral records, statuses, individual actions, and bulk handling.

Purpose

Approve valid referrals, reject invalid ones, and keep the customer-referral workflow accurate.

Prerequisites

At least one customer referral has been recorded.

Navigation Path

Step-by-step Instructions

  1. Open Customer Referrals and review the Customer ID, Customer Name, Reference, Order Status, Amount, Date, and Status for a record.
  2. Select Approve for an individual valid referral, or Reject when it should not be rewarded.
  3. To process multiple records, mark their checkboxes.
  4. Select Confirm Marked Customer Referrals or Decline Marked Customer Referrals.
  5. Confirm the displayed status has changed as intended.
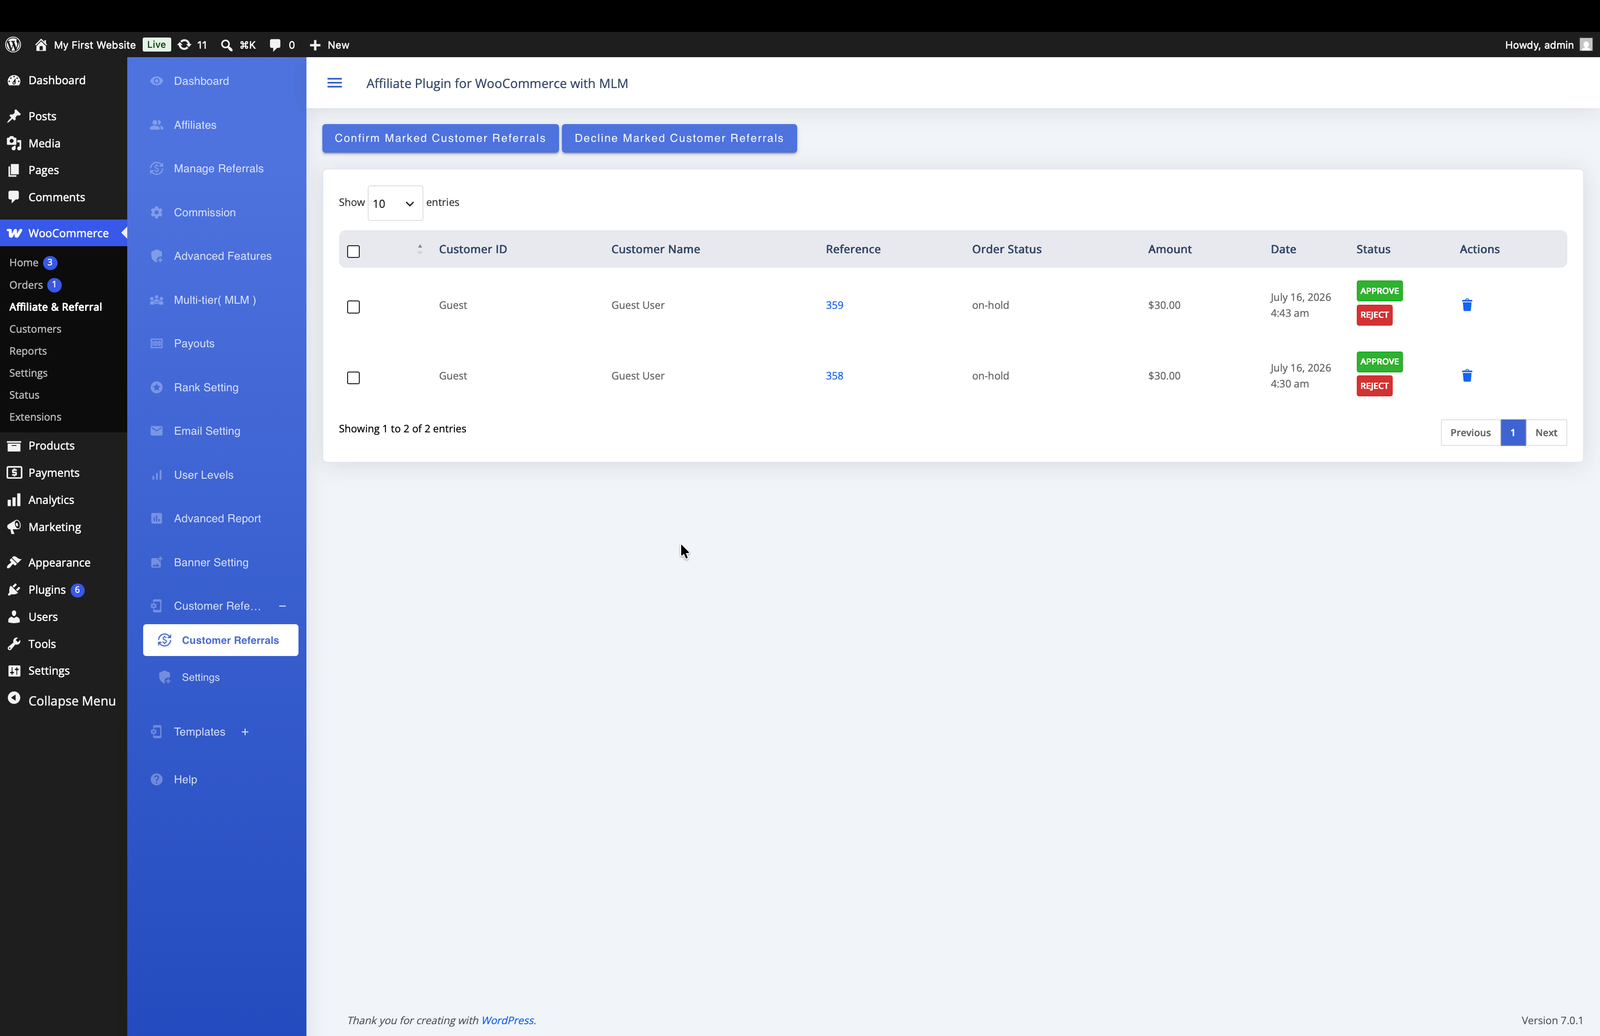
Customer Referrals table showing Customer ID, Customer Name, Reference, Order Status, Amount, Date, Status, Approve, Reject, and marked referral controls
Review each customer referral, use the individual Approve or Reject actions, or process marked records with the confirmation and decline controls.

Expected Result

The table shows the outcome of the action you selected for each referral.

Notes

Use the labels and actions available in your Customer Referrals screen; table columns can vary by plugin version.

Tips

Review a small number of individual referrals before using a bulk action for the first time.

Warning

Bulk approval and rejection affect every selected record. Confirm the selected rows and status before applying the action.

Related Articles

Previous: Referral AutomationNext: Customer Dashboard
Refer & Earn

Customer Dashboard (Refer & Earn)

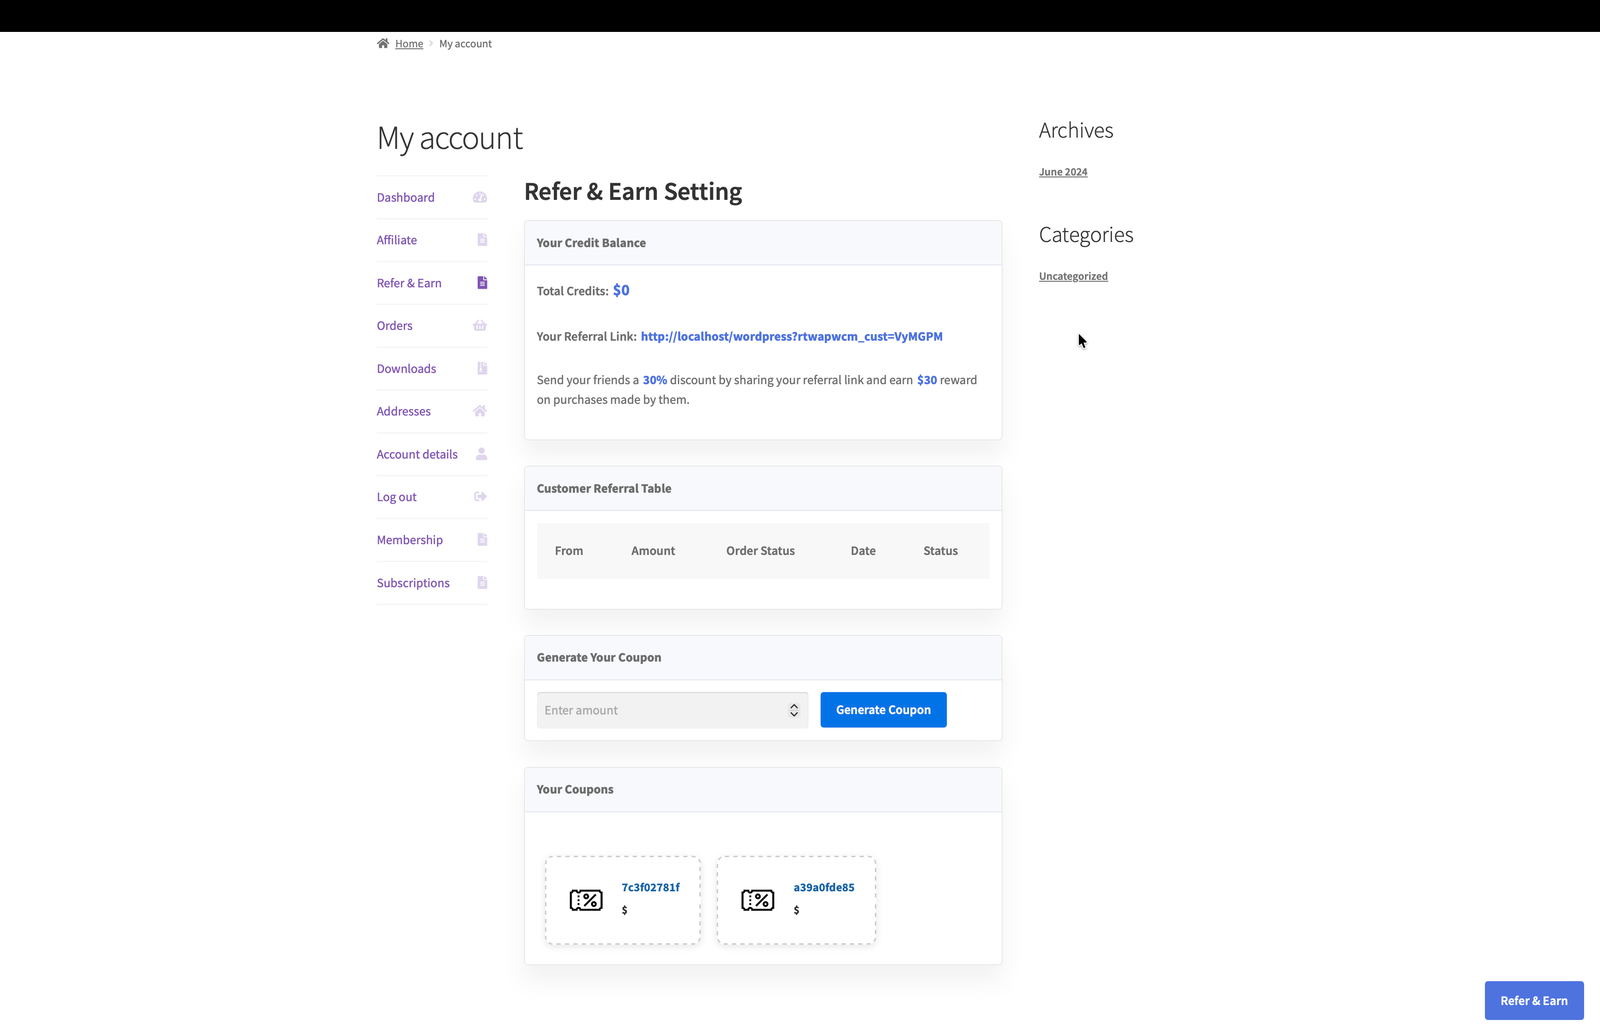
Show customers how to use their Referral Link, Credit Balance, Customer Referral Table, coupon generator, and Coupon List.

Overview

Refer & Earn appears in the WooCommerce My Account menu. It shows the customer’s Credit Balance, Referral Link, Customer Referral Table, coupon generator, and coupons.

Purpose

Give customers one place to share their link and check the results of their referrals.

Prerequisites

Customer Referral is enabled and the customer is signed in to their WooCommerce account.

Navigation Path

Step-by-step Instructions

  1. Open My Account and select Refer & Earn from the account menu.
  2. Review Your Credit Balance and copy Your Referral Link.
  3. Use Customer Referral Table to review From, Amount, Order Status, Date, and Status.
  4. Enter an amount under Generate Your Coupon, then select Generate Coupon when eligible.
  5. Review generated codes under Your Coupons.
WooCommerce My Account Refer and Earn page showing credit balance, referral link, customer referral table, coupon generator, and coupons
Customers open Refer & Earn from My Account to view credits, copy their referral link, review referrals, and generate or view coupons.

Expected Result

The customer can locate the personal link, review referral activity, and use the coupon controls that the store has made available.

Notes

The provided interface labels the coupon areas Generate Your Coupon and Your Coupons.

Tips

Customers should copy the link directly from Refer & Earn rather than editing it manually.

Warning

Credit Balance and coupons are customer-facing features; they do not replace the Affiliate Program’s payout workflow.

Related Articles

Previous: Manage Customer ReferralsNext: Generate Coupons
Coupons

Generate Coupons

Use the customer-facing coupon generator and Coupon List only when the program makes eligible wallet credits available for coupon generation.

Overview

Refer & Earn includes the Generate Your Coupon form and the Your Coupons area for generated customer coupons.

Purpose

Turn eligible customer referral credits into a coupon where the program provides that option.

Prerequisites

You are signed in and have access to My Account → Refer & Earn with an eligible credit balance.

Navigation Path

Step-by-step Instructions

  1. Open My Account → Refer & Earn and review Your Credit Balance.
  2. Enter the amount you want to use in Generate Your Coupon.
  3. Select Generate Coupon.
  4. Review the generated code under Your Coupons.
  5. Use the code at checkout according to the store’s coupon rules.
Refer and Earn page showing Generate Your Coupon amount field, Generate Coupon button, and Your Coupons list
Enter an amount in Generate Your Coupon, select Generate Coupon, then find the generated code in Your Coupons.

Expected Result

An eligible customer can find the generated coupon in Coupon List and use it according to the store’s configured conditions.

Notes

This guide does not assume a minimum balance, coupon value, expiry, or combinability rule because those details were not verified in the supplied source.

Tips

Copy the coupon code from Coupon List and check the cart before placing an order.

Warning

Do not assume all wallet credits can be converted into coupons. Follow the controls and eligibility displayed to the customer.

Related Articles

Previous: Customer DashboardNext: Customer Referral History
Customer

Customer Referral History

Use the customer referral table to review recorded referral activity and the status currently shown for each entry.

Overview

The Customer Referral Table provides the customer’s history of referral entries and their displayed status.

Purpose

Help customers confirm that a referral was recorded and see whether it is pending, processing, or completed.

Prerequisites

You have shared a referral link or have at least one referral entry.

Navigation Path

Step-by-step Instructions

  1. Open My Account → Refer & Earn.
  2. Find the Customer Referral Table.
  3. Review the visible From, Amount, Order Status, Date, and Status columns.
  4. Contact the store administrator if a referral remains pending longer than expected.

Table and Status Guide

Visible column or statusMeaning
FromThe source shown for the referral entry.
AmountThe displayed referral reward amount.
Order StatusThe order status shown for the referral.
DateThe displayed referral date.
StatusThe current stage shown by the program.
Pending / Processing / CompletedCommon workflow states; the final status shown for the referral determines its outcome.

Expected Result

The customer can identify the relevant referral record and its displayed status.

Notes

Exact table columns can vary by release and by customer access; use the labels visible in the dashboard.

Tips

Keep the original shared link and the friend’s order reference available if you need support.

Warning

A visible referral entry does not by itself guarantee a reward; review its final displayed status and the store’s policy.

Related Articles

Previous: Generate CouponsNext: Customer Referral FAQ
FAQ

Customer Referral FAQ

Answers to practical Customer Referral questions for store administrators and customers.

Overview

Use this page to resolve common setup and customer-use questions.

Purpose

Direct readers to the correct Customer Referral area without mixing it with affiliate workflows.

Prerequisites

Customer Referral is enabled, or you are reviewing the feature before setup.

Navigation Path

Questions and Answers

What is the difference between Affiliate Program and Customer Referral?
Affiliates use the Affiliate Dashboard and affiliate commissions. Customers use Refer & Earn and the Customer Referral reward flow.
How are customer rewards calculated?
The administrator sets Customer Commission Type and Customer Commission Amount in Customer Referral → Settings.
Where can customers find their referral links?
Customers open Customer Referral → Refer & Earn and copy the displayed Referral Link.
Can administrators approve referrals manually?
Yes, use Customer Referral → Customer Referrals and the available individual or bulk actions when manual review is needed.
Can customers generate coupons?
Customers can use Generate Coupon and Coupon List when those controls and eligible credits are available in Refer & Earn.
What should I check if a reward is not visible?
Check the referral status, Automation Status, and the saved reward settings, then test the complete flow with a customer account.

Expected Result

You can identify the correct article or menu area for common Customer Referral questions.

Notes

For a setting-specific question, compare the current Settings screen with the labels in Configure Customer Referral Settings.

Tips

Include the referral status and a screenshot of the visible customer or administrator table when requesting support.

Warning

Do not use Customer Referral instructions to configure affiliate commissions or affiliate payouts.

Related Articles

Previous: Customer Referral HistoryNext: Commission Rules
Commission

Commission System Overview

Commission rewards an affiliate when a qualifying purchase is attributed to that affiliate and the referral is processed.

Overview

Direct affiliate commission is the commission associated with the referring affiliate. MLM level commission is a separate network-level feature and is documented later. Customer Referral rewards are also separate: they use Customer Referral settings and customer credits, not affiliate commission settings.

Purpose

Set a clear commission rule, test an attributed purchase, and review the referral before paying it.

Prerequisites

An active affiliate, a saved commission rule, and a test product are required.

Navigation Path

Step-by-step Instructions

  1. Set a commission rule in Commission.
  2. Have an affiliate share a referral link and place a test purchase through it.
  3. Review the resulting record in Manage Referrals.
  4. Use the available Approve or Reject action after review.
Manage Referrals screen with referral records, approve and reject actions, date filters, CSV and PDF exports
Manage Referrals shows the recorded commission amount, sale amount, order status, referral status, actions, and available date-filter exports.

Calculation Example

Assumption: a 10% global commission and a ₹1,000 qualifying sale. Commission = ₹1,000 × 10% = ₹100.

Expected Result

A referral record is created for the attributed order and can be reviewed by the administrator.

Notes

Percentage and fixed commission are both available in the Commission settings interface. The exact commission basis for every cart composition is not documented here unless a rule specifically states it.

Tips

Use a low-value test product before inviting affiliates.

Warning

Do not confuse Customer Referral credit with affiliate commission; configure each in its own area.

Related Articles

Previous: Customer Referral FAQNext: Configure Global Commission
Global Rule

Configure Global Commission

Set the default commission for all products from the Commission settings screen.

Overview

Commission for All Products is the default rule shown in the Commission settings screen.

Purpose

Provide a starting commission when no more specific applicable rule has been configured.

Prerequisites

You are signed in as an administrator.

Navigation Path

Step-by-step Instructions

  1. Open Commission.
  2. Under Commission for All Products, choose Commission Type.
  3. Enter the Commission Amount.
  4. Review any enabled commission options that apply to your program.
  5. Select Save Changes.
Commission Settings showing Commission for All Products, commission type, commission amount, category rules, affiliate rules, and two-way settings
Set the global Commission Type and Commission Amount before adding category or affiliate-specific rules.

Settings Reference

Visible settingUse
Commission TypeSelects the global calculation type.
Commission AmountSets the global commission value.
Commission based onThe screen shows Products and Users (To Set Commission For Users Goto Levels).
Affiliate Referral AutomationSelects the status at which affiliate referrals automatically approve.

Expected Result

A qualifying referral can use the saved global rule when no confirmed, more-specific rule applies.

Notes

Withdrawal limits and payout fees are visible on the same screen but are documented in Wallet & Payouts.

Tips

Record the test rule and expected amount before testing.

Warning

Save changes before testing; unsaved values do not configure the live rule.

Related Articles

Previous: OverviewNext: Product-Specific Commission
Product Rule

Product-Specific Commission

Set commission values for individual WooCommerce products.

Overview

The primary guide confirms Percentage Commission, Fixed Commission, and Percentage and Fixed Commission columns in the WooCommerce Products list.

Purpose

Use a product rule when one product needs a different affiliate reward.

Prerequisites

Commission settings are configured and the product already exists.

Navigation Path

Step-by-step Instructions

  1. Open WooCommerce → Products.
  2. Locate the product and use the commission columns shown in the product list.
  3. Enter a value in Percentage Commission, Fixed Commission, or both in Percentage and Fixed Commission.
  4. Save or update the product.
  5. Place a test referral order for that product.

Calculation Example

Assumption: a ₹1,000 product has a 15% product rule. The expected commission is ₹150.

Expected Result

The product-specific value is available for a referral to that product.

Notes

The primary documentation states that individual-product settings take precedence over universal and category-specific commissions.

Tips

Use only one intended commission column unless the combined percentage-and-fixed option is deliberate.

Warning

Do not assume an unverified product-edit tab name; use the commission controls visible in your Products list.

Related Articles

Previous: Global CommissionNext: Category-Specific Commission
Category Rule

Category-Specific Commission

Set a commission value for selected product categories.

Overview

The Commission screen includes Commission Per Category with Categories, Percentage, Fixed Price, and Action fields.

Purpose

Apply a category-specific rule instead of the global rule where appropriate.

Prerequisites

The categories exist in WooCommerce.

Navigation Path

Step-by-step Instructions

  1. Open Commission and locate Commission Per Category.
  2. Select one or more Categories.
  3. Enter Percentage or Fixed Price.
  4. Use the add action to add another rule when needed.
  5. Select Save Changes.

Calculation Example

Assumption: a selected category has a 10% rule and a ₹1,000 eligible product. Expected commission: ₹100.

Expected Result

The saved category rule is available for qualifying category products.

Notes

The primary documentation confirms category rules override universal commission. It does not document a mixed-category cart calculation rule, so this guide does not assume one.

Tips

Test one category product before testing mixed carts.

Warning

Do not infer a mixed-cart result from a single-category test.

Related Articles

Previous: Product CommissionNext: Affiliate-Specific Commission
Affiliate Rule

Affiliate-Specific Commission

Set a rate for an individual affiliate in the Commission screen.

Overview

The current screen provides Commission Per Affiliate fields for Affiliate Name, Product Tag, Percentage, and Fixed Price, and Commission Per Affiliate Per Category fields for Affiliate Name, Category, Percentage, and Fixed Price.

Purpose

Set a different rate for a named affiliate and optionally a selected category.

Prerequisites

The user is an affiliate and relevant categories or product tags exist.

Navigation Path

Step-by-step Instructions

  1. Open Commission Per Affiliate or Commission Per Affiliate Per Category.
  2. Select the Affiliate Name.
  3. Optionally select the visible Product Tag or Category field.
  4. Enter Percentage or Fixed Price.
  5. Use the add action and select Save Changes.

Calculation Example

Assumption: a named affiliate has a 5% affiliate-specific rule on a ₹1,000 qualifying sale. Expected commission: ₹50.

Expected Result

The selected affiliate has the configured rate available for its intended conditions.

Notes

The supplied interface verifies these fields but does not establish a universal precedence over every other commission rule.

Tips

Document why a custom rate was added and test it using that affiliate’s link.

Warning

Do not assume an affiliate-specific rate has the highest priority; test any overlapping product or category rules.

Related Articles

Previous: Category CommissionNext: Commission Rule Priority
Priority

Commission Rule Priority

Use only precedence relationships confirmed by the available documentation.

Overview

Confirmed precedence: a product-specific rule takes precedence over universal and category-specific commission; a category-specific rule overrides universal commission.

Purpose

Prevent incorrect assumptions when several commission rules can match an order.

Prerequisites

At least two overlapping rules are configured in a test environment.

Navigation Path

Settings Reference

Rule combinationVerified outcome
Product-specific + category-specific + globalProduct-specific takes precedence.
Category-specific + globalCategory-specific overrides global.
Affiliate-specific with another ruleUniversal precedence not verified; test the configured combination.
Recurring, lifetime, or MLM with direct rulesNot documented as a universal priority chain.

Verified Examples

  1. With global 10%, category 12%, and product 15% for the same product, the confirmed product rule is the applicable rule.
  2. With global 10% and category 12% for a category product, the confirmed category rule overrides global.

Expected Result

You can test only the combinations whose precedence is confirmed and avoid claiming a universal rule order where none is documented.

Notes

Special Offers Per Category, product tags, affiliate-specific fields, recurring, lifetime, and MLM may create additional conditions; their combined precedence is not verified.

Tips

Keep a written matrix of your live rules and test every intended overlap.

Warning

Never rely on an assumed priority for overlapping affiliate-specific, lifetime, recurring, or MLM rules.

Related Articles

Previous: Affiliate-Specific CommissionNext: Two-Way Commission
Two-Way

Two-Way Affiliate Commission

Enable an optional buyer discount alongside the affiliate’s commission for a referral.

Overview

Two-way commission is an Affiliate Program feature: the referred customer receives an administrator-configured discount and the affiliate receives commission.

Purpose

Offer an optional purchase incentive while keeping a commission for the referring affiliate.

Prerequisites

Affiliate commission is configured and a product is available to edit.

Navigation Path

Step-by-step Instructions

  1. Open Commission.
  2. Enable Enable Two Way Commission.
  3. Set the visible Discount Type and Discount Amount under Set User Discount For 2Way Comm..
  4. Select Save Changes.
  5. Open WooCommerce → Products, edit the intended product, and use its Referee Commission Setting tab to enter the affiliate commission value.
  6. Test the affiliate link in cart or checkout and confirm the buyer discount appears.

Calculation Example

Assumption: a ₹1,000 product, a ₹100 buyer discount, and 10% affiliate commission. The buyer discount and affiliate commission are configured separately; confirm the resulting amount with a test order.

Expected Result

The buyer receives the configured discount and the affiliate referral can receive its configured commission.

Notes

The buyer discount is optional; it applies only when Two Way Commission is enabled and configured.

Tips

Test the cart and checkout view after each change.

Warning

This is not the Customer Referral reward system.

Related Articles

Previous: Commission PriorityNext: Recurring Commission
Subscriptions

Recurring Commission

Configure and verify referral commission for subscription orders only when the required subscription setup and settings are available.

Overview

Recurring commission concerns subscription renewals and requires WooCommerce Subscriptions.

Purpose

Distinguish the initial attributed subscription order from a renewal commission workflow.

Prerequisites

WooCommerce Subscriptions is active, the product is a subscription, and an affiliate referral is tracked.

Navigation Path

Step-by-step Instructions

  1. Confirm WooCommerce Subscriptions and a subscription product are active.
  2. Review the available recurring or unlimited/lifetime commission option in Commission.
  3. Save the setting only after confirming it applies to your intended subscription flow.
  4. Place a test referred subscription order, then verify the renewal record after a test renewal.

Expected Result

You can verify whether the configured subscription flow creates a renewal referral record in your installed release.

Notes

The supplied Commission screen describes Unlimited / Lifetime Commission as generating commission every time a referee makes a purchase. It does not independently document every subscription-renewal condition.

Tips

Test a renewal in a staging environment before promising recurring earnings.

Warning

Do not assume every renewal automatically creates commission without a successful configured test.

Related Articles

Previous: Two-Way CommissionNext: Lifetime Commission
Lifetime

Lifetime Commission

Use the available Unlimited / Lifetime Commission option to configure ongoing commission for referee purchases, then verify the behaviour with a test.

Overview

The current Commission screen labels the option Unlimited / Lifetime Commission and states that commission is generated every time a referee makes a purchase when enabled.

Purpose

Configure ongoing attribution for future referee purchases where the installed plugin behaviour supports it.

Prerequisites

An affiliate referral and a test customer account are available.

Navigation Path

Step-by-step Instructions

  1. Open Commission.
  2. Enable Unlimited / Lifetime Commission.
  3. Select Save Changes.
  4. Complete an attributed test purchase, then make a later qualifying test purchase with the same referee.
  5. Review the referral records in Manage Referrals.

Expected Result

The test determines whether a later referee purchase produces the configured commission in your release.

Notes

Do not describe this association as permanent: the available source does not document how it can be changed or removed.

Tips

Record the affiliate, referee, and order IDs for both tests.

Warning

Do not assume cookie expiry, logged-in attribution, and lifetime attribution use the same conditions.

Related Articles

Previous: Recurring CommissionNext: Cookie Duration
Examples

Commission Calculation Examples

Use these neutral examples to plan and test rules; each example states its assumptions.

Overview

Examples help verify a saved rule against a test referral record.

Purpose

Make percentage, fixed, and confirmed override behaviour easier to check.

Prerequisites

A test product, affiliate, and referral link are available.

Navigation Path

Calculation Examples

AssumptionExpected calculation
10% global on ₹1,000 qualifying order₹100 commission.
₹100 fixed global rule₹100 commission for the qualifying referral.
Product 15%, category 12%, global 10%₹150 on a ₹1,000 product: the verified product rule takes precedence.
Category 12%, global 10%₹120 on a ₹1,000 category product: the verified category rule overrides global.
Affiliate-specific 5%₹50 on a ₹1,000 qualifying sale, subject to the configured conditions; priority against other rules is unverified.
Two-way configurationBuyer discount and affiliate commission are configured separately; verify with cart and referral tests.
Subscription renewal or lifetime purchaseVerify on your installed setup; no universal calculation chain is documented.
Direct + MLM level commissionSeparate direct and MLM calculations; see the future MLM documentation.

Expected Result

A test referral amount can be compared with a documented assumption.

Notes

Use your store currency in production examples; ₹ is used here only as a neutral illustrative currency.

Tips

Include the order total, rule, and expected amount in every test note.

Warning

Examples are not a substitute for testing overlapping rules.

Related Articles

Previous: Cookie DurationNext: Commission Troubleshooting
Troubleshooting

Commission Troubleshooting

Use the referral table, saved rules, and order status to isolate a commission issue.

Overview

Check the referral record first, then the relevant commission setting and order status.

Purpose

Resolve common missing, incorrect, pending, and rejected commission reports without assuming a cause.

Prerequisites

Keep the affected order or referral reference available.

Navigation Path

Troubleshooting Checks

IssueWhat to check / expected resolution
Commission not generatedConfirm the referral link, global rule, and Referral record. A qualifying attributed purchase should create a record.
Incorrect amountCompare global, category, product, and affiliate-specific rules; test the confirmed priority combinations.
Product or category rule not applyingConfirm the exact product/category and saved values; product over category/global and category over global are confirmed.
Affiliate-specific rate not applyingConfirm Affiliate Name and optional tag/category conditions; test overlap because priority is not verified.
Two-way discount missingConfirm Enable Two Way Commission, Discount Type/Amount, product Referee Commission Setting, and cart test.
Renewal or lifetime commission missingConfirm feature settings and test order conditions; universal renewal/lifetime behaviour is not documented.
Referral cookie expiredCheck Cookie Expiration days in Advanced Features → General and repeat the referral test.
Referral pending or rejectedReview status and the available Approve/Reject action in Manage Referrals.
Order status not eligibleCompare the displayed order status with Affiliate Referral Automation and the test configuration.
Affiliate Dashboard Referral Table with date filters, search, CSV export, PDF export, referral type, commission amount, sale amount, order status, and referral status
Affiliates can use the Referral Table’s date filters, search, Export CSV, and Export PDF controls to review displayed referral records.

Expected Result

You have a focused setting, order, or referral record to test or provide to support.

Notes

The administrator screen also provides date filters and CSV/PDF export in Filter & Export Referral Table.

Tips

Export the same date range from the relevant table before escalating an issue.

Warning

Do not change several commission rules at once while diagnosing an amount issue.

Related Articles

Previous: Calculation ExamplesNext: Wallet & Payouts
Wallet

Wallet Overview

Overview

The affiliate wallet holds affiliate earnings. It is separate from Customer Referral credits.

Purpose

Follow approved commission from referral record to balance, withdrawal, or coupon use.

Navigation Path

Requirements

An affiliate must have an approved or pending referral record.

Step-by-step Instructions

  1. A referral is recorded after an attributed purchase.
  2. Pending Commission waits for review.
  3. Approved Commission is added to the affiliate account balance.
  4. The affiliate requests a withdrawal or uses coupon generation when enabled.

Status Reference

LabelMeaning
Pending CommissionAwaiting approval.
Approved CommissionReady for payout.
Wallet AmountEarnings available for withdrawal or program use.
paidCompleted withdrawal status shown in history.

Expected Result

The affiliate can distinguish pending commission, available wallet balance, and paid withdrawal.

Notes

Customer Referral rewards are not part of this wallet.

Tips

Keep the displayed amount, date, and status when you need administrator support.

Warning

Do not treat a pending request as a completed payment.

PreviousNext
Transactions

Wallet Transactions

Overview

The verified affiliate transaction view is Withdrawal Transaction Table.

Purpose

Locate a withdrawal and its displayed outcome.

Navigation Path

Requirements

At least one withdrawal transaction is required.

Step-by-step Instructions

  1. Open Payout.
  2. Review Withdrawal Transaction Table.
  3. Use search to locate a request.
  4. Compare Amount, Date, and Status.
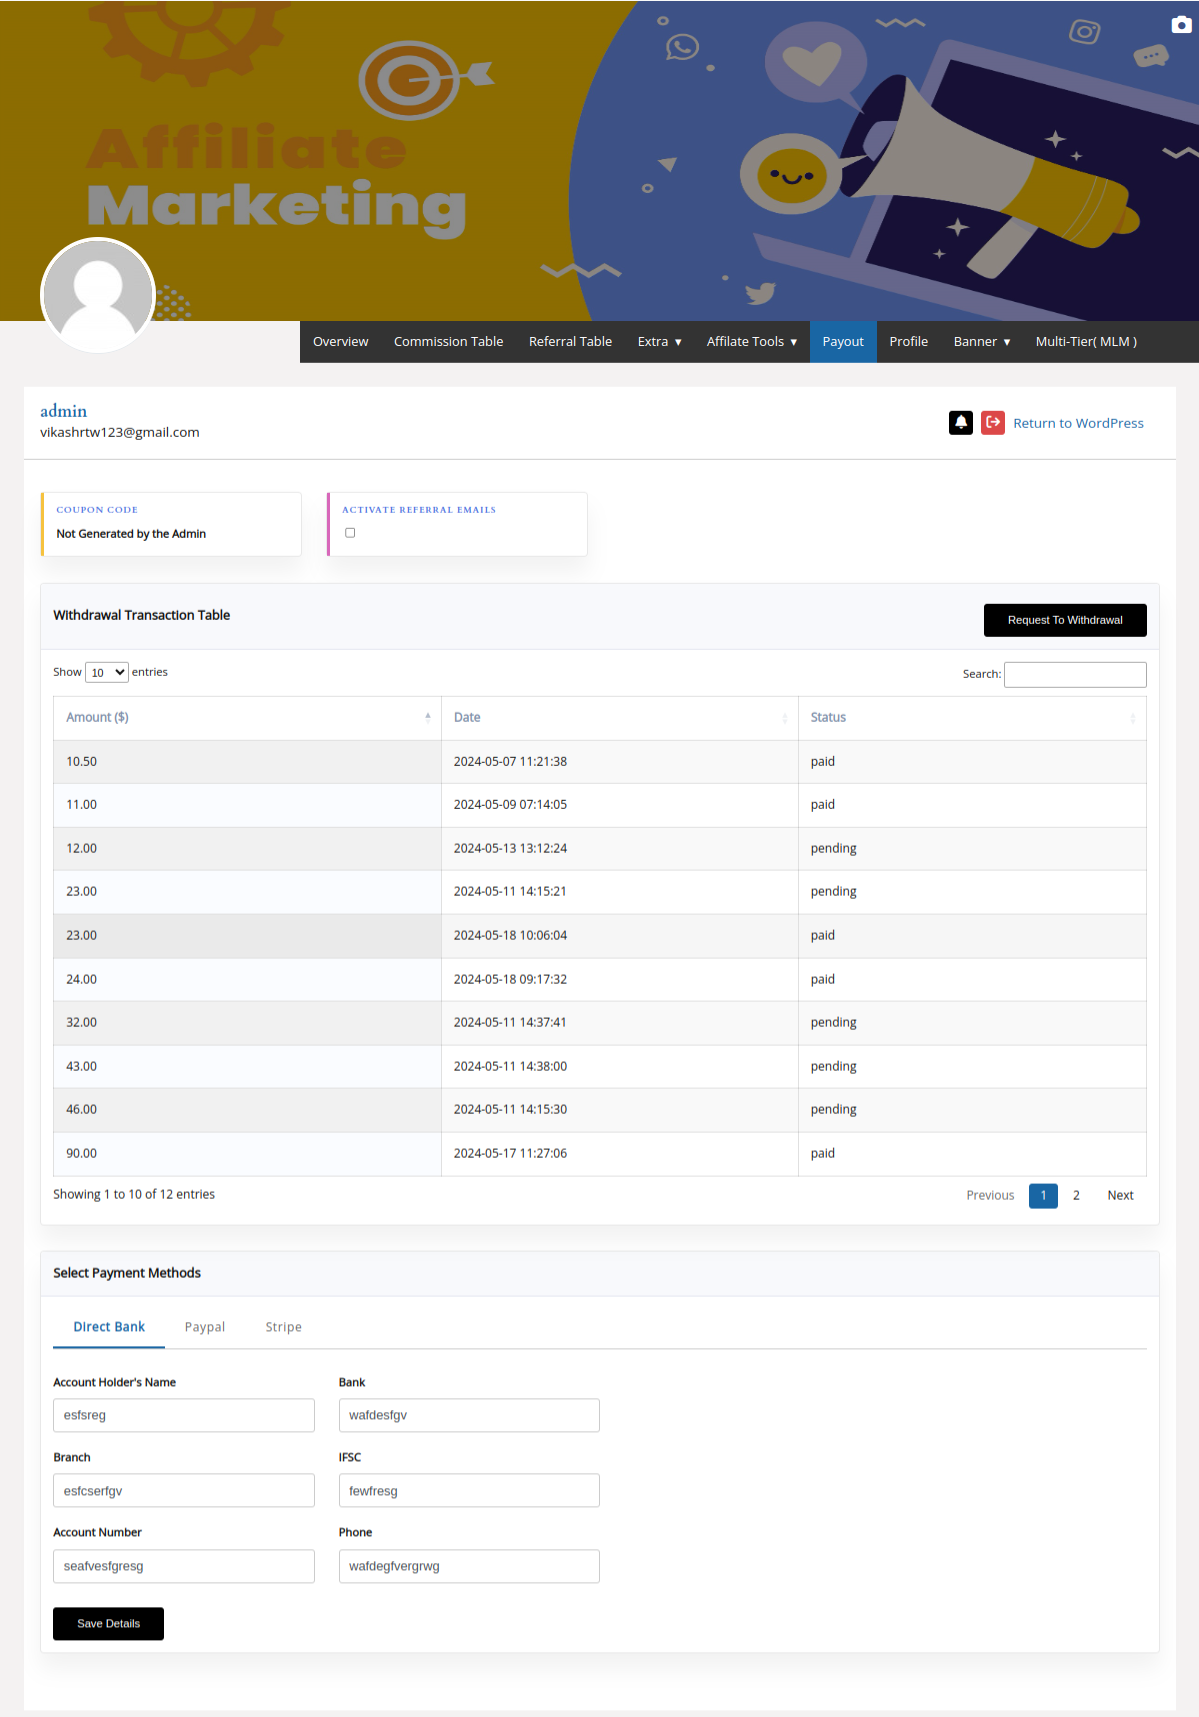
Affiliate Payout page showing Withdrawal Transaction Table, request withdrawal, and payment methods
Withdrawal Transaction Table shows Amount, Date, Status, search, and the Request To Withdrawal control.

Expected Result

You can find the request and its current status.

Notes

A separate credit/debit wallet ledger and exports were not verified and are omitted.

Tips

Keep the displayed amount, date, and status when you need administrator support.

Warning

Do not treat a pending request as a completed payment.

PreviousNext
Withdrawal

Withdrawal Requests

Overview

Affiliates submit a request from Request To Withdrawal; the request appears in Withdrawal Transaction Table.

Purpose

Move available affiliate earnings into the administrator payment workflow.

Navigation Path

Requirements

Available balance, saved payout details, and any configured withdrawal limits.

Step-by-step Instructions

  1. Open Payout.
  2. Confirm payout details are saved.
  3. Select Request To Withdrawal.
  4. Submit the available request details.
  5. Review its pending status in Withdrawal Transaction Table.

Expected Result

A withdrawal transaction appears with the amount and displayed status.

Notes

The Commission screen contains minimum and maximum withdrawal amount settings; exact enforcement behaviour was not verified.

Tips

Keep the displayed amount, date, and status when you need administrator support.

Warning

Do not treat a pending request as a completed payment.

PreviousNext
Payout Methods

Payout Methods

Overview

Verified methods are PayPal and Stripe in administrator Payments settings; the affiliate Payout view also shows Direct Bank.

Purpose

Enable methods and save the affiliate details required by the chosen method.

Navigation Path

Requirements

Service credentials for administrators and payout details for affiliates.

Step-by-step Instructions

  1. Administrator: enable Activate PayPal and/or Activate Stripe.
  2. Choose Live or Sandbox, enter the shown credentials, and select Save Changes.
  3. Affiliate: select Direct Bank, Paypal, or Stripe where available and save the required details.
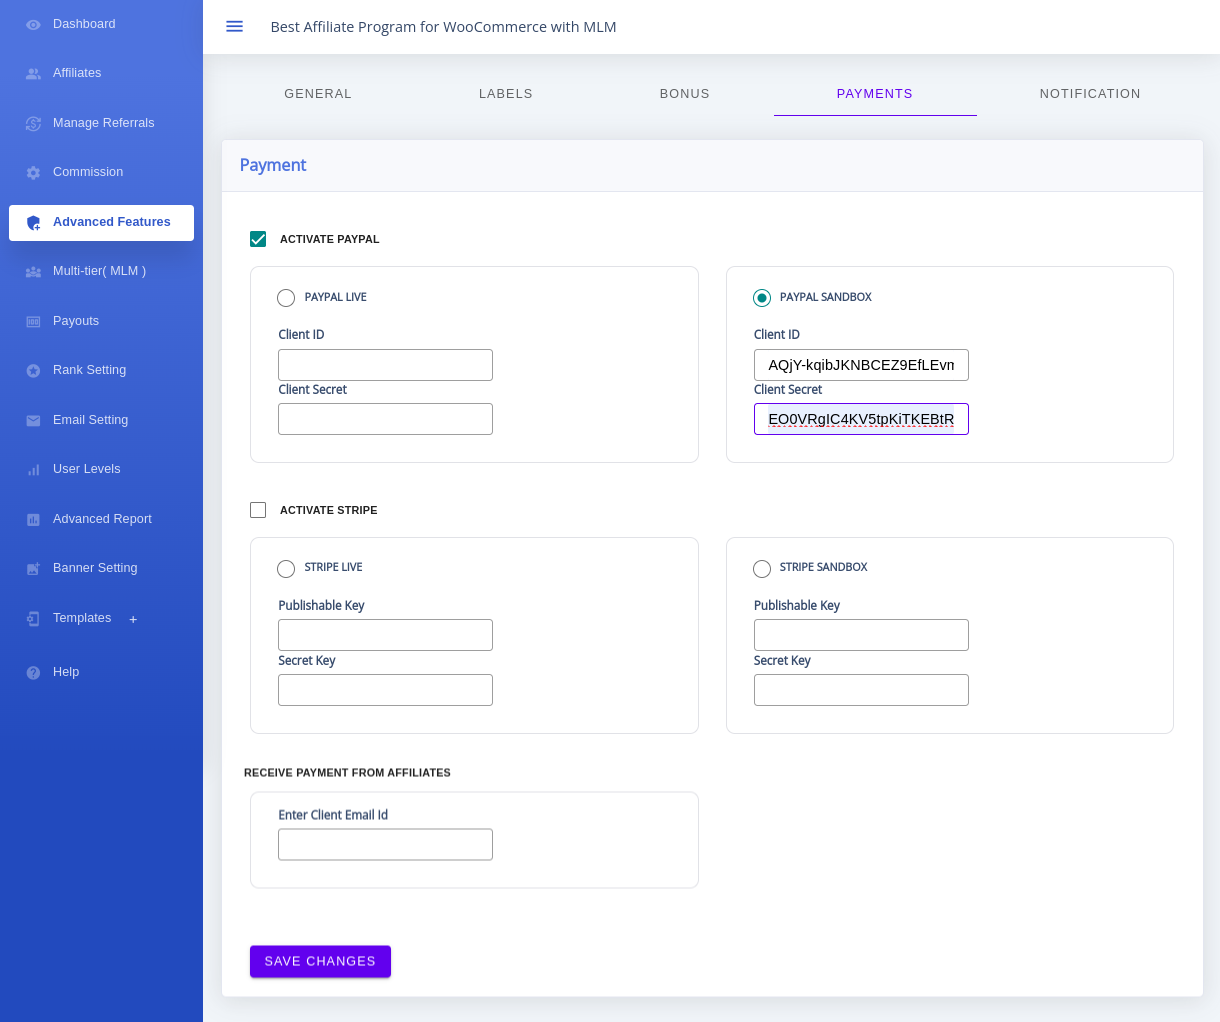
Payments settings showing Activate PayPal, Activate Stripe, Live and Sandbox options
Administrators enable PayPal or Stripe from Payments before affiliates select available payout methods.

Settings Reference

MethodVerified location
PayPalAdministrator Payments and affiliate Payout.
StripeAdministrator Payments and affiliate Payout.
Direct BankAffiliate Payout; the screen displays account-holder, bank, branch, IFSC, account number, and phone fields.

Expected Result

The affiliate can save details for an administrator-enabled method.

Notes

Paystack and manual payment are not verified and are omitted.

Tips

Keep the displayed amount, date, and status when you need administrator support.

Warning

Do not treat a pending request as a completed payment.

PreviousNext
Administrator

Manual Payout Approval

Overview

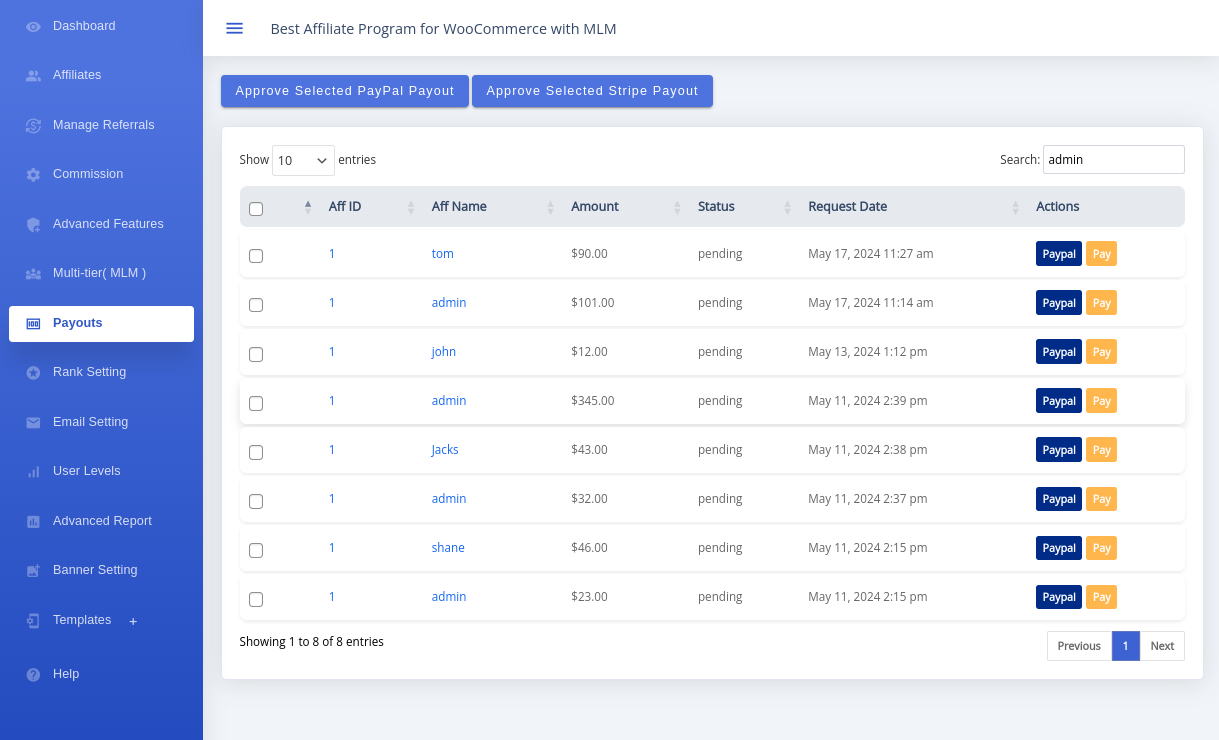
The Payouts table shows Aff ID, Aff Name, Amount, Status, Request Date, and Actions.

Purpose

Review and process pending payout requests.

Navigation Path

Requirements

A pending request and enabled payment method.

Step-by-step Instructions

  1. Open Payouts and review the request.
  2. Use the visible per-row Paypal or Pay action when appropriate.
  3. For selected rows, use Approve Selected PayPal Payout or Approve Selected Stripe Payout.
  4. Reload and confirm the displayed status.
Administrator Payouts table with pending requests and payment actions
The Payouts table provides individual payment actions and selected PayPal or Stripe approval controls.

Expected Result

The table reflects the processed action.

Notes

A bulk rejection control is not visible in the supplied interface and is not documented.

Tips

Keep the displayed amount, date, and status when you need administrator support.

Warning

Do not treat a pending request as a completed payment.

PreviousNext
Coupons

Wallet to Coupon Conversion

Overview

Commission settings include Activate Generation of Coupons, allowing affiliates to generate store coupons from earnings.

Purpose

Use earnings as a coupon where the administrator has enabled the feature.

Navigation Path

Requirements

Coupon generation must be enabled and the affiliate must have eligible earnings.

Step-by-step Instructions

  1. Administrator: enable Activate Generation of Coupons and save changes.
  2. Affiliate: open Affiliate Tools → Coupon Generate.
  3. Follow the available controls and record the generated code.
  4. Use it at checkout according to store coupon rules.

Expected Result

An eligible affiliate can generate a coupon when the configured controls allow it.

Notes

Coupon expiry, calculation, minimum amount, and combinability were not verified.

Tips

Keep the displayed amount, date, and status when you need administrator support.

Warning

Do not treat a pending request as a completed payment.

PreviousNext
History

Withdrawal History

Overview

Withdrawal Transaction Table displays Amount, Date, and Status, plus search and pagination.

Purpose

Confirm a request’s current outcome.

Navigation Path

Requirements

At least one withdrawal request.

Step-by-step Instructions

  1. Open Payout.
  2. Find the request in Withdrawal Transaction Table.
  3. Review Amount, Date, and Status.
  4. Use search or pagination to find older entries.

Status Reference

Visible statusMeaning
pendingNot yet shown as paid.
paidShown as paid in the table.

Expected Result

You can identify the request amount and current status.

Notes

Payment-method, reference, and export columns are not visible in the verified affiliate history table.

Tips

Keep the displayed amount, date, and status when you need administrator support.

Warning

Do not treat a pending request as a completed payment.

PreviousNext
Troubleshooting

Wallet Troubleshooting

Overview

Start with the referral, wallet, payout method, or transaction status shown in the relevant interface.

Purpose

Isolate common balance, withdrawal, coupon, and payment-method issues.

Navigation Path

Requirements

Affiliate ID, amount, date, or referral reference.

Step-by-step Instructions

Troubleshooting Checks

IssueWhere to check / expected resolution
Withdrawal button missingCheck Payout access, available balance, and saved payout details.
Insufficient balanceReview Wallet Amount, Approved Commission, and withdrawal limits.
Pending withdrawalCheck Withdrawal Transaction Table, then Payouts administrator review.
Coupon not generatedCheck Activate Generation of Coupons and Coupon Generate controls.
Wallet balance incorrectCompare pending and approved commission with the referral status.
Payment method unavailableCheck Activate PayPal/Activate Stripe and the affiliate Payout tabs.

Expected Result

You have a focused record or setting to test.

Notes

Do not change several payout settings while a request is pending.

Tips

Keep the displayed amount, date, and status when you need administrator support.

Warning

Do not treat a pending request as a completed payment.

PreviousNext
+
Bonus & Rewards

Bonus & Rewards Overview

Configure optional incentives that supplement affiliate commission without changing the core commission rule.

Overview

Commission rewards a qualifying sale. A bonus is an additional incentive configured in the Bonus tab. A wallet credit is the resulting affiliate account balance. Customer Referral credits remain separate.

Purpose

Reward signup, performance, and sharing activity with explicit rules.

Navigation Path

Prerequisites

Administrator access and a test affiliate account.

Step-by-step Configuration

  1. Open the Bonus tab.
  2. Choose only the bonus types that match your program.
  3. Save changes and run a controlled test before enabling the reward publicly.
Bonus settings showing signup bonus, performance bonus, sharing bonus and sharing bonus limit
The Bonus tab contains the verified signup, performance, sharing, and sharing-limit controls.

Settings Reference

TermUse
CommissionReward for a qualifying referral sale.
BonusAdditional configured incentive.
Wallet creditAffiliate earnings available in the affiliate account.

Expected Result

Only the intended supplemental rewards are configured.

Notes

Do not mix Bonus-tab rewards with MLM commission or Customer Referral credits.

Tips

Use one test incentive at a time.

Warning

A bonus should not replace the commission rule needed for a referred sale.

Related Articles

Previous: Wallet TroubleshootingNext: Signup Bonus
Signup

Signup Bonus

Set an additional amount for a qualifying referral signup.

Overview

The verified Bonus screen provides Signup Bonus Type and Signup Bonus. The supplied screen shows Referral Link as the selected type.

Purpose

Reward the configured signup condition separately from sale commission.

Navigation Path

Prerequisites

A chosen Signup Bonus Type and a test signup flow.

Step-by-step Configuration

  1. Open Bonus.
  2. Select Signup Bonus Type.
  3. Enter the Signup Bonus amount.
  4. Select Save Changes, then test a qualifying signup.

Example

Assumption: Signup Bonus is set to 4. A qualifying signup under the saved type should receive that configured additional amount.

Expected Result

The saved amount is available for the qualifying signup flow.

Notes

Switching Signup Bonus Type to Referral Code changes how referrals are recognised across the program: referral links then stop being used for commissions, signup bonuses and network placement, and codes take over completely. Test this setting with a test affiliate before relying on it.

Tips

Record the affiliate and signup reference during testing.

Warning

Do not enable a signup type without confirming its referral-link impact.

Related Articles

Previous: OverviewNext: Referral Bonus
Sharing

Referral Bonus

Configure the verified Sharing Bonus for eligible product sharing activity.

Overview

The Bonus screen labels this reward Sharing Bonus: an amount for sharing a product on social media. It is not the normal referral-sale commission.

Purpose

Reward configured product-sharing activity with a capped additional amount.

Navigation Path

Prerequisites

Social Media Share Buttons and a Sharing Bonus value are configured.

Step-by-step Configuration

  1. Open Bonus.
  2. Enable Social Media Share Buttons if required.
  3. Enter Sharing Bonus.
  4. Set Sharing Bonus Limit using the visible Time Limit and Amount Limit fields.
  5. Save changes and test one eligible share.

Example

Assumption: Sharing Bonus is 5 and the weekly amount limit is 8. Verify the live rule with a controlled share rather than assuming a calculation outside the configured limit.

Expected Result

The configured sharing reward is available within its saved limit.

Notes

A separate generic “Referral Bonus” label was not verified; this article documents the visible Sharing Bonus feature.

Tips

Test the limit before notifying affiliates.

Warning

Do not count Sharing Bonus as the referral-sale commission.

Related Articles

Previous: Signup BonusNext: Performance Bonus
Performance

Performance Bonus

Set an incentive for affiliates who reach a configured total sales amount.

Overview

The verified Performance Bonus controls are Total Sale Amount To Unlock Achievement and Incentive.

Purpose

Reward affiliates after the configured sales target is achieved.

Navigation Path

Prerequisites

A performance target, incentive value, and test affiliate.

Step-by-step Configuration

  1. Open Performance Bonus.
  2. Enter Total Sale Amount To Unlock Achievement.
  3. Enter the Incentive.
  4. Use the visible add action for another target if needed.
  5. Select Save Changes and verify with a controlled target test.

Settings Reference

Visible fieldUse
Total Sale Amount To Unlock AchievementSales amount target.
IncentiveConfigured additional reward.

Example

Assumption: target 2,000 and incentive 5. An affiliate reaching the qualifying target should receive the saved incentive when the plugin conditions are met.

Expected Result

The saved target and incentive are available for qualifying performance.

Notes

A referral-count target was not visible in the supplied Bonus screen and is not documented.

Tips

Test one target before adding multiple tiers.

Warning

Do not assume how overlapping performance targets are calculated without a test.

Related Articles

Previous: Referral BonusNext: Rank Rewards
+
Rank Rewards

Rank Rewards

Configure and review affiliate ranks separately from Bonus-tab incentives and MLM commissions.

Overview

Rank Setting lists Rank Name, Rank Priority, Rank Commission, and Date. The screen provides Add New Rank.

Purpose

Create rank-based commission or reward rules and verify the intended rank order.

Navigation Path

Prerequisites

Administrator access and defined rank requirements.

Step-by-step Configuration

  1. Open Rank Setting.
  2. Select Add New Rank.
  3. Enter the available rank details and save them.
  4. Review Rank Priority and Rank Commission in the list.
  5. Test a qualifying affiliate against the saved rank conditions.
Rank Setting table showing Add New Rank, Rank Name, Rank Priority, Rank Commission, Action and Date
Rank Setting lists each configured rank’s name, priority, commission, and date.

Settings Reference

Visible fieldUse
Rank NameIdentifies the rank.
Rank PriorityDisplays the configured rank priority.
Rank CommissionDisplays the configured rank commission value.

Example

Assumption: a rank has commission 10. Verify the actual qualification trigger and final commission through a test affiliate before publishing it.

Expected Result

The rank appears in the Rank list with its configured priority and commission.

Notes

The available screenshot does not verify an additional one-time Rank Reward amount, so that behaviour is not claimed.

Tips

Use descriptive rank names and test rank order before adding multiple ranks.

Warning

Do not treat Rank Commission as a Bonus-tab incentive without confirming the configured workflow.

Related Articles

Previous: Performance BonusNext: Level Rewards
Levels

Level Rewards

Use User Levels to configure level-based affiliate commission conditions without mixing them with Rank Settings or MLM.

Overview

User Levels lists Level, Name, Commission, and To Reach. The supplied interface includes Add New Level.

Purpose

Define commission levels based on the available qualification condition.

Navigation Path

Prerequisites

Defined level conditions and an affiliate test account.

Step-by-step Configuration

  1. Open User Levels.
  2. Select Add New Level.
  3. Enter the available Name, Commission, and To Reach details.
  4. Save the level.
  5. Review the level in the list and test the configured qualifying condition.
User Levels table showing Add New Level, Level, Name, Commission, To Reach and Actions
User Levels displays the configured level, commission, and To Reach condition.

Settings Reference

Visible fieldUse
LevelDisplays the configured level number.
CommissionDisplays the level commission.
To ReachDisplays the qualification condition, such as becoming an affiliate, number of referrals, or total sale amount.

Example

Assumption: a level requires five referrals. Test the exact qualifying count and resulting commission in the installed release.

Expected Result

The level appears with its saved commission and To Reach condition.

Notes

Level Rewards differ from Rank Rewards because their visible configuration area and qualification condition are separate.

Tips

Test one level before layering additional conditions.

Warning

Do not use User Levels as evidence of MLM distribution.

Related Articles

Previous: Rank RewardsNext: Bonus History
History

Bonus History

Verify bonus outcomes using the affiliate balance and available referral records until a dedicated Bonus History table is available.

Overview

A dedicated Bonus History table with status, reward amount, award date, and reference was not verified in the available interface.

Purpose

Provide a repeatable verification process without inventing a history screen.

Navigation Path

Prerequisites

A completed test bonus and its affiliate or referral reference.

Step-by-step Configuration

  1. Record the affiliate and action that should qualify for the bonus.
  2. Review the affiliate’s displayed wallet amount and available referral records.
  3. Compare the expected incentive with the observed balance after the qualifying workflow completes.
  4. Keep the date and reference for administrator review.

Expected Result

The administrator has a traceable test result for the configured bonus.

Notes

Dedicated bonus status labels, filtering, and exports are not documented because they were not verified.

Tips

Test each bonus type with only one changed setting.

Warning

Do not infer a bonus outcome from a wallet change without recording the qualifying event.

Related Articles

Previous: Level RewardsNext: Bonus Troubleshooting
Troubleshooting

Bonus Troubleshooting

Check the saved incentive, qualifying event, and affiliate balance before changing a bonus rule.

Overview

Start with the specific Bonus, Rank Setting, or User Levels rule that should have created the result.

Purpose

Isolate missing or unexpected bonus outcomes without assuming a cause.

Navigation Path

Prerequisites

Affiliate ID, qualifying action, target, and expected reward amount.

Troubleshooting Checks

IssueWhere to check / expected resolution
Signup bonus missingCheck Signup Bonus Type, Signup Bonus value, and the qualifying signup flow.
Sharing bonus missingCheck Social Media Share Buttons, Sharing Bonus, and Sharing Bonus Limit.
Performance bonus missingCheck Total Sale Amount To Unlock Achievement and Incentive.
Rank reward missingCheck Rank Name, Rank Priority, Rank Commission, and the installed rank conditions.
Level reward missingCheck the User Level Commission and To Reach condition.
Wallet not updated or duplicateCompare one controlled qualifying event with the balance before changing settings.

Expected Result

You can identify the exact configuration and event that need review.

Notes

A duplicate-prevention workflow was not verified, so this guide does not claim one.

Tips

Change one setting at a time and retain a test record.

Warning

Do not use MLM settings to troubleshoot a Bonus-tab rule.

Related Articles

Previous: Bonus HistoryNext: MLM
MLM

MLM Overview

Configure a multi-level affiliate network separately from standard affiliate commission rules.

Overview

In this plugin, MLM adds level commissions to the normal affiliate referral workflow. An affiliate who referred the customer can receive the direct referral commission. Eligible affiliates above that affiliate can receive separately configured MLM level commissions.

Purpose

Use MLM when your programme needs a referral network and level-based commission, rather than a single affiliate earning from a sale.

Prerequisites

Configure the standard affiliate commission first, then enable MLM and define the applicable level commissions.

Navigation Path

How the workflow works

  1. An affiliate refers a customer or recruits another affiliate through the configured programme workflow.
  2. A customer places an order through the child affiliate’s referral link.
  3. The direct affiliate commission is calculated from the Commission configuration.
  4. When the MLM conditions and level settings apply, eligible upline affiliates receive MLM level commission.
Affiliate dashboard Multi-tier MLM tab showing MLM plan, level commission table and MLM chain controls
The affiliate Multi-tier (MLM) tab shows the configured plan details and controls for viewing the MLM chain.

Standard Affiliate Program vs MLM

AreaStandard Affiliate ProgramMLM
Main relationshipAffiliate and referred customer.Affiliate network and configured levels.
Who earnsThe affiliate linked to the sale.The direct affiliate and eligible upline affiliates.
Commission typeDirect referral commission.Direct referral commission plus MLM level commission.
Network structureNo downline structure is required.Uses the selected MLM structure.
DashboardAffiliate Dashboard referral tools and records.Affiliate Dashboard Multi-tier (MLM) tab and chain view.
Typical use caseSingle-level affiliate referrals.Level-based affiliate networks.

Important terms

A sponsor/referrer is the affiliate associated with recruiting or referring another affiliate. A placement parent is the parent position in an MLM structure. Do not assume they are always the same person unless the installed plan and placement workflow confirm it.

Keep commission types separate

Direct commission is configured in Commission Configuration. MLM level commission is configured in Multi-tier (MLM).

Expected Result

You can distinguish a direct sale commission from any level commission generated for the MLM network.

Related Articles

Previous: Bonus TroubleshootingNext: Enable MLM
MLM Setup

Enable MLM

Activate MLM before configuring its structure, depth, and level commissions.

Overview

The Multi-tier (MLM) settings screen provides the ACTIVATE MLM control.

Purpose

Make the MLM settings available for an affiliate network that uses level commission.

Prerequisites

Administrator access and an active Affiliate & Referral installation. Define the standard direct commission separately if your programme will pay it.

Navigation Path

Step-by-step Configuration

  1. Open Multi-tier (MLM) from the Affiliate & Referral menu.
  2. Enable ACTIVATE MLM.
Multi-tier MLM settings showing Activate MLM, MLM Type, Depth, Child and MLM Levels controls
Use ACTIVATE MLM, then configure the plan and level settings shown on the same screen.
  1. Choose the required MLM TYPE, set the available values, and select SAVE CHANGES.
  2. Confirm that the Multi-tier (MLM) tab is available in an affiliate’s dashboard after the affiliate is active in the programme.

Settings Reference

Visible settingUse
ACTIVATE MLMEnables or disables MLM.
MLM TYPESelects the MLM plan.
DEPTHSets how many MLM levels the configuration can have.
CHILDSets how many children a user can have when the selected plan uses that value.
MLM LEVELSSets the commission type and amount for each level.

Expected Result

The saved Multi-tier (MLM) configuration is active and eligible MLM commissions can be evaluated for future qualifying referrals.

Warning

The settings screen warns that changing the MLM plan can require affiliates to be activated or deactivated again so chains match the selected plan. Test plan changes before applying them to an existing network.

Related Articles

Previous: MLM OverviewNext: Choose an MLM Structure
MLM Setup

Choose an MLM Structure

Select the MLM type before creating or reorganising an affiliate network.

Overview

The MLM guide documents Binary, Forced Matrix, and Unilevel structures. The Multi-tier (MLM) screen provides the plan selection together with DEPTH, CHILD, and level-commission controls.

Purpose

Match the network shape to the programme rules before affiliates build their downline.

Navigation Path

Step-by-step Configuration

  1. Open Multi-tier (MLM) and enable ACTIVATE MLM.
  2. Select the required option in MLM TYPE.
  3. Set DEPTH, and set CHILD where the selected structure requires a child limit.
  4. Set the default and individual MLM LEVELS commission values, then select SAVE CHANGES.

Structure Comparison

StructureDirect children / widthDepthPlacementCommon use case
BinaryTwo direct child positions.Configured levels.Two-leg structure; placement workflow must be tested in the installed release.A two-branch network.
Forced MatrixConfigured by CHILD.Configured by DEPTH.Matrix position; automatic placement is not documented here without verification.A fixed-width, fixed-depth network.
UnilevelThe available sources do not confirm a universal width limit.Configured levels.Verify placement behaviour in the installed release.A level-based network where the applicable plan settings are tested first.

Notes

Do not change a plan casually after affiliates have formed a network. The interface specifically notes that a plan change may require reactivating or deactivating members to build chains according to the selected plan.

Expected Result

The MLM type and supporting level settings are saved before affiliate network growth begins.

Related Articles

Previous: Enable MLMNext: Binary MLM Configuration
Binary

Binary MLM Configuration

Configure the Binary plan as a two-leg network and set its MLM level commissions.

Overview

The documented Binary structure has two child positions: a left branch and a right branch. It is used with the same DEPTH and MLM LEVELS settings available on the Multi-tier (MLM) screen.

Purpose

Set up a two-branch structure without adding unverified volume, pairing, or carry-forward rules.

Prerequisites

MLM is active and the direct affiliate commission is configured separately when required.

Navigation Path

Step-by-step Configuration

  1. Select Binary in MLM TYPE.
  2. Set the required DEPTH for the levels that can receive MLM commission.
  3. Confirm the two-child Binary structure, then define the default commission and each entry under MLM LEVELS.
  4. Select SAVE CHANGES and test the resulting chain with test affiliates.

Settings Reference

SettingHow it applies
MLM TYPESelects Binary.
DEPTHLimits the configured MLM levels.
DEFAULT COMMISSION FOR A LEVELSets the default type and amount used for a level.
MLM LEVELSAllows commission type and amount to be set level by level.

Example Network

Affiliate A has one left child and one right child. If a qualifying sale is attributed to a child, the child’s direct commission remains a Commission configuration rule; an eligible parent level can receive the separately configured MLM level commission.

Expected Result

The Binary plan is saved with two branches and configured level commissions.

Warning

Pairing bonuses, weak-leg calculations, carry-forward volume, and matching bonuses were not verified and are intentionally not documented.

Related Articles

Previous: Choose an MLM StructureNext: Forced Matrix Configuration
Forced Matrix

Forced Matrix Configuration

Set a fixed width and depth, then configure commission by MLM level.

Overview

Forced Matrix uses the CHILD value for the number of children and DEPTH for the number of configured levels.

Purpose

Create a bounded matrix and define the commission available at each configured level.

Prerequisites

MLM is active and the matrix width and depth have been approved for the programme.

Navigation Path

Step-by-step Configuration

  1. Select Forced Matrix in MLM TYPE.
  2. Enter the required number of direct positions in CHILD.
  3. Enter the number of commission levels in DEPTH.
  4. Set the default commission and each relevant MLM LEVELS entry, then select SAVE CHANGES.

Settings Reference

SettingUse
CHILDSets the configured matrix width.
DEPTHSets how many levels the MLM configuration can have.
MLM LEVELSSets commission type and amount for each configured level.

Example

Example assumption: 5 × 4. Set CHILD to 5 and DEPTH to 4. This represents five direct positions on Level 1 and commission settings for up to four configured levels. Test the placement result before using the plan with live affiliates.

Expected Result

The matrix width, depth, and level commission settings are saved.

Warning

The available documentation does not verify what happens when a level is full, automatic spillover, manual placement, or whether commission follows the sponsor rather than the placement parent. Do not describe those rules until tested in the installed release.

Related Articles

Previous: Binary MLM ConfigurationNext: Unilevel MLM Configuration
Unilevel

Unilevel MLM Configuration

Configure the Unilevel plan and its per-level commission rates from Multi-tier (MLM).

Overview

Unilevel is a supported MLM type. The available interface confirms that MLM commission can be configured by DEPTH and MLM LEVELS, but it does not verify a universal direct-child limit for this plan.

Purpose

Set the level depth and commission values for a Unilevel programme while keeping unsupported placement claims out of the configuration.

Prerequisites

MLM is active, the programme’s intended affiliate relationship is defined, and the direct commission has been configured separately if needed.

Navigation Path

Step-by-step Configuration

  1. Select Unilevel in MLM TYPE.
  2. Set DEPTH to the number of MLM levels your programme will configure.
  3. Set the default commission and the commission type and amount for each applicable entry in MLM LEVELS.
  4. Select SAVE CHANGES, then validate the chain and referral result with test affiliates.

Example Structure

Affiliate A sponsors affiliates on its first level. A qualifying customer order through a child affiliate can create the child’s direct commission and, when the saved MLM conditions apply, configured level commission for eligible upline levels. Test the exact sponsor and placement relationship in the installed plan.

Difference from Binary and Forced Matrix

PlanConfirmed configuration distinction
BinaryTwo direct child positions in left and right branches.
Forced MatrixConfigured child count and configured depth define the matrix.
UnilevelUses the selected plan with depth and per-level commission rates; direct-width behaviour must be verified in the installed release.

Expected Result

The Unilevel plan and its configured MLM level commissions are saved and ready for controlled testing.

Warning

Do not label Unilevel “unlimited” or assume a particular placement rule unless the installed interface and test result confirm it.

Related Articles

Previous: Forced Matrix ConfigurationNext: Configure MLM Levels and Commission
MLM Commission

Configure MLM Levels and Commission

Set the commission basis, number of levels, and commission type and amount for each MLM level.

Overview

MLM commission is configured independently of the direct affiliate commission. The Multi-tier (MLM) screen provides MLM COMMISSION BASED ON, DEPTH, DEFAULT COMMISSION FOR A LEVEL, and MLM LEVELS.

Purpose

Define what each eligible upline level earns when a qualifying child referral produces a commission.

Prerequisites

MLM is active, an MLM type is selected, and the direct commission is configured separately in Commission Configuration.

Navigation Path

Step-by-step Configuration

  1. Under MLM COMMISSION BASED ON, select the applicable basis: Based On Product Price or Based On The Amount Earned By The Affiliate As Commission.
  2. Enter the number of commission levels in DEPTH.
  3. Set the Type and Amount in DEFAULT COMMISSION FOR A LEVEL.
  4. For every displayed entry in MLM LEVELS, choose Commission Type and enter Commission Amount.
Multi-tier MLM settings with commission basis, depth, default level commission, and individual MLM level commission settings
The MLM screen shows both supported commission bases and a commission type and amount for each configured level.
  1. Select SAVE CHANGES.
  2. Place a controlled test order through a child affiliate link and compare the direct referral row with the MLM commission row in the administrator referral records.

Settings Reference

SettingMeaningExampleEffect
MLM COMMISSION BASED ONDefines the value used for MLM calculation.Based On Product PriceLevels calculate from the configured product-price basis.
DEPTHNumber of MLM levels configured.2Displays Level 1 and Level 2 settings.
DEFAULT COMMISSION FOR A LEVELDefault type and amount for a level.Fixed, 10Provides the default level commission setting.
MLM LEVELSIndividual level commission rules.Level 1, Percentage, 5Sets that level’s MLM commission.

How the commission types differ

The direct affiliate receives the standard referral commission configured in Commission. The parent or eligible upline receives MLM Level 1 commission. Higher eligible upline positions can receive Level 2 and later commission only when those levels and conditions are configured.

Verified Example

Assumption: product price is 1,000 and Level 1 is configured as 5% using Based On Product Price. The Level 1 MLM commission is 50. Any direct affiliate commission is a separate rule and is not replaced.

Expected Result

Each configured MLM level has a saved commission type and amount, evaluated against the selected basis.

Related Articles

Previous: Unilevel MLM ConfigurationNext: MLM Placement and Sponsor Relationships
MLM Relationships

MLM Placement and Sponsor Relationships

Understand the relationship names used when affiliates form an MLM chain.

Overview

MLM relationships identify an affiliate’s connection to the people above and below them in the chain. A sponsor/referrer and a placement parent can describe different relationships; do not treat them as interchangeable without testing the selected MLM plan.

Purpose

Use clear relationship terms when checking why a level commission or tree position appears.

Prerequisites

MLM is active and the affiliate registration flow is available.

Relationship Reference

TermMeaning
Sponsor/referrerThe affiliate associated with referring or recruiting another affiliate.
Placement parentThe parent position that places an affiliate within the selected MLM structure.
Direct childAn affiliate directly below a parent position.
UplineAffiliates above a member in the MLM chain.
DownlineAffiliates below a member in the MLM chain.
Level 1 / Level 2The first and second positions above or below a member, depending on the view being discussed.

Step-by-step Registration Check

  1. Use the plugin’s affiliate registration form when registering a new affiliate through an existing affiliate’s referral flow.
  2. Activate the new affiliate if the programme requires approval.
  3. Open Multi-tier (MLM) and confirm the selected plan, depth, and child settings.
  4. Check the affiliate’s Multi-tier (MLM) dashboard view to confirm the resulting chain position.

Relationship Example

Affiliate A refers Affiliate B. B is a child in A’s network and A is B’s upline at Level 1. If the selected plan places B beneath a different parent, the placement parent and sponsor may differ; verify this with a test registration before describing the live relationship.

Expected Result

A test affiliate registered through the plugin form appears in the expected MLM chain position.

Warning

Automatic MLM parent mapping requires registration through the plugin affiliate registration form. Default WordPress registration is not documented as creating that mapping. Manual placement is also not documented here because it was not verified.

Related Articles

Previous: Configure MLM Levels and CommissionNext: MLM Network Tree
MLM Dashboard

MLM Network Tree

Use the affiliate-facing Multi-tier (MLM) tab to view the available chain hierarchy.

Overview

The verified affiliate Multi-tier (MLM) screen displays the MLM plan, a level commission table, and Show MLM Chain. It also includes a Show In Active Member Also option and a tree-style hierarchy.

Purpose

Help affiliates review the MLM chain visible to their account without confusing it with administrator configuration.

Navigation Path

Step-by-step Instructions

  1. Sign in as an affiliate and open Multi-tier (MLM).
  2. Review the displayed MLM plan, number of children needed to start earning commission, and level commission table.
  3. Select Show MLM Chain to display the available hierarchy.
Affiliate Multi-tier MLM dashboard showing Show MLM Chain, inactive member option, level commission table and network tree
The affiliate view provides the MLM plan and level commission details alongside the available tree display.

What each audience can do

AudienceVerified responsibility
AffiliateViews the available Multi-tier (MLM) plan, level commission information, and chain display.
AdministratorActivates MLM and configures plan, basis, depth, child count, and level commissions.

Expected Result

The affiliate can view the chain data that the installed dashboard makes available.

Notes

Expanding nodes, editing parent relationships, and all tree controls beyond those visibly shown are not documented because they were not verified.

Related Articles

Previous: MLM Placement and Sponsor RelationshipsNext: Downline Performance and Reports
MLM Performance

Downline Performance and Reports

Review MLM-related activity from the affiliate chain and administrator referral records.

Overview

The affiliate Multi-tier (MLM) screen confirms plan and level-commission information, but a dedicated affiliate downline performance report with export controls was not verified. Administrators can review referral rows that distinguish Referral Commission from MLM Commission.

Purpose

Use verified MLM information to review activity without duplicating the general Reports documentation.

Navigation Paths

Step-by-step Review

  1. Affiliate: Open Multi-tier (MLM) and review the visible plan, required children value, level commission entries, and chain.
  2. Administrator: Open Manage Referrals and find the relevant referral record.
  3. Use the referral record to distinguish the direct Referral Commission from the parent MLM Commission, then review or approve it according to the referral workflow.

Verified Data

AreaVerified dataNot assumed
Affiliate Multi-tier (MLM)MLM plan, child requirement, level commission table, and chain controls.Sales totals, customer/order details, date filters, CSV, or PDF downloads.
Administrator referral recordsDirect referral commission and MLM commission records for review.A separate MLM-only export or downline analytics report.

Expected Result

Affiliates can inspect available chain data, while administrators can verify the direct and MLM commission records attached to qualifying referrals.

Related Articles

Previous: MLM Network TreeNext: MLM Commission Examples
MLM Commission

MLM Commission Examples

Use controlled examples to distinguish the direct commission from separate MLM level commissions.

Overview

The actual result depends on the saved direct commission, MLM level settings, selected commission basis, and qualifying referral. These examples use only the shown inputs and exclude tax, shipping, discounts, refunds, and mixed-cart behaviour.

Purpose

Validate configuration with predictable test orders before using it for live affiliates.

Navigation Path

Calculation Examples

Example and assumptionsDirect affiliateLevel 1 parentLevel 2 upline
A — Order amount 1,000; direct commission 10%; MLM Level 1 5%; MLM Level 2 3%; basis: product price.100 direct commission.50 MLM Level 1 commission.30 MLM Level 2 commission.
B — Order amount 1,000; direct commission 10%; MLM Level 1 10%; basis: product price.100 direct commission.100 MLM Level 1 commission.Not configured in this example.
C — Child direct commission 100; MLM Level 1 5%; basis: amount earned by the affiliate as commission.100 direct commission.5 MLM commission, assuming the 5% applies to the child affiliate’s 100 commission.Not configured in this example.

How to verify

  1. Configure the direct affiliate commission in Commission System Overview.
  2. Set the MLM basis, depth, and level values in Multi-tier (MLM).
  3. Create one controlled order through a child affiliate referral link.
  4. Review the administrator referral records for the separate Referral Commission and MLM Commission rows.

Expected Result

Example B can produce the same numerical amount for the direct affiliate and parent because they are separate commission types using equal percentage values on the same order basis.

Warning

These are configuration examples, not universal rules. Confirm the installed release’s exact order eligibility and calculation result with a test order.

Related Articles

Previous: Downline Performance and ReportsNext: MLM Troubleshooting
Troubleshooting

MLM Troubleshooting

Check registration, chain structure, commission basis, and referral records before changing MLM settings.

Overview

Several settings can affect the MLM result. Start with one test affiliate and one test order, then compare direct and MLM referral records.

Purpose

Identify the next verified check without assuming the cause.

Troubleshooting Checks

SymptomLikely cause / what to checkNavigation path / expected resolution
New affiliate is not in the chainRegistration may not have used the plugin affiliate registration form, or the affiliate may need activation.Check the affiliate registration flow and Multi-tier (MLM); register one test affiliate through the plugin form and verify the chain.
Third or later child is not appearingBinary or Forced Matrix child limit may have been reached.WooCommerce → Affiliate & Referral → Multi-tier (MLM); review MLM TYPE and CHILD, then test the configured limit.
Incorrect parent mappingSponsor and placement parent may not be the same, or the registration flow may be wrong.Check the test registration and MLM chain; do not manually alter a relationship unless the installed interface supports it.
Direct affiliate and parent receive the same amountEqual percentage values may be using the same product-price basis.Review Commission and Multi-tier (MLM); compare the direct Referral Commission and MLM Commission as separate records.
MLM commission is not generatedMLM may be inactive, level/depth may not include the upline, the referral may not qualify, or the order status may not be eligible.Check Multi-tier (MLM) and Manage Referrals; test one qualifying order and review its referral rows.
Wrong level commissionThe level type, amount, or commission basis may differ from the intended setting.WooCommerce → Affiliate & Referral → Multi-tier (MLM); compare MLM COMMISSION BASED ON, DEPTH, and MLM LEVELS with the test result.
Network tree is not showingThe account may have no visible chain data, or the Multi-tier (MLM) feature may not be active.Affiliate Dashboard → Multi-tier (MLM); confirm activation and select Show MLM Chain.
Downline report is emptyA dedicated downline report with export fields was not verified; the account may only have chain data.Affiliate Dashboard → Multi-tier (MLM); review available chain information. Use Manage Referrals for administrator commission review.
Commission basis is misunderstoodThe screen supports product price and child affiliate commission as different MLM bases.WooCommerce → Affiliate & Referral → Multi-tier (MLM); select one basis and retest with known values.
Width or depth limit is reachedCHILD or DEPTH can limit the selected plan’s configured positions or commission levels.WooCommerce → Affiliate & Referral → Multi-tier (MLM); review the plan values before changing a live network.

Expected Result

You have an isolated configuration or workflow check to resolve before changing further MLM settings.

Warning

Do not add spillover, pairing, genealogy, or manual placement assumptions to an investigation unless they are confirmed by the installed plugin release.

Related Articles

Previous: MLM Commission ExamplesNext: Reports & Analytics
Reports

Reports Overview

Use the administrator and affiliate reporting views to interpret referrals, commissions, sales, and available account activity.

Overview

Reports answer different questions for each audience. Administrators use the Dashboard and referral records to review programme-wide activity. Affiliates use Overview, Report, Commission Table, Referral Table, and available Download areas to review their own activity.

Purpose

Choose the correct view before interpreting a total or investigating a record.

Report Categories

Report typeAudienceMain dataTypical use
Admin DashboardAdminProgramme summary cards, Sale Overview, recent referrals, and top affiliates.Review programme totals before opening detail records.
Affiliate Overview and ReportAffiliatePersonal referrals, commission, wallet amount, sales, orders, link activity, and displayed commission distribution.Understand personal referral performance.
Referral recordsAdmin and AffiliateIndividual attributed referral and commission records.Review status and reconcile a specific referral.
Commission and sales dataAdmin and AffiliateDisplayed commission, sale, order, and date information.Compare totals with the underlying records.

Later Reports Articles

Wallet and Payout Reports, Customer Referral Reports, MLM and Downline Reports, Date Filters and Search, CSV and PDF Exports, and Reports Troubleshooting will be completed in Part 2.

Expected Result

You can select the administrator-wide or affiliate-specific report that matches the question being investigated.

Read summaries with detail records

Use a summary value as a starting point, then confirm it against the corresponding referral, commission, payout, or order records available in the interface.

Related Articles

Previous: MLM TroubleshootingNext: Admin Dashboard and Summary Metrics
Admin Dashboard

Admin Dashboard and Summary Metrics

Use the administrator Dashboard to review high-level programme activity before investigating individual records.

Overview

The verified Dashboard displays a Sale Overview chart, summary cards, an Earnings distribution, Last 5 Referrals, and Top 5 Affiliates.

Purpose

Review summary values and identify the detailed referral, affiliate, or payout record that needs follow-up.

Navigation Path

Step-by-step Instructions

  1. Open Dashboard from the Affiliate & Referral menu.
  2. Review Sale Overview, which visibly compares Earnings, Orders, and Sales.
  3. Review the summary cards and use Last 5 Referrals or Top 5 Affiliates to identify a record for further review.
Administrator Dashboard showing Sale Overview, total affiliates, total referrals, commission and payout summary cards, earnings, recent referrals, and top affiliates
The administrator Dashboard combines programme summary cards with the most recent referrals and highest-performing affiliates.

Metric Reference

Visible metricMeaning
Total AffiliatesCount displayed for affiliates in the programme.
Total ReferralsCount displayed for recorded referrals.
Total CommissionDisplayed total commission value.
Approved, Pending, and Rejected CommissionDisplayed commission values grouped by their shown state.
Payout Paid and Payout PendingDisplayed payout values grouped by their shown state.
Total Click, Total Purchase, Conversion Ratio, Total EarningAdditional visible activity and earning summary values.

Verify an Unusual Total

  1. Identify the affected card or chart period.
  2. Open the relevant detailed table, such as Referral Reports or Commission Reports.
  3. Compare the displayed records and their statuses before changing configuration.

Expected Result

You can connect an unusual Dashboard total to the available detailed records.

Notes

A Dashboard date filter was not visible in the verified screenshot, so no period-selection workflow is documented here.

Related Articles

Previous: Reports OverviewNext: Affiliate Reports
Affiliate Reports

Affiliate Reports

Use the affiliate Dashboard reports to interpret your own links, referrals, orders, sales, and commission activity.

Overview

The verified affiliate Dashboard includes Overview, Commission Table, Referral Table, and the Extra menu with Report and Download. The Report screen contains a Report Table, Report Chart, Commission Distribution, and Day Wise Report Table.

Purpose

Interpret personal performance without confusing overview totals with individual referral records.

Navigation Path

Step-by-step Instructions

  1. Open Extra and select Report.
  2. Read the Report Table to compare each displayed Link with its No. of Hits and Purchase Done values.
  3. Use Day Wise Report Table to compare Total Order, Total Commission Earned, Date, and Total Sales Amount.
Affiliate Dashboard Report view with Report Table, Report Chart, Commission Distribution and Day Wise Report Table
The affiliate Report view separates link activity, chart summaries, commission distribution, and day-wise order, commission, and sales values.

Overview Cards vs Detailed Records

ViewUse
OverviewShows personal Total Referrals, Total Commission, Pending Commission, Wallet Amount, Sales Report, and Orders charts.
ReportShows link hits and purchases, chart summaries, commission distribution, and day-wise data.
Commission Table / Referral TableShows the individual commission or referral records available to the affiliate.

Expected Result

You can trace a personal total from Overview or Report to the available detailed tables.

Notes

The visible Report Table has search and entry-count controls. Date filters and export controls are not shown in this verified Report screenshot and are not assumed here.

Related Articles

Previous: Admin Dashboard and Summary MetricsNext: Referral Reports
Referral Records

Referral Reports

Use the administrator referral table to review individual affiliate-attributed sales and their status.

Overview

Manage Referrals displays recorded referral rows. The verified screen includes an affiliate ID and name, Reference, Order Status, Comm. Amount, Sale Amount, Customer Name, Date, Status, and Actions.

Purpose

Find the specific attributed referral behind a summary total or commission question.

Navigation Path

Step-by-step Instructions

  1. Open Manage Referrals.
  2. Use the visible search field or the From and To controls in Filter & Export Referral Table to locate the record.
  3. Read its Reference, Order Status, Comm. Amount, Sale Amount, Customer Name, Date, and Status before taking any action.
Manage Referrals administrator table with affiliate ID and name, reference, order status, commission amount, sale amount, customer name, date, status, actions and date filters
Manage Referrals provides the detailed record fields used to reconcile a referral with its sale and commission.

Field Reference

Visible columnUse
Aff ID / Aff NameIdentifies the affiliate associated with the row.
ReferenceShows the displayed referral or order reference.
Order StatusShows the order status recorded for that row.
Comm. Amount / Sale AmountShows the recorded commission and sale values.
Customer Name / DateIdentifies the displayed customer and record date.
Status / ActionsShows the referral state and available approve, reject, or delete controls.

Expected Result

You can identify the referral record, its linked sale details, and its current status.

Notes

For approval and rejection steps, use Manage Referrals and Approve or Reject Commissions. This article focuses on reading report data.

Related Articles

Previous: Affiliate ReportsNext: Commission Reports
Commission Records

Commission Reports

Interpret commission entries alongside the referral and order details that produced them.

Overview

Administrators use Manage Referrals to see the displayed commission amount with affiliate, reference, order status, sale amount, customer, date, and status. Affiliates can use their Commission Table and Referral Table for their own records.

Purpose

Reconcile a displayed commission total with an individual order or referral record without reopening commission settings.

Navigation Paths

Step-by-step Review

  1. Find the relevant referral in Manage Referrals or the affiliate’s Referral Table.
  2. Compare the displayed Comm. Amount with the Reference, Sale Amount, Order Status, and referral Status.
  3. For MLM activity, distinguish the direct Referral Commission from the parent MLM Commission in the administrator referral records.
Affiliate Referral Table with referral type, commission amount, sale amount, order status, affiliate name, customer name, date, status, filters and export controls
The affiliate Referral Table displays the referral type, commission amount, sale amount, order status, affiliate, customer, date, and status for available records.

Interpretation Example

If a row displays a sale amount of 1,000 and a commission amount of 100, the 100 is the commission recorded for that row. Review the referral type and associated record before assuming it is the direct commission rather than an MLM commission.

Expected Result

You can match a commission amount to its displayed referral, sale, order status, and current referral status.

Notes

The affiliate Report chart labels commission distribution as Pending, Approved, and Paid. Do not infer a complete lifecycle beyond the states visible in the record or chart.

Related Articles

Previous: Referral ReportsNext: Sales and Order Reports
Sales and Orders

Sales and Order Reports

Use the displayed sales and order values to reconcile affiliate activity with the relevant WooCommerce order record.

Overview

The administrator Dashboard Sale Overview visibly compares Earnings, Orders, and Sales. The affiliate Overview provides a Sales Report and Orders chart, while the affiliate Report’s Day Wise Report Table provides Total Order, Total Commission Earned, Date, and Total Sales Amount.

Purpose

Compare sales and order activity with the referral and commission records generated by affiliate links.

Navigation Paths

Step-by-step Review

  1. Administrator: Open Dashboard and review the Sale Overview chart, Last 5 Referrals, and Top 5 Affiliates.
  2. Affiliate: Open Overview to review Sales Report and Orders, or open Extra → Report for the Day Wise Report Table.
  3. Use the Date, Total Order, Total Commission Earned, and Total Sales Amount displayed in the report with the associated referral reference when reconciling a result.

Verified Data Reference

ViewVerified sales or order information
Admin DashboardSale Overview chart for Earnings, Orders, and Sales; Last 5 Referrals; Top 5 Affiliates.
Affiliate OverviewSales Report and Orders charts.
Affiliate ReportDay Wise Report Table: Total Order, Total Commission Earned, Date, Total Sales Amount.
Referral recordsReference, Order Status, Sale Amount, Customer Name, Date, and commission amount.

Expected Result

You can use the plugin’s displayed sales and order data to find the corresponding referral record, then consult WooCommerce orders for full order administration.

Important

These views do not replace WooCommerce order reports. Tax, shipping, refunds, and product-level analytics are not documented here because they were not verified in the plugin report interfaces.

Related Articles

Previous: Commission ReportsNext: Wallet and Payout Reports
Wallet & Payouts

Wallet and Payout Reports

Use the administrator Payouts list and affiliate withdrawal history to review payout-related records.

Overview

Administrators review payout requests in Payouts. Affiliates review their Withdrawal Transaction Table in the Affiliate Dashboard Payout tab.

Purpose

Distinguish a displayed wallet balance from a withdrawal request and a completed payout.

Navigation Paths

Step-by-step Review

  1. Administrator: Open Payouts and locate the affiliate request.
  2. Review the visible Aff ID, Aff Name, Amount, Status, and Request Date.
  3. Affiliate: Open Payout and review the Withdrawal Transaction Table for Amount, Date, and Status.
Affiliate Dashboard Payout tab showing Withdrawal Transaction Table with Amount, Date, Status and Request To Withdrawal
The affiliate Payout tab shows the withdrawal history available to that affiliate.

Record Reference

RecordMeaning
Wallet balanceAn available balance shown in the affiliate-facing account context; it is not itself a payout record.
Withdrawal requestA request shown as an administrator Payouts row or an affiliate withdrawal transaction.
Completed payoutA withdrawal record whose displayed status is paid.
Admin Payouts rowShows affiliate ID/name, amount, status, request date, and visible actions.
Affiliate withdrawal historyShows amount, date, and status.

Expected Result

You can match a payout-related total to the available administrator request or affiliate withdrawal record.

Related Articles

Previous: Sales and Order ReportsNext: Customer Referral Reports
Customer Referral

Customer Referral Reports

Review customer referral records separately from affiliate referral and commission reports.

Overview

Administrators use Customer Referrals to review customer referral rows. Customers use Refer & Earn in My Account to see their credit balance and customer referral table.

Purpose

Check the customer reward records without confusing them with affiliate commission records.

Navigation Paths

Step-by-step Review

  1. Administrator: Open Customer Referrals and identify the required row.
  2. Review the visible Customer ID, Customer Name, Reference, Order Status, Amount, Date, Status, and Actions.
  3. Customer: Open Refer & Earn to view Your Credit Balance and the Customer Referral Table.
Customer Referrals administrator table showing customer ID, customer name, reference, order status, amount, date, status and approve or reject actions
Customer Referrals contains the administrator-side rows used to review a customer referral.

Record Reference

AreaVerified data
Customer ReferralsCustomer ID, Customer Name, Reference, Order Status, Amount, Date, Status, and actions including Approve or Reject.
Refer & EarnCredit balance, referral link, Customer Referral Table, coupon generator, and coupon list.
Customer Referral TableFrom, Amount, Order Status, Date, and Status.

Expected Result

Administrators can see the current referral state; customers can see the related credit and customer-facing history available to their account.

Notes

Approve or Reject changes the record’s reporting state; use the dedicated management article for the approval workflow.

Related Articles

Previous: Wallet and Payout ReportsNext: MLM and Downline Reports
MLM Reports

MLM and Downline Reports

Review the MLM chain and MLM-related referral records without assuming a separate export report exists.

Overview

Affiliates use Multi-tier (MLM) to view the available plan, level commission table, and MLM chain. Administrators use Manage Referrals to review the direct referral commission and MLM commission records associated with a qualifying sale.

Purpose

Separate chain visibility from the commission records that support a particular MLM result.

Navigation Paths

Step-by-step Review

  1. Affiliate: Open Multi-tier (MLM) and select Show MLM Chain to view the available hierarchy.
  2. Review the displayed plan, number of children needed to start earning commission, and level commission table.
  3. Administrator: Open Manage Referrals and compare the direct Referral Commission with the MLM Commission record for the relevant referral.
Affiliate Multi-tier MLM tab showing MLM plan, child requirement, level commission table and network chain
The affiliate Multi-tier (MLM) screen provides the verified chain and level information available to the affiliate.

Verified Reporting Boundary

AreaVerified information
Affiliate Multi-tier (MLM)MLM plan, child requirement, level commission table, and available chain view.
Administrator referral recordsReferral/commission record information, including the distinction between direct and MLM commission.
Not verifiedA dedicated MLM report with child affiliate, sales total, date range, CSV, or PDF export controls.

Expected Result

You can use the relevant chain and referral record views without treating them as an unverified dedicated MLM analytics report.

Related Articles

Previous: Customer Referral ReportsNext: Date Filters and Search
Filtering

Date Filters and Search

Use only the date and search controls that are visible on the report or record screen you are reviewing.

Overview

The verified administrator Manage Referrals screen has From and To date inputs in Filter & Export Referral Table, plus a Search field. The affiliate Referral Table has From and To date inputs, Search, and filter/export controls. The affiliate Report view visibly provides Search and an entry-count control, but not date inputs.

Purpose

Narrow a record table to a known date range or value before interpreting or exporting it.

Step-by-step Instructions

  1. Open the relevant referral table.
  2. Enter a start date in From and an end date in To where those controls are available.
  3. Use Search to locate displayed text or a known record value.
  4. Confirm the table’s returned rows and date values before relying on the result or exporting it.

Control Reference

ControlPurposeExample use
FromSets the visible start-date boundary where available.Review referrals from the start of a promotion.
ToSets the visible end-date boundary where available.End the review on the promotion’s final day.
SearchFinds matching displayed rows.Locate a reference, affiliate, or customer shown in the table.
Show entriesChanges how many rows are displayed at once.Review more results without changing the filter.

Expected Result

The displayed rows correspond to the entered date range or search value.

Warning

Do not assume every Dashboard, Report, or payout screen has date filtering. Use only the controls visible in the current screen.

Related Articles

Previous: MLM and Downline ReportsNext: CSV and PDF Exports
Exports

CSV and PDF Exports

Export referral records only from the screens that visibly provide CSV or PDF controls.

Overview

The administrator Filter & Export Referral Table provides CSV and PDF buttons. The affiliate Referral Table provides Export CSV and Export PDF. The affiliate Download tab is a separate feature that generates a category file containing referral links and commission details.

Purpose

Save the currently reviewed referral data or generate the available category referral-link file.

Navigation Paths

Step-by-step Instructions

  1. On a referral table, apply From, To, or Search where available and verify the displayed rows.
  2. Administrator: Select CSV or PDF in Filter & Export Referral Table.
  3. Affiliate: Select Export CSV or Export PDF on Referral Table.
  4. For category referral links and commission details, open Extra → Download, select the category, and generate the available file.
Affiliate Dashboard Download tab for selecting a category and generating a file with referral links and commission details
Download is separate from Referral Table export: it generates the available category referral-link and commission-details file.

Export Reference

ScreenVerified controlsContent
Admin Manage ReferralsCSV, PDFThe filtered referral-table data displayed by that workflow.
Affiliate Referral TableExport CSV, Export PDFThe referral records made available to the affiliate.
Affiliate DownloadCategory selection and Generate fileReferral links and commission details for products in the selected category.

Expected Result

Your browser starts the requested download for the control you selected.

Notes

File names, CSV delimiters, encoding, automatic delivery, scheduling, and whether an export includes rows beyond the displayed filter were not verified and are not documented.

Related Articles

Previous: Date Filters and SearchNext: Reports Troubleshooting
Troubleshooting

Reports Troubleshooting

Compare a summary with the available underlying record before assuming a report is incorrect.

Overview

Report differences can result from the selected date range, record status, missing attribution, or viewing the wrong audience-specific screen.

Purpose

Identify the next reliable check without treating one possible cause as certain.

Troubleshooting Checks

SymptomLikely causes / what to checkNavigation / related article
Totals do not match expectationsCompare the summary with the individual referral rows, status, and selected date range.Admin Dashboard and Summary Metrics
Referral or commission record is missingCheck referral attribution, order status, and the relevant administrator or affiliate referral table.Commission Troubleshooting
Payout record is missingCheck whether there is a withdrawal request and whether it appears in Payouts or Withdrawal Transaction Table.Wallet and Payout Reports
Customer Referral record is missingCheck Customer Referrals and the customer’s Refer & Earn history.Customer Referral Reports
MLM or downline data is missingCheck MLM activation, chain visibility, and the associated referral records.MLM and Downline Reports
Date filter returns no rowsCheck From, To, the table’s displayed dates, and whether the screen supports date filtering.Date Filters and Search
CSV or PDF is empty, or export is unavailableConfirm that the active screen visibly has the export button and recheck the filtered rows before exporting.CSV and PDF Exports
Status appears incorrect or remains pendingCompare the record status with the approval/payout workflow; pending and approved data are different report states.Referral Reports

Expected Result

You have a specific record, status, date range, or workflow step to verify next.

Warning

Do not change commission, payout, customer referral, or MLM settings merely to make a report total change. Verify the underlying record first.

Related Articles

Previous: CSV and PDF ExportsNext: Advanced Features Overview
Advanced Features

Advanced Features Overview

Use optional settings only after the core affiliate programme, referral links, and commission rules have been tested.

Overview

Advanced Features contains optional configuration that changes how affiliates share links, access marketing assets, or use enabled coupon workflows. These settings are normally configured by a store administrator with access to WooCommerce and the Affiliate & Referral menus.

Purpose

Enable a feature only when it supports a planned affiliate or customer workflow and has been tested with a non-production account.

Prerequisites

An administrator account, an active affiliate programme, and a working referral-link test.

Navigation Path

When to enable these features

FeatureEnable whenRelationship
QR Code for Referral LinksAffiliates need a scannable version of a generated referral link.Affiliate Program link sharing.
BannersAffiliates need approved store graphics or embed code to promote products.Affiliate Program marketing assets.
Coupon GenerateThe store intentionally permits eligible affiliates to convert enabled earnings into coupons.Affiliate coupon workflow; separate from Customer Referral coupons.

Expected Result

Only the optional features that match the store’s documented programme are enabled.

Warning

Do not enable several optional features at once. Test each feature with a controlled affiliate account before making it available to all affiliates.

Related Articles

Previous: Reports TroubleshootingNext: QR Code Sharing
QR Codes

QR Code Sharing

Enable QR codes for referral links, then let affiliates create and download a code for a generated link.

Overview

A QR code provides a scannable form of an affiliate’s generated referral link. It is useful for printed material or mobile sharing where entering a long URL is inconvenient.

Purpose

Give affiliates a shareable QR code that directs a customer to the referral URL they generated.

Prerequisites

An administrator must enable QR CODE FOR REFERRAL LINKS. The affiliate needs access to Affiliate Tools and a generated referral link.

Navigation Paths

Step-by-step Configuration

  1. Administrator: Open General in Advanced Features.
  2. Enable QR CODE FOR REFERRAL LINKS, then select SAVE CHANGES.
Advanced Features General settings showing QR Code for Referral Links toggle and Save Changes
QR Code for Referral Links is enabled from Advanced Features → General.
  1. Affiliate: Open Affiliate Tools → Generate Link, enter a permitted page or product URL, and select Generate Link.
  2. Select Create QR Code, then select Download QR to save the generated code.
Affiliate Tools showing Generate Link, Create QR Code, a QR code preview and Download QR
After generating the referral link, the affiliate can create and download its QR code.

Settings Reference

ControlUse
QR CODE FOR REFERRAL LINKSEnables the QR-code workflow for referral links.
Generate LinkCreates the referral link from the entered URL.
Create QR CodeCreates a QR code for the generated link.
Download QRSaves the displayed QR code.

Expected Result

The affiliate can download a QR code that opens the generated referral link when scanned.

Tips

Scan the downloaded code on a phone before printing it or adding it to a campaign.

Related Articles

Previous: Advanced Features OverviewNext: Banners and Marketing Assets
Marketing Assets

Banners and Marketing Assets

Manage approved banner assets for affiliates, then let them use the available Banner area in the Affiliate Dashboard.

Overview

Banner management is an administrator workflow; affiliates access the available assets from Banner in their dashboard. Registration templates are configured separately and are not promotional banners.

Purpose

Provide affiliates with approved images and the available embed code for a consistent promotion workflow.

Prerequisites

Administrator access, a prepared banner image, and a valid target link.

Navigation Paths

Step-by-step Configuration

  1. Administrator: Open Banner Setting and select Add New Banner.
  2. Add the available banner details and target link, then save the banner.
  3. Affiliate: Open Banner and choose Custom Banner to view the available banners.
Banner Setting screen showing Add New Banner and banner records with image, title and link
Administrators create and manage the banners made available to affiliates.
  1. Use the available Copy HTML control when the banner view presents it, then place the code only where the store has authorised it.
Affiliate Dashboard Banner menu with Custom Banner and Create Banner options and banner cards with Copy HTML controls
The affiliate Banner area shows Custom Banner and Create Banner options and the available Copy HTML control.

Settings Reference

AreaUse
Banner SettingAdministrator area for adding and managing banner assets.
Custom BannerAffiliate view of banners available from the programme.
Create BannerVisible affiliate Banner menu option; its full workflow should be verified in the installed release.
Copy HTMLCopies the available banner code for authorised placement.

Expected Result

Affiliates can use the banner assets that the administrator has configured for the programme.

Notes

Banner assets and affiliate registration templates are separate workflows. Do not use a registration template as a promotional banner.

Related Articles

Previous: QR Code SharingNext: Referral Coupons
Referral Coupons

Referral Coupons

Enable the affiliate coupon-generation workflow only when affiliates may convert eligible earnings into store coupons.

Overview

Affiliate coupon generation is different from a Customer Referral coupon and from wallet documentation. The verified Commission screen includes Activate Generation of Coupons; the affiliate interface exposes Coupon Generate under Affiliate Tools.

Purpose

Allow an eligible affiliate to generate a store coupon from the enabled affiliate workflow.

Prerequisites

Activate Generation of Coupons is enabled in Commission settings. The affiliate must meet any configured coupon-generation conditions, including the visible minimum coupon amount where applicable.

Navigation Paths

Step-by-step Configuration

  1. Administrator: Open Commission and enable Activate Generation of Coupons.
  2. Review the visible Minimum Amount For Coupon Generation, then select Save Changes.
  3. Affiliate: Open Affiliate Tools and select Coupon Generate.
  4. Use the available generation controls and review the resulting coupon before attempting to use it at checkout.
Affiliate Tools menu showing Coupon Generate alongside Generate Link and QR code controls
Coupon Generate is available from Affiliate Tools after the administrator enables the coupon-generation setting.

Coupon Comparison

Coupon typeSourceAudience
Affiliate referral couponEnabled affiliate coupon-generation workflow in Commission and Affiliate Tools.Affiliate.
Wallet couponWallet-to-coupon workflow.Affiliate; documented in Wallet to Coupon Conversion.
Customer Referral couponCustomer Refer & Earn credit workflow.Customer; documented in Generate Coupons.

Expected Result

An eligible affiliate can access Coupon Generate and produce a coupon when the store’s configured rules allow it.

Notes

Coupon expiry, value calculation, combinability, and additional eligibility rules were not verified and are not documented here.

Warning

Do not treat an affiliate referral coupon as a Customer Referral reward or as a substitute for a cash payout.

Related Articles

Previous: Banners and Marketing AssetsNext: Fraud Prevention
Fraud Prevention

Fraud Prevention

Use the verified commission restrictions and referral review workflow to reduce avoidable invalid commissions.

Overview

The verified controls related to invalid commission handling are Restrict Commission on Own Referral, Reject Commission on Refund, administrator approval or rejection in Manage Referrals, and the configured Affiliate Referral Automation order status.

Purpose

Reduce self-referral and refunded-order commission risk, then review records before approving an uncertain referral.

Prerequisites

Administrator access, a defined referral-review process, and a test affiliate/customer scenario.

Navigation Paths

Step-by-step Configuration

  1. Open Commission.
  2. Enable Restrict Commission on Own Referral when affiliates should not earn commission on purchases made through their own referral.
  3. Enable Reject Commission on Refund when refunded orders should reject a commission that has not already been approved.
  4. Set the intended Affiliate Referral Automation status and select Save Changes.
Commission settings showing Reject Commission on Refund, Restrict Commission on Sale Items and Restrict Commission on Own Referral
The verified Commission settings include own-referral restriction and refund-rejection controls.
  1. Open Manage Referrals to review a pending record and use the available Approve or Reject action when manual review is required.
  2. Run one controlled self-referral and one refunded-order test before relying on the configuration.

Settings Reference

Setting or workflowWhat it checksRecommended useImportant consideration
Restrict Commission on Own ReferralPrevents commission generation on an affiliate’s own referral purchase.Enable when self-purchase commission is not allowed.Test a controlled affiliate purchase before launch.
Reject Commission on RefundRejects commission for a refunded order when the commission is not already approved.Enable when refunds should invalidate unapproved commission.The screen’s wording limits this behaviour to not-already-approved commission.
Manage Referrals approval/rejectionAllows administrator review of individual recorded referrals.Use for exceptions or an approval-based programme.Approval/rejection is a review action, not an automated fraud score.
Affiliate Referral AutomationSets the order status at which affiliate referrals automatically approve.Match it to the store’s order process.Test the selected status with a controlled order.

Expected Result

The selected restrictions and review process are applied to new qualifying referral records.

Notes

IP validation, device validation, duplicate-referral prevention, bot detection, VPN detection, blacklists, and automatic fraud scoring were not verified and are intentionally not documented.

Warning

Restriction settings can create unexpected outcomes in legitimate test orders. Test before applying a manual rejection to a customer-facing referral.

Related Articles

Previous: Referral CouponsNext: Cookie Settings
Referral Tracking

URL and Referral Tracking

Generate affiliate-specific links from approved product or page URLs, and keep affiliate, customer, and coupon workflows separate.

Overview

Affiliate Tools generates a referral URL from the page or product URL entered by an affiliate. A Customer Referral link is a separate customer-facing link that uses the administrator’s saved Referral Slug.

Purpose

Ensure users share the correct tracking method and administrators can verify the resulting referral record.

Navigation Paths

Step-by-step Instructions

  1. Affiliate: Open Affiliate Tools → Generate Link.
  2. Enter an approved product or page URL, then select Generate Link.
  3. Copy the generated referral URL, or select Create QR Code after QR sharing has been enabled.
  4. Administrator: Verify a qualifying tracked referral in Manage Referrals. The affiliate can review available link activity in Extra → Report.
Affiliate Tools Generate Link screen with an entered URL, generated referral link and copy control
Affiliate Tools generates a tracking link from the URL entered by the affiliate.

Tracking Method Comparison

Tracking methodUsed byHow it worksWhere results appear
Affiliate referral URLAffiliateAffiliate Tools adds the affiliate-specific referral parameter to an approved page or product URL.Manage Referrals; affiliate Overview, Report, and Referral Table where available.
Customer Referral URLCustomerRefer & Earn displays the customer’s personal referral link using the saved Referral Slug.Customer Referrals and the customer’s Customer Referral Table.
QR codeAffiliateA scannable representation of the generated affiliate referral URL.The same referral workflow as the underlying affiliate link.
Affiliate referral couponAffiliateCoupon Generate workflow when enabled by the administrator.Affiliate Tools and the resulting coupon workflow.
Wallet-generated couponAffiliateSeparate wallet-to-coupon conversion workflow.Wallet coupon records.

Safe Examples

Use a full store URL that you are authorised to promote, such as https://store.example/product-name/, then generate the affiliate tracking URL from Affiliate Tools. Do not manually alter the generated referral parameter. Customer Referral URLs should be copied from Refer & Earn rather than constructed manually.

Expected Result

A qualifying purchase through the generated affiliate URL can produce a referral record that the administrator can review.

Notes

URL shortening, cross-domain/subdomain tracking, UTM tracking, JavaScript tracking, fallback attribution, and referral-coupon attribution were not verified.

Related Articles

Previous: Cookie SettingsNext: Advanced Features Troubleshooting
Troubleshooting

Advanced Features Troubleshooting

Check the saved setting, feature availability, and the underlying referral record before changing an advanced workflow.

Overview

Most advanced-feature issues can be isolated by checking the applicable setting and repeating one controlled referral test.

Purpose

Provide a practical next check without assuming a single cause.

Troubleshooting Checks

SymptomPossible causes / what to checkNavigation / related article
QR code option is missing or not generatedConfirm QR CODE FOR REFERRAL LINKS is enabled and a referral link has been generated first.QR Code Sharing
Banner is not visible or image does not loadConfirm the banner was saved in Banner Setting and verify its image/target details with a test affiliate.Banners and Marketing Assets
Referral coupon is unavailable or not attributedConfirm Activate Generation of Coupons, the available Coupon Generate control, and the intended coupon workflow.Referral Coupons
Self-purchase was not blocked, or a valid referral was restrictedConfirm Restrict Commission on Own Referral and repeat a controlled test; programme conditions can affect the result.Fraud Prevention
Duplicate referral, IP/device rejection, or unexpected validationIP, device, and duplicate-validation controls were not verified. Review the referral record and any manual approval decision instead of assuming an automated cause.Manage Referrals
Referral URL does not trackGenerate the URL again through Affiliate Tools, use an authorised page/product URL, and test in a private session.URL and Referral Tracking
Referral cookie expires too earlyConfirm COOKIE EXPIRATION and use a fresh browser session; zero is documented as expiring when the browser closes.Cookie Settings
Customer Referral URL uses the wrong slugConfirm Referral Slug in Customer Referral Settings, save it, and copy a new customer link from Refer & Earn.Customer Referral Link & Slug
Affiliate coupon and wallet coupon are confusedConfirm whether the workflow begins in Affiliate Tools → Coupon Generate or the separate Wallet to Coupon Conversion article.Wallet to Coupon Conversion

Expected Result

You have a specific setting or controlled test to review before changing further configuration.

Warning

Do not claim that an unverified IP, device, or duplicate-referral control caused a result. Preserve the referral reference and review the available record first.

Related Articles

Previous: URL and Referral TrackingNext: Email Notifications
Emails

Email Notifications

Keep administrators, affiliates and customers informed through configurable email notifications triggered by important events.

Affiliate Registration
Affiliate Approval
Commission Earned
Payout Request
Payout Completed
Customer Referral Reward
Integrations

Integrations Overview

Use this section to identify the required WooCommerce connection and the optional services that affect subscriptions or affiliate payouts.

Overview

Core compatibility is required for the affiliate program to work with store orders. Optional integrations add recurring-order or payout workflows. Configure and test each optional connection before using it for live payments.

What integrations enable

IntegrationPurposeRequirementConfiguration location
WooCommerceCreates the orders that referral and commission records relate to.Required.WooCommerce and Affiliate & Referral settings.
WooCommerce SubscriptionsProvides subscription and renewal orders for recurring-commission testing.Optional plugin.WooCommerce Subscriptions and WooCommerce → Affiliate & Referral → Commission.
PayPalProvides an administrator-enabled payout method.Optional external account and credentials.WooCommerce → Affiliate & Referral → Advanced Features → Payments.
StripeProvides an administrator-enabled payout method.Optional external account and credentials.WooCommerce → Affiliate & Referral → Advanced Features → Payments.
Direct BankLets affiliates save bank details for manual payout processing.Optional; no automatic transfer is shown.Affiliate Dashboard → Payout.

Prerequisites

Use an administrator account, a staging store where possible, and a test affiliate. Obtain external-service credentials before enabling a payout option.

Step-by-step setup

  1. Confirm WooCommerce is active and complete a test order through an affiliate referral link.
  2. Enable only the optional services your store will use, then save their displayed settings.
  3. Test the full workflow: order or renewal, referral record, commission record, and—when relevant—a payout request.

Verification

Confirm the expected referral appears in Manage Referrals, and verify payout requests in Payouts. A public, endpoint-level REST interface is not verified in the supplied documentation or interface; see Developer Documentation before planning custom API work.

Important

Run payout and renewal tests with non-production credentials or a staging site before handling real affiliate balances.

Related Articles

Previous: EmailsNext: WooCommerce and HPOS Compatibility
Core Compatibility

WooCommerce and HPOS Compatibility

WooCommerce is required because referrals and commissions are connected to WooCommerce orders. HPOS should be tested with this plugin before it is enabled on a production store.

Overview

High-Performance Order Storage (HPOS) is a WooCommerce order-storage option. The available documentation and interface evidence do not provide a plugin-specific HPOS compatibility declaration, so this article documents a safe verification process rather than a compatibility claim.

Requirements

WooCommerce must be active. Back up the site and test on staging before changing the store’s order-data storage.

Navigation Path

Step-by-step verification

  1. Open the WooCommerce Features screen and check the current order-data storage setting.
  2. On staging, enable the chosen HPOS setting only after WooCommerce reports that order data is ready for the change; save the WooCommerce setting.
  3. Open an affiliate referral URL, place a test order, then check WooCommerce → Affiliate & Referral → Manage Referrals for the related record.
  4. Check the commission result and test any refund handling that is enabled for your store before applying the change to production.

What to verify

CheckExpected result
OrderThe WooCommerce test order is available in the store’s order screen.
ReferralThe referral record can be matched to the order/reference.
CommissionThe resulting commission follows the configured program rules.
Refund settingIf Reject Commission on Refund is enabled, verify that workflow using a non-production test order.

Expected Result

Your test confirms whether referral and commission records remain usable with the selected WooCommerce order-storage setting.

Warning

Do not assume plugin-level HPOS support from WooCommerce’s HPOS setting alone. Complete the referral and commission test after every relevant plugin update.

Related Articles

Previous: Integrations OverviewNext: WooCommerce Subscriptions
Subscriptions

WooCommerce Subscriptions

Use this optional dependency when your store sells subscriptions and you need to test recurring commission on renewal orders.

Overview

WooCommerce Subscriptions creates the initial subscription order and subsequent renewal orders. The affiliate program’s recurring-commission behavior must be configured and verified separately.

Requirements

WooCommerce Subscriptions must be active, and the store needs a subscription product and a test affiliate referral.

Navigation Path

Step-by-step verification

  1. Create or identify a subscription product in WooCommerce.
  2. Open Commission and configure the verified recurring or lifetime behavior required by your program, then save the settings.
  3. Place an initial subscription order through a test affiliate referral link.
  4. After a test renewal is created, review the referral and commission records to determine whether your configured rule generated a result.

Reference

Order eventWhat to review
Initial subscription orderConfirm the direct referral and commission follow the configured rules.
Renewal orderConfirm whether a recurring commission record was created for the configured program.
Referral or commission recordMatch the displayed order/reference, amount, date, and status.

Expected Result

You have a tested result for both the initial order and a renewal in your own configuration.

Important

Do not assume every renewal creates commission. The result depends on the enabled commission settings and the order status that your program accepts.

Related Articles

Previous: WooCommerce and HPOS CompatibilityNext: PayPal Payout Integration
Payouts

PayPal Payout Integration

Enable PayPal in Payments settings before affiliates can select it in their Payout view and administrators can use the PayPal payout action.

What this integration enables

The verified interface provides Activate PayPal in Payments settings and a PayPal option in the affiliate Payout view. The administrator Payouts table also displays PayPal payment actions.

Requirements

An external PayPal account and the credentials shown by the selected Payments mode are required. Affiliates need to select PayPal in their Payout area where the method is available.

Navigation Paths

Step-by-step setup

  1. Administrator: Open Advanced Features, select Payments, and enable Activate PayPal.
  2. Select the displayed Paypal Live or Paypal Sandbox mode, enter the displayed Client ID and Client Secret, then select Save Changes.
Payments screen showing Activate PayPal, PayPal Live, PayPal Sandbox, Client ID, Client Secret, and Save Changes
Enable PayPal and save the credentials for the selected mode.
  1. Affiliate: Open Payout, select Paypal under Select Payment Methods, and save the available payout details.
  2. Administrator: Review the payout request in Payouts and use the visible PayPal action only after verifying the request.

Settings Reference

Setting or screenPurpose
Activate PayPalMakes the PayPal configuration available in Payments.
Paypal Live / Paypal SandboxSelects the displayed configuration mode.
Affiliate Dashboard → PayoutContains the PayPal method tab where available.
PayoutsContains visible PayPal actions for payout requests.

Verification

Confirm that PayPal is visible to the affiliate after saving the administrator setting, then use a test payout request to verify the administrator workflow and displayed status.

Warning

Do not expose live credentials in screenshots, support tickets, or public documentation.

Related Articles

Previous: WooCommerce SubscriptionsNext: Stripe Payout Integration
Payouts

Stripe Payout Integration

Enable Stripe in Payments settings before affiliates can select it in their Payout view and administrators can use the Stripe approval control.

What this integration enables

The Payments screen provides Activate Stripe, and the affiliate Payout screen includes a Stripe method tab. The administrator Payouts screen includes Approve Selected Stripe Payout.

Requirements

An external Stripe account and the keys required by the displayed Payments mode are needed. Affiliates must save the details requested in their available Stripe method tab.

Navigation Paths

Step-by-step setup

  1. Administrator: Open Advanced Features → Payments and enable Activate Stripe.
  2. Select Stripe Live or Stripe Sandbox, complete the visible Publishable Key and Secret Key fields, then select Save Changes.
  3. Affiliate: Open Payout, select Stripe under Select Payment Methods, and save the available details.
  4. Administrator: Open Payouts, select the appropriate request, and use Approve Selected Stripe Payout only after review.

Settings Reference

Setting or controlPurpose
Activate StripeMakes Stripe configuration available in Payments.
Stripe Live / Stripe SandboxSelects the displayed Stripe configuration mode.
Publishable Key / Secret KeyCredential fields shown for the selected Stripe mode.
Approve Selected Stripe PayoutVisible administrator action for selected payout requests.

Verification

Confirm that the Stripe tab is available in the affiliate Payout view after saving the administrator setting, then test a payout request and confirm its displayed status.

Warning

The supplied interface does not verify Stripe Connect, webhooks, transfer type, country availability, or automatic payout schedules. Configure only the fields and actions shown in your version.

Related Articles

Previous: PayPal Payout IntegrationNext: Direct Bank Transfer
Payouts

Direct Bank Transfer

Affiliates can save Direct Bank details in the Payout view for an administrator to use during manual payout processing.

Overview

The verified affiliate Payout screen shows Direct Bank under Select Payment Methods and fields for account-holder name, bank, branch, IFSC, account number, and phone. The interface does not show an automatic bank transfer.

Requirements

The affiliate must have the requested bank information and an approved balance or payout request, as applicable to the store’s workflow.

Navigation Path

Step-by-step setup

  1. Open Payout in the Affiliate Dashboard.
  2. Under Select Payment Methods, select Direct Bank.
  3. Complete the displayed bank-detail fields and select Save Details.
Affiliate Payout screen showing Direct Bank fields, withdrawal history, and payment method tabs
The Direct Bank tab contains the fields an affiliate can save for manual payout handling.
  1. Request withdrawal when the control is available, then keep the saved details accurate while the administrator reviews the request.
  2. Administrator: review the request in WooCommerce → Affiliate & Referral → Payouts and update the displayed payout workflow after completing the bank transfer outside the plugin.

Details Reference

Visible fieldUse
Account Holder's NameIdentifies the supplied bank account holder.
Bank / BranchIdentifies the supplied bank and branch.
IFSC / Account NumberBank-routing and account information requested by the form.
PhoneAffiliate contact detail shown in the Direct Bank form.

Expected Result

The affiliate’s Direct Bank details are saved and can be used during the administrator’s manual payout process.

Privacy tip

Collect only the details required for the payout process, limit administrator access, and do not share bank details in public tickets or screenshots.

Related Articles

Previous: Stripe Payout IntegrationNext: WordPress Themes and Page Builders
Compatibility

WordPress Themes and Page Builders

Place the plugin’s configured pages in your theme’s normal WordPress and WooCommerce page flow, then test the displayed forms and dashboard with the active theme.

Overview

The verified General settings provide configured page locations for login, registration, and the affiliate dashboard. The supplied sources do not verify named theme or page-builder integrations, so test styling and navigation with your active setup.

Requirements

You need the active theme, the page used for affiliate registration or dashboard access, and a test account.

Navigation Path

Step-by-step verification

  1. Review the configured login, registration, and affiliate dashboard pages in General.
  2. Open each page while logged out and while signed in as a test affiliate.
  3. Check that the registration form, dashboard navigation, and required shortcodes or content render inside the active theme layout.
  4. If styling is unexpected, temporarily test with cache/minification disabled and compare the result after clearing the site cache.

What to check

AreaVerification
Configured pageThe selected page opens from the expected site navigation.
Affiliate formRequired fields and submission controls are visible and usable.
Affiliate DashboardDashboard tabs and content are readable at desktop and mobile widths.
Styling issueTest the active theme and cache/minification configuration before changing plugin settings.

Expected Result

Configured affiliate pages are accessible and usable within the active WordPress theme.

Compatibility note

No named theme or page-builder compatibility is verified in the supplied sources. Treat any theme-specific styling adjustment as a site-level change and retest affiliate registration and dashboard pages afterward.

Related Articles

Previous: Direct Bank TransferNext: Integration Troubleshooting
Troubleshooting

Integration Troubleshooting

Use the related record, setting, and external-service account to isolate an integration issue before changing live configuration.

Before you begin

Record the order or payout reference, displayed status, date, and affected affiliate. Test configuration changes on staging where possible.

SymptomPossible causesWhat to checkExpected resolution
A WooCommerce order has no referralThe order was not placed from a tracked affiliate referral, the referral cookie expired, or the order does not meet configured conditions.WooCommerce → Affiliate & Referral → Manage Referrals; then review the affiliate URL and cookie settings.A qualifying test order produces a referral that matches its order/reference.
HPOS order is not visible in recordsOrder-data migration or a plugin-specific compatibility issue may be involved.WooCommerce → Settings → Advanced → Features; then repeat the referral and commission test on staging.Keep the selected storage mode only after records can be matched reliably.
A subscription renewal has no commissionRecurring behavior may not be configured, or the renewal may not meet the accepted order-status conditions.WooCommerce → Affiliate & Referral → Commission; compare the renewal’s order/reference with referral and commission records.A test renewal documents the result for your saved configuration.
PayPal or Stripe payout is unavailableThe method may be disabled, the selected mode may lack valid credentials, or the affiliate has not saved required details.WooCommerce → Affiliate & Referral → Advanced Features → Payments and Affiliate Dashboard → Payout.After saving valid settings, the enabled method is available to the affiliate and the administrator can review a request.
Bank details are missingThe affiliate may not have selected Direct Bank or saved all displayed fields.Affiliate Dashboard → Payout → Select Payment Methods → Direct Bank.The affiliate saves the requested details before the administrator handles the payout manually.
Payout status did not changeThe request may still be pending, an administrator action may not have completed, or an external payment outcome may need review.WooCommerce → Affiliate & Referral → Payouts and Affiliate Dashboard → Payout.The status is checked again after the administrator completes the applicable workflow.
Affiliate page layout is brokenA theme override, page configuration, cache, or minification setting may affect rendering.WooCommerce → Affiliate & Referral → Advanced Features → General; test the configured page after clearing cache.The configured page, form, and dashboard tabs are visible and usable in the active theme.
A shortcode page does not displayThe page may not be the configured page or its shortcode/content may be missing.WooCommerce → Affiliate & Referral → Advanced Features → General and the relevant WordPress Page editor.The configured page displays the expected affiliate content for the test user.
Currency display appears incorrectThe displayed store currency or the source order amount may differ from the value being compared.Compare the WooCommerce order total with the related referral or payout record.Use the store’s displayed currency consistently when reconciling records; multi-currency conversion behavior is not verified.

Notes

No endpoint-level REST API documentation is verified in the supplied sources. Do not rely on unverified custom requests to diagnose referral or payout records.

Related Articles

Previous: WordPress Themes and Page BuildersNext: Hooks & Filters
Developer

Developer Overview

Extend selected Affiliate & Referral pages and behavior with the verified shortcodes and WordPress filters in this section.

Overview

The verified extension surface consists of page shortcodes and filters for the admin dashboard callback, early commission processing, referral-table CSS classes, and the Affiliate Name column label. Use these extension points instead of editing the main plugin.

Safe setup

  1. Create a small site-specific plugin, or use the active child theme’s functions.php file.
  2. Put the code under version control and test it on staging with a test affiliate and test order.
  3. Deploy only after you confirm the visible output and related records.
<?php
/**
 * Keep Affiliate & Referral customizations in a small custom plugin
 * or the active child theme's functions.php file.
 */
Test custom code on staging

Commission customizations can change financial records. Never edit the main plugin, and do not override normal processing until custom code is fully tested.

Related Articles

Previous: Integration TroubleshootingNext: Available Shortcodes
Developer

Available Shortcodes

Place these verified shortcodes on the intended WordPress page, then select that same page in the related setting when required.

Shortcode reference

ShortcodeDisplaysRequired configuration
[rtwapwcm_affiliate_page]The affiliate dashboard.Select the same page in Advanced Settings.
[rtwapwcm_aff_reg_page]The affiliate registration form.Select the same page in Advanced Settings.
[rtwapwcm_cust_ref_button]The Customer Referral Refer & Earn button.Enable the shortcode option in Customer Referral settings first; this disables the default floating button.

Affiliate dashboard page

Purpose: render the affiliate dashboard. Navigation Path: WordPress Pages → dashboard page, then WooCommerce → Affiliate & Referral → Advanced Settings.

  1. Create or edit the dashboard page.
  2. Add the shortcode.
  3. Select this same page in Advanced Settings and save.
[rtwapwcm_affiliate_page]

Expected result: an eligible affiliate sees the Affiliate Dashboard on the configured page.

Affiliate registration page

Purpose: render the affiliate registration form. Navigation Path: WordPress Pages → registration page, then WooCommerce → Affiliate & Referral → Advanced Settings.

  1. Create or edit the registration page.
  2. Add the shortcode.
  3. Select this same page in Advanced Settings and save.
[rtwapwcm_aff_reg_page]

Customer Referral button

Navigation Path: WooCommerce → Affiliate & Referral → Customer Referral → Settings.

  1. Enable Enable Refer Button Shortcode.
  2. Save settings; the default floating Refer & Earn button is disabled.
  3. Add the shortcode to the page where the button should appear.
[rtwapwcm_cust_ref_button]
Placement choice

Enable this option when you need to control the button’s page placement. Re-enable the default setting to return to the floating-button behavior.

Related Articles

Previous: Developer OverviewNext: Filters and Extension Points
Developer

Filters and Extension Points

Use these verified WordPress filters for narrow, update-safe customizations.

Filter reference

FilterInput / defaultReturn and effect
rtwapwcm_dashboard_callbackDefault: array($this, 'rtwapwcm_display_admin_section')Return a callable for the Affiliate & Referral admin submenu page.
rtwapwcm_early_mra_override_processfalse, order ID, user ID, order object, commission settings, currency, currency symboltrue stops default calculation after custom processing; false continues it.
rtwapwcm_referral_table_extra_classDefault: empty stringReturn additional CSS classes for the affiliate dashboard referral table.
rtwapwcm_affiliate_column_nameDefault: Affiliate NameReturn the Affiliate Name table-column label.

Admin submenu callback

Parameter: current callback. Return: a valid callable. Effect: the callable is used for the Affiliate & Referral admin submenu page.

<?php
function my_site_affiliate_admin_page() {
    // Render the custom admin content required by this site.
}

add_filter(
    'rtwapwcm_dashboard_callback',
    function( $callback ) {
        return 'my_site_affiliate_admin_page';
    }
);
Callable required

Return a callable that exists when the submenu is loaded. An invalid callback can prevent the replacement page from rendering.

Related Articles

Previous: Available ShortcodesNext: Override Commission Processing
Developer

Override Commission Processing

Use the early processing filter only when custom code can safely complete the required commission processing for your site.

Parameters and return values

rtwapwcm_early_mra_override_process runs before normal commission calculation. It receives $override (initially false), $order_id, $user_id, $order, $commission_settings, $currency, and $currency_symbol.

ReturnExecution effectUse
falseThe plugin continues normal calculation.Validation fails or no custom rule applies.
trueThe plugin stops its default calculation.Only after custom processing completes successfully.

Complete control-flow example

This example validates the supplied inputs and preserves default behavior until custom code reports success. It intentionally does not assume unverified commission fields or record formats.

<?php
add_filter(
    'rtwapwcm_early_mra_override_process',
    function( $override, $order_id, $user_id, $order, $commission_settings, $currency, $currency_symbol ) {
        // Preserve normal processing if supplied order data is not usable.
        if ( ! $order_id || ! $user_id || ! is_object( $order ) ) {
            return false;
        }

        // Add site-specific calculation and recording logic here.
        // Do not return true until it has completed successfully.
        $custom_processing_completed = false;

        if ( ! $custom_processing_completed ) {
            return false;
        }

        // Custom processing succeeded: stop the default calculation.
        return true;
    },
    10,
    7
);
  1. Add the snippet to a small custom plugin or child theme on staging.
  2. Test with a known order and keep the callback returning false until custom processing is complete.
  3. When returning true, verify the expected commission outcome is recorded exactly once.
Financial-data warning

Returning true without completing custom processing suppresses the plugin’s default calculation. Test order statuses and duplicate processing before using it on a live store.

Related Articles

Previous: Filters and Extension PointsNext: Developer Examples
Developer

Developer Examples

Use these presentation-level examples in a child theme or small custom plugin, then test them on staging.

Add a referral-table CSS class

Filter: rtwapwcm_referral_table_extra_class. Parameter: existing class string. Return: the existing value plus a class. Effect: site CSS can target the referral table without removing existing classes.

<?php
add_filter(
    'rtwapwcm_referral_table_extra_class',
    function( $classes ) {
        $classes = is_string( $classes ) ? trim( $classes ) : '';

        return trim( $classes . ' my-site-referral-table' );
    }
);

Change the Affiliate Name column label

Filter: rtwapwcm_affiliate_column_name. Parameter: current label, default Affiliate Name. Return: replacement label. Replace the text domain with the one loaded by your child theme or custom plugin.

<?php
add_filter(
    'rtwapwcm_affiliate_column_name',
    function( $label ) {
        return __( 'Partner Name', 'my-site-textdomain' );
    }
);

Expected result: the table retains existing classes and gains my-site-referral-table; the Affiliate Name heading uses the translation-safe replacement label.

Related Articles

Previous: Override Commission ProcessingNext: Developer Troubleshooting
Developer

Developer Troubleshooting

Confirm the configured page, callable, return value, and test data before changing a production customization.

SymptomWhat to checkExpected resolution
Dashboard or registration shortcode is not showing expected contentConfirm the shortcode is present and the same page is selected in WooCommerce → Affiliate & Referral → Advanced Settings.The selected page displays the correct dashboard or registration form.
Refer & Earn button is floating or missingIn WooCommerce → Affiliate & Referral → Customer Referral → Settings, enable Enable Refer Button Shortcode before using [rtwapwcm_cust_ref_button].The button renders at the shortcode location and the floating button is disabled.
Replacement admin page does not renderConfirm the callback returned by rtwapwcm_dashboard_callback exists and is callable.A valid callable renders the intended page.
Commission is missing or duplicated after custom codeReview the early override callback and confirm it returns true only after custom processing succeeds.Return false for normal processing, or true only after a tested custom result is complete.
Custom table class is missingConfirm the class filter returns a string that appends existing classes; clear site cache if needed.The table retains existing classes and includes the new class.
Column label is not translatedConfirm the callback returns a string and use the text domain loaded by your custom plugin or child theme.The intended translated label is displayed.
Do not edit plugin core

Keep snippets in a child theme or small custom plugin. Core-file edits can be overwritten during updates and are harder to troubleshoot.

Related Articles

Previous: Developer ExamplesNext: General FAQ
FAQ

General FAQ

Short answers for common setup questions. Open the linked guide when you need the full configuration steps.

Getting started

Is WooCommerce required?

Yes. The plugin’s referral and commission records relate to WooCommerce orders, so WooCommerce must be active before you configure the program. Follow Plugin Requirements before installation.

Where do administrators configure the affiliate program?

Most administrator settings are available under WooCommerce → Affiliate & Referral. The relevant tab or menu depends on the task, such as Commission, Payouts, Advanced Features, or Multi-tier (MLM). Start with First-time Setup for the recommended sequence.

How can I safely test the program before launch?

Use a test affiliate, generate a referral link, place a qualifying test order, and then review its referral and commission records. A staging site is the safest place to test payment, subscription, or storage changes. See Quick Start for the core test flow.

Related Articles

Previous: Hooks & FiltersNext: Affiliate Program FAQ
FAQ

Affiliate Program FAQ

Answers for affiliate registration, dashboard access, and referral sharing.

Registration and sharing

How do people become affiliates?

Administrators assign the registration page and template, then configure the available approval behavior. Do not assume a standard customer account automatically becomes an affiliate; use the plugin registration workflow. See Configure Affiliate Pages and Registration.

Where does an affiliate find a referral link?

An affiliate uses the Affiliate Dashboard and its available Affiliate Tools to obtain a referral link. The store’s configuration determines which sharing tools and URLs are available. See Create and Share Referral Links.

Can affiliates generate QR codes?

Yes, only after the administrator enables the QR-code option in Advanced Features. The affiliate then uses the available dashboard tool to generate or download the QR code. See Generate and Share QR Codes.

Related Articles

Previous: General FAQNext: Customer Referral FAQ
FAQ

Customer Referral FAQ

Answers about the separate Refer & Earn customer workflow.

Customer referral workflow

How is Customer Referral different from the Affiliate Program?

Customer Referral is a customer-facing Refer & Earn workflow that can provide customer credit and a friend discount. The Affiliate Program uses a separate affiliate account, dashboard, referral records, and payout workflow. Compare them in Customer Referral Overview.

Where can a customer find the referral link?

A signed-in customer can use My Account → Refer & Earn to view the displayed referral link and credit information. The exact link slug comes from the administrator’s Customer Referral settings. See Referral Link & Slug.

Can an administrator approve customer referrals manually?

Yes. The Customer Referrals screen displays visible Approve and Reject actions, including marked-referral actions where available. Review the related order and referral details before making a decision. See Manage Customer Referrals.

Related Articles

Previous: Affiliate Program FAQNext: Commission FAQ
FAQ

Commission FAQ

Answers about commission types, rules, and referral records.

Commission configuration

Can a commission be fixed or percentage-based?

The Commission screen displays fixed and percentage configuration options for supported rule types. Use the rule and fields shown in your installed version, then verify the result with a test referral. See Commission System Overview.

Which commission rule takes priority?

The verified precedence is product-specific over category and global, and category-specific over global. A universal order involving affiliate-specific, recurring, lifetime, or MLM conditions is not verified, so test those combinations. See Commission Rule Priority.

Is two-way commission required?

No. Two-way commission is an optional administrator setting that can combine affiliate commission with a referred buyer discount. Configure and test both amounts before using it on a live store. See Two-Way Affiliate Commission.

Related Articles

Previous: Customer Referral FAQNext: Wallet & Payout FAQ
FAQ

Wallet & Payout FAQ

Answers about balances, withdrawal requests, and available payout methods.

Withdrawals and payment details

Is a pending withdrawal already paid?

No. The affiliate Withdrawal Transaction Table distinguishes displayed pending and paid statuses, and a pending request still requires the administrator’s payout workflow. See Withdrawal History.

Which payout methods are verified in the interface?

The administrator Payments screen displays PayPal and Stripe activation controls, while the affiliate Payout view displays Direct Bank, Paypal, and Stripe tabs. Availability depends on the administrator’s saved configuration. See Payout Methods.

Can an affiliate convert eligible earnings to a coupon?

Coupon generation must be enabled and the affiliate must meet the configured conditions before the available coupon workflow can be used. This is separate from Customer Referral coupons. See Wallet to Coupon Conversion.

Related Articles

Previous: Commission FAQNext: MLM FAQ
FAQ

MLM FAQ

Answers about MLM structures, placement, and level commissions.

Structure and commission

How is MLM commission different from direct affiliate commission?

Direct affiliate commission applies to the affiliate credited with the referral. MLM level commission is a separate configured reward for eligible upline levels, so it does not replace direct commission. See MLM Overview.

Which MLM structures are available?

The verified MLM structures are Binary, Forced Matrix, and Unilevel. Each has its own placement limits or level configuration, so choose and test the structure before building a network. See Choose an MLM Structure.

Why was a new affiliate not added to the expected MLM chain?

Automatic MLM parent mapping requires the plugin’s affiliate registration form where that workflow is configured. Binary or Forced Matrix limits can also prevent the expected placement. See MLM Placement and Sponsor Relationships.

Related Articles

Previous: Wallet & Payout FAQNext: Reports FAQ
FAQ

Reports FAQ

Answers about report records, filters, and exports.

Reviewing records

Why does a report total not match what I expect?

Compare the summary with the individual records, their displayed status, and the selected date range before changing settings. Pending, approved, and paid values can represent different states. See Reports Troubleshooting.

Which report screens have date filters or search?

Use date filters or search only where they are visible in the specific table; the plugin does not show the same controls on every report. Check the displayed From, To, and Search controls before interpreting the result. See Date Filters and Search.

Do all reports export CSV and PDF files?

No. Export availability depends on the screen, and only visible export controls should be used as evidence that a format is supported. Apply the intended filters before exporting. See CSV and PDF Exports.

Related Articles

Previous: MLM FAQNext: Integrations FAQ
FAQ

Integrations FAQ

Answers about required dependencies, subscription testing, and payout connections.

Compatibility and payments

Does the plugin need WooCommerce?

Yes. WooCommerce provides the order workflow that referral and commission records use. Confirm the referral and commission result with a test order after setup. See WooCommerce and HPOS Compatibility.

Do subscription renewals always create commission?

No. WooCommerce Subscriptions is required, and the result depends on the enabled commission settings and accepted order status. Test an initial order and a renewal in your own configuration. See WooCommerce Subscriptions.

Can the plugin’s HPOS or API compatibility be assumed?

No. The supplied sources do not provide a plugin-specific HPOS declaration or public endpoint-level API reference. Test HPOS on staging and consult Developer Documentation before planning API work. See Integrations Overview.

Related Articles

Previous: Reports FAQNext: Troubleshooting
Troubleshooting

Common Issues

Before contacting support

Ensure that WordPress, WooCommerce and the plugin are updated to the latest compatible versions.

Support

Support Overview

Use the relevant written guide and troubleshooting article first, then open a ticket when you need help with a reproducible issue or account-specific configuration.

Start with documentation

Use the sidebar search, the relevant feature article, and the FAQ to check setup labels and expected results. For a failed configuration or incorrect record, start with the feature-specific troubleshooting article before changing multiple settings.

Useful links

Previous: TroubleshootingNext: Before Opening a Support Ticket
Support

Before Opening a Support Ticket

Collect the affected record and confirm the issue once with a controlled test before contacting support.

Quick checks

  1. Open the relevant written guide and confirm the saved setting, menu path, and expected result.
  2. Record the affected order, referral, payout, or affiliate reference and its displayed status.
  3. Repeat the issue once with a controlled test where it is safe to do so.
  4. Check the matching FAQ or troubleshooting article for the next verified action.
Important

Do not share live payment credentials, passwords, full bank details, or private customer information in a support ticket or screenshot.

Related Articles

Previous: Support OverviewNext: How to Report an Issue
Support

How to Report an Issue

A complete report lets support reproduce the behavior without asking for basic environment details first.

Include this information

  • Plugin version
  • WooCommerce version
  • WordPress version
  • PHP version
  • Active theme
  • Screenshots that show the relevant screen and issue
  • Exact error messages, if any
  • Numbered steps to reproduce the issue

Write a clear report

State what you expected to happen, what happened instead, and the exact page, menu path, or record involved. Include one test example where possible, such as an order or referral reference, while removing private payment and customer data.

Related Articles

Previous: Before Opening a Support TicketNext: Contact Support
Support

Contact Support

When you have completed the checks and collected the report details, create a support ticket.

Create a ticket

Use the support form to send the issue details, screenshots, and steps to reproduce. Include the environment information listed in the previous article so the request can be reviewed efficiently.

Create Support Ticket

Response time: Within 24 hours (typically 4–6 business hours).

Before sending

Remove passwords, private keys, full payment details, and unnecessary customer personal information from attachments.

Related Articles

Previous: How to Report an IssueNext: Changelog
Changelog

Plugin Updates

The changelog provides a history of new features, improvements and bug fixes included in each release.

6 August 2026 — version 2.5.0

  • New: optional setting to include MLM commissions in the monthly commission limit.
  • Improved: affiliate dashboard charts follow the store currency format; all scripts and styles are served from the plugin; the text domain now matches the plugin folder.
  • Fixed: a security issue where a non-administrator affiliate could approve their own commission; server-side validation of withdrawal and coupon amounts; fixed-rate commission per unit; renewal commissions on HPOS stores; refer-a-friend referrer recording; customer referral auto-approval and store credit; IPv6 visitor tracking; and other fixes.

7 July 2026 — version 2.4.0

  • New: cart total discount for two-way commission; compatibility with WooCommerce 10.9.3.
  • Improved: referral tracking on cached and CDN-hosted stores.
  • Fixed: registration page bug and other minor fixes.

26 May 2026 — version 2.3.0

  • New: date filters, PDF/CSV export and extra columns (sales amount, customer, child affiliate) in the affiliate and admin referral tables.

The complete release history ships with the plugin as changelog.txt.

Stay Updated

Always use the latest version of the plugin to benefit from new features, performance improvements and security updates.

Navigation

Documentation Tips

Helpful Tip

Use the search box in the sidebar to instantly find any feature, setting or documentation topic. The sidebar navigation also lets you jump directly to each section without scrolling through the entire page.