In-depth Guide to Create a Child Theme in WordPress
Wondering if it is possible to create a child theme in WordPress without knowing coding?
Well, we are here to help you with that. A lot of webmasters do not know much about coding or html. There are different methods to insert a child theme on your website. You can do it manually (of course with some html codes) or opt to use a child theme generator plugin.
Read this guide entirely to learn how to create a child theme in WordPress.
What is a Child Theme in WordPress?
Let’s assume, you have a domain name, a hosting package, and also the WordPress theme.
After you apply the theme, you may still want to do some customization to get the desired look. The child theme allows you to do all of it in a hassle-free way.
The child theme is also WordPress theme with functionality and features extracted from another theme (called parent theme).
It allows you to modify the existing theme on your website in a way so that you can get the updates as and when they are released without losing the custom changes and styles you have used to change the appearance of your webpages.
If you customize your WordPress theme without using a child theme, you are gonna lose all modifications once the update is released. Needless to say, you will do everything all over and again from the scratch.
When you use a child theme, everything you have done to change the appearance of your website remains intact. At the same time, taking updates on the parent theme keeps everything functional and secure.
Step-by-Step Instructions to Create a WordPress Child Theme
As mentioned earlier, there are two ways to create a child theme on a WordPress website:
Method 1: Manual Method without Using Plugin
You can do this in two ways:
- Use an FTP client on your server
- Do everything locally and then compress the files into zipped child theme folder to install it like any normal theme from the
‘Themes’ menu.
Herein I am going to proceed with the second option as it would be relatively easier if you are a novice.
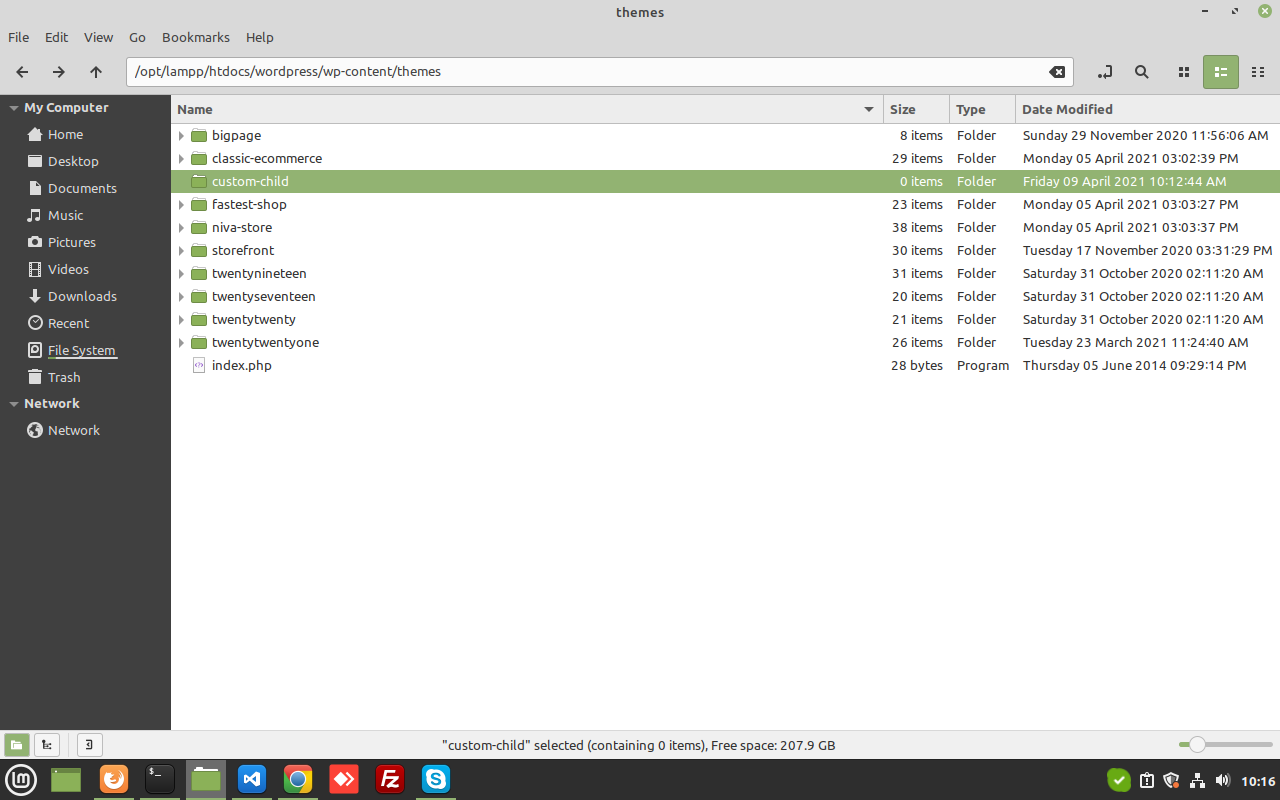
Step 1- Create the Folder for the Child Theme
- Visit wp-content/themes
- Create a new folder for the child theme (this folder will contain all files of your child theme)
- Give a name to your child folder without using any space
Step 2- Create a Style Sheet
You need to create a style sheet for the child theme. It is used to store the codes that gives you the desired website design.
- Open the child theme folder
- Create a file for style sheet (No matter the name of your style sheet file, it should have .css extension for easy understanding)
Herein is an example of how to write the codes in your style sheet based on your WordPress theme, URL, etc.
/*
Theme Name: Twenty Twenty-One
Theme URI: https://wordpress.org/themes/twentytwentyone/
description: >-
A child theme for Twenty Twenty-One
Author: A. Smith
Author URI: http://example.com
Template: elegantthemes
Version: 1.2
License: GNU General Public License v2 or later
License URI: http://www.gnu.org/licenses/gpl-2.0.html
Tags: one-column, accessibility-ready, custom-colors, custom-menu, custom-logo, editor-style, featured-images, footer-widgets, block-patterns, rtl-language-support, sticky-post, threaded-comments, translation-read
Text Domain: twentytwentyone
*/
Just to give you a basic understanding, herein is a brief description of the terms and lines in the above code. This will help you to create a custom style code based on the parent theme on your website.
Theme Name- Based on the name you provide, the information will appear for the child theme at WordPress back end. This is why we suggest to use the exact name of the parent theme you have on your site.
Theme URL- The URL stored on the file keeps your website’s main theme demonstration page handy. It is mandatory to mention the theme URL to make it acceptable for the WordPress directory.
Description- The description you provide here will be stored in the ‘Theme Details’ and will appear in the theme menu.
Author- Name of the author of the theme. You may insert your name.
Author URL- You may write the domain name of your website here.
Template- The name of the parent theme i.e the folder name should appear in this section. This is why we recommend using the theme name as the name of the child theme folder. The name should exactly be the same. This information is case-sensitive. If the information does not match, you may see error messages.
Version- Write the child theme version. If it is the first time, you can write 1.0
License- The license of the child theme must match to that of the parent theme. Make sure you choose the same (generally a GPL license).
License URL- This URL directs you to page where the license of your theme is mentioned. You must use the license as it is for the parent theme.
Tags- The tags are used to find a theme from the WordPress repository. Use relevant tags so that it is easy to locate at the directory.
Text domain- This information allows you make your theme compatible for translation. Make sure the text domain fits your theme’s ‘slug’.
Do you think the above code is too lengthy?
Fortunately, you don’t need to write everything. But make sure the file contains the theme template and name.
However, we suggest to write down all of it only if you wish to publish it later.
Step 3- Activate Your Child Theme
You can activate the child theme only after you have created the folder and style sheet. To activate the child theme:
- Go to ‘Appearance’ at the WordPress back end
- Choose ‘Themes’
- Click to open ‘Theme Details’
- Review the child theme information and click the ‘Activate’ button
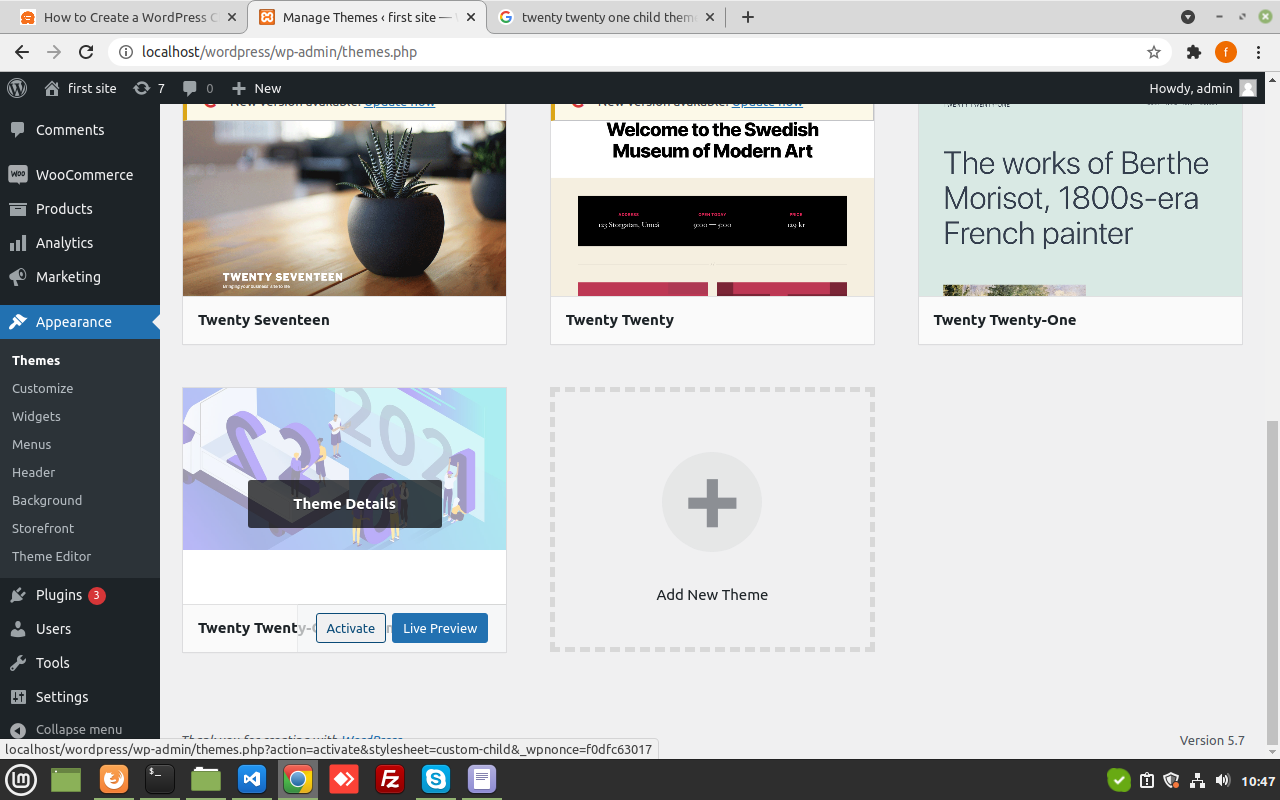
That’s all! You have successfully created a child theme for your WordPress website.
Note: If you check your site appearance, it may look blank. You can do more to enhance the look with some WordPress functions and PHP. But for that you may have to go a bit in details with the coding part.
Method 2: Use Child Theme Configurator Plugin
Want to avoid hours of working with PHP, style sheets, and all of the stuff. Choose a powerful plugin so that you never have to worry about writing codes again.
Below is an overview on how the child theme generator plugins work:
A fully functional child theme configurator module offers an intuitive user-friendly interface allowing you to generate and customize your child theme within a few minutes.
To create your child theme using a plugin follow the steps below:
- Download and install the child theme generator plugin
- Activate your plugin
- Visit ‘Dashboard’
- Go to ‘Appearance’
- Choose ‘Child Theme’
- The ready-to-use style sheet form will appear
- Fill in the details- theme name, description, and author details, etc.
- Once you enter all the details, click ‘Create Child Theme’ button
Congrats! You are done.
Once you enter all the details, you may be directed to the Themes gallery to choose a new theme. All you need to do is follow the instructions as they appear on the screen. As easy as it can be.
What is Your Choice to Create a Child Theme?
Now that you have learnt how to create a child theme for your WordPress website, it’s time to get going right away. But before you do, herein are some considerations:
- Do everything manually
- Use a child theme generator plugin
As you know, using a plugin will save hours of work and your efforts on modifying the parent theme. Make sure you are using a highly functional WordPress child theme configurator extension to avoid problems.
It helps to get all the things done in a few minutes allowing you to focus on other aspects.
Need help to create a custom child theme in WordPress?
We are always happy to help you. Please feel free to get in touch and we will reach out at the earliest with a solution.
- Support
- You can also mail us at support@redefiningtheweb.com